Getting Started with Acquia Cloud IDE: A Code Editor as a Service
- 12 minute read
-
There are two main challenges developers face when setting up and managing their local environments:
- Lack of local resources (You need a powerful machine to run Docker.)
- Lots of time spent configuring environments, especially if you want to build something more sophisticated
While it may be fun experimenting with Linux and everything related to DevOps, sometimes you just don’t have the time. Sound familiar?
Don’t take my word for it. Check out this Twitter poll conducted by a former colleague:
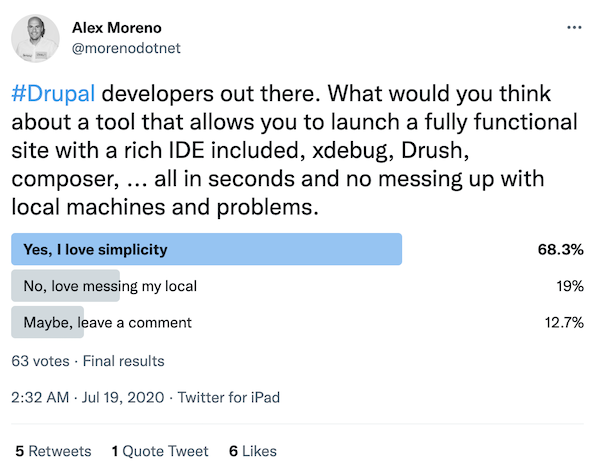
The results could not be more clear. Developers want simplicity. Fair, right? You have enough stress and problems to solve as you work to meet tight deadlines.
On the other hand, the solution to having everything run locally and perform without making you crazy — 10 or 20 seconds waiting for the Drupal config area in a slow machine can be frustrating — pretty much means throwing cash at the problem.
There has to be a better solution. Ideally, developers would love a local environment that’s fast, can spin up in seconds, and doesn't require a minimum of 32 or 64GB of expensive RAM to run development sites.
Enter Acquia Cloud IDE.
What is Acquia Cloud IDE?
Acquia Cloud IDE is part of Acquia Developer Experience, a set of easy-to-use and flexible tools for building powerful Drupal applications. Created by developers for developers.
It's a source code editor-as-a-service, a Drupal-optimized integrated development environment (IDE) in your browser. Edit and browse your code, work on your terminal, preview your site, use Xdebug — all without having to install anything on your local machine.
Acquia Cloud IDE is a Drupal development stack (LAMP) that runs on the Acquia Cloud Platform, which is further optimized with tools like Composer, Drush, Xdebug, and Git to empower professional developer teams to deliver valuable solutions quickly and at scale. Capabilities you'll find include the:
- Ability to copy the codebase, database, and files from any environment from an Acquia Cloud Platform application
- Ability to push changes to any environment to an Acquia Cloud Platform application
Cloud IDE allows developers to connect to their private sandboxes where they can quickly develop, build, and conduct local unit testing. It integrates with the Acquia Cloud Platform development and staging environments to streamline workflows for merging local code updates for integration testing and QA before production deployment.
Put in simple terms: Do you have a browser? Then you don't need anything else! You can have a full IDE at your fingertips in minutes.
OK, but is it for you? Cloud IDE is perfect for you if you're:
- A developer, especially (but not only) a junior developer
- Not necessarily a Drupal specialist
- A Windows user
- Under a locked down network
- Have a developer team working on a Drupal applications
Other users, including senior and Drupal experts, will also find the tool extremely useful.
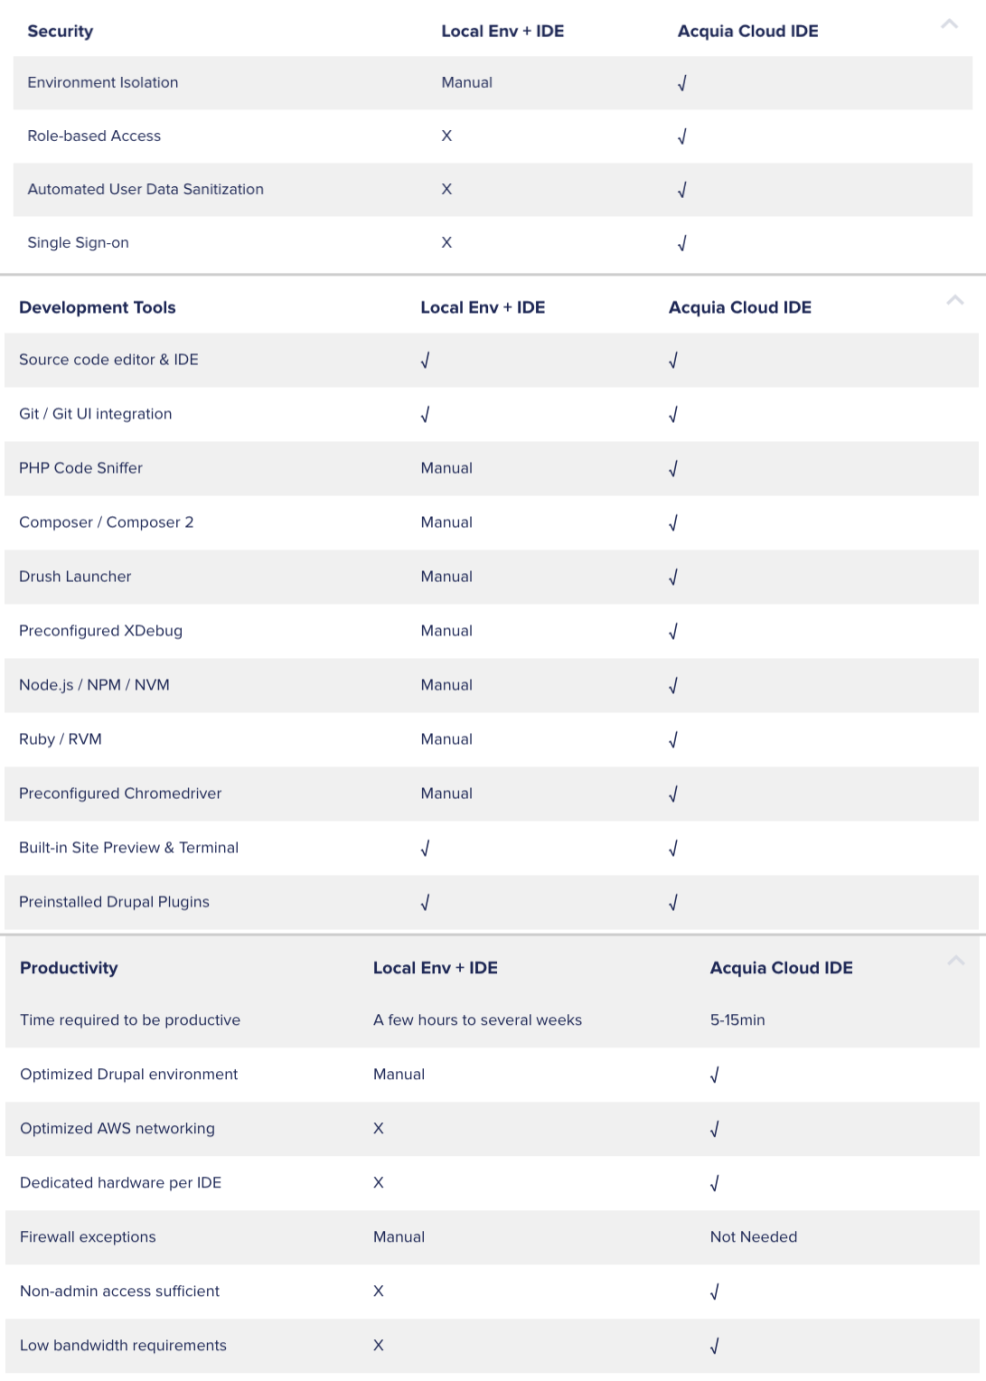
The following table shows how Acquia Cloud IDE compares to a traditional local environment in terms of security, tools, and productivity.
But enough about how amazing and game-changing this is. Let’s get our hands dirty and prove it.
There are multiple ways of creating a Cloud IDE in the Acquia Cloud Platform. The easiest is through the Cloud Platform UI.
Step 1: Log in to Acquia Cloud platform: https://accounts.acquia.com/sign-in?site=cloud&path=a/develop
Step 2: Once you’re in the Develop page of your application, click on the Action button on the top right-hand corner and select the option to Create Cloud IDE. Enter the name you want for your Cloud IDE and click Submit.
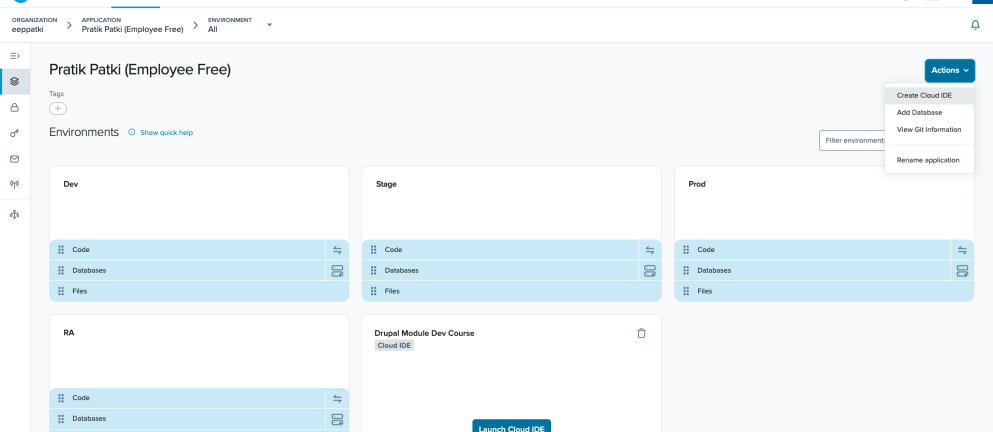
Note: Each subscription of Acquia Cloud Platform gets 1 Cloud IDE free as part of their contract. If you don't see the “Create Cloud IDE” button in the UI, reach out to your AM / Sales team.
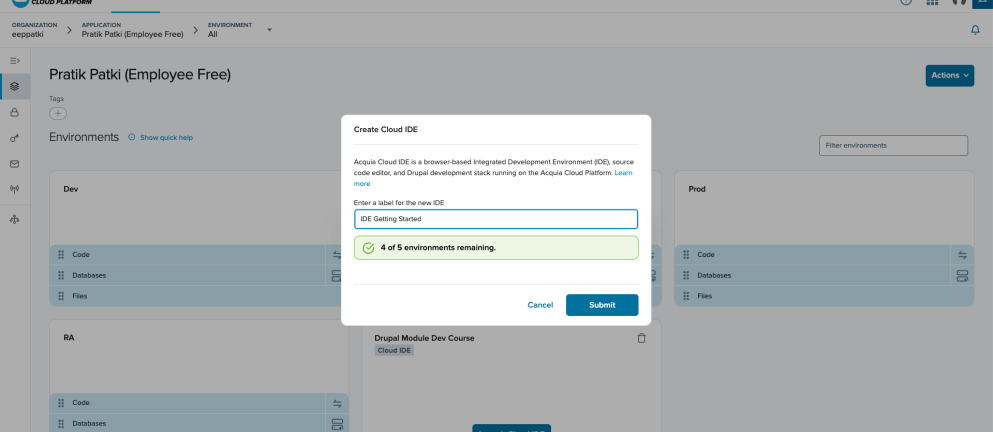
Step 3: Wait for the IDE card to be created, which could take two to three minutes, and then click on the “Launch Cloud IDE” button to open the IDE. The IDE will open in a separate tab.
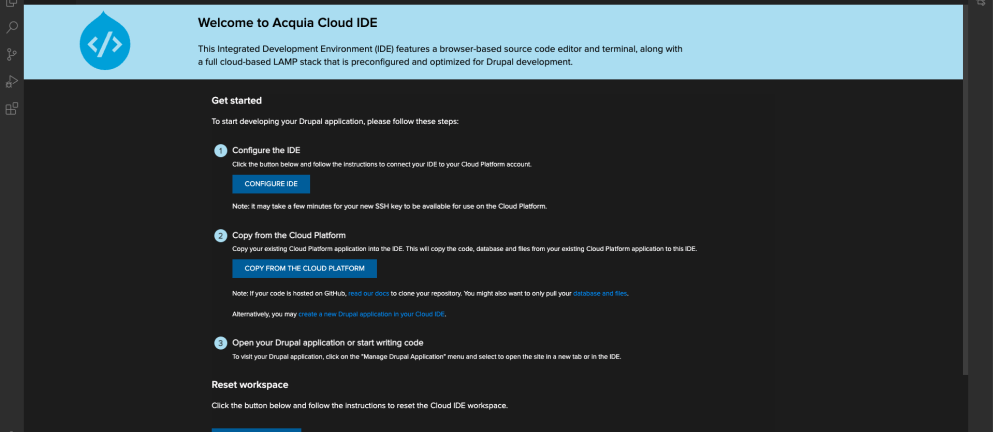
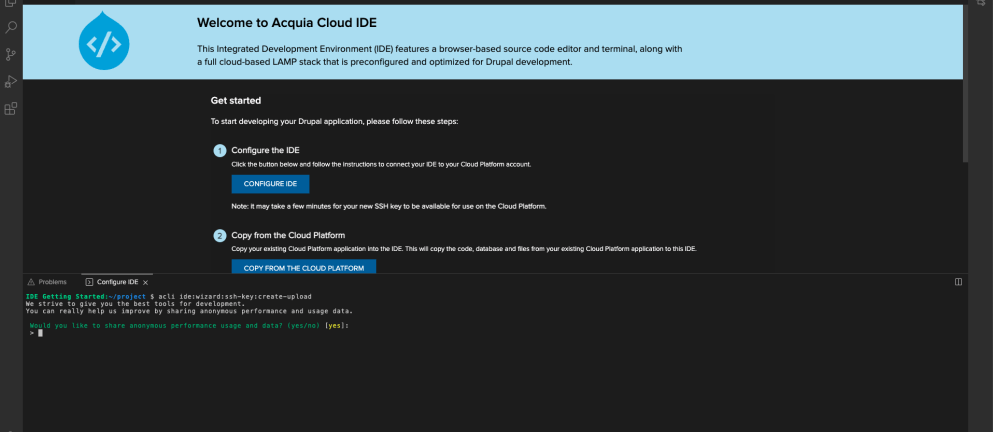
Step 4: When opening the IDE for the first time, click on the “Configure IDE” button, which will authenticate it against the Cloud Platform using an SSH key.
Step 5: Your IDE is now ready for use. Yep — it’s that easy! Choose to copy your codebase, database, or files from an existing Cloud Platform application or choose to create a new Drupal application by clicking on the button mentioned in step 2 of the Get Started page.
If you prefer a CLI-based approach to creating Cloud IDE, check out our documentation site here.
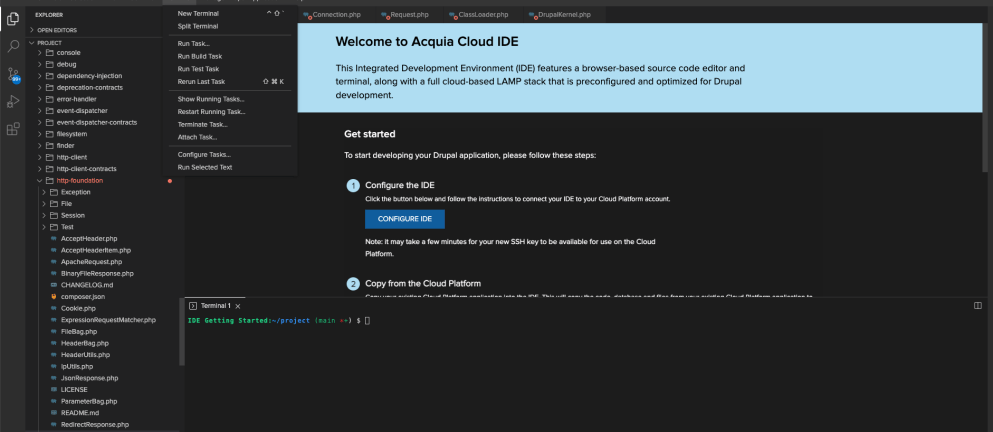
The Terminal
If you look on top, you should see a "Terminal" button. Clicking it will open a terminal at the bottom of the IDE. And guess what: It's fully featured. More than that, you have full access to a remote Linux server in your own home folder:
The default folder when we connect is going to be ~/project. It’s where your Drupal site will live.
A normal workflow would be your IDE working on a feature branch, then pushing your pull requests from your fork. Remember: This is a fully featured Linux home environment. You're in control here, so ideally this should be treated like your local computer . . . in the cloud.
If you need more information on building or configuring your Drupal site on the Cloud Platform, my colleagues have compiled excellent documentation.
At the cost of repeating myself, Acquia Cloud IDE is a Linux local (well, locally remote) environment. You could potentially do things like add a new key to your environment manually (see adding a public key to an Acquia profile), clone your fork instead, and work on the develop branch, refreshing just databases (or anything really) that you could think of in your local machine.
The terminal is actually quite good and replicates the experience of working on a local terminal in Linux or Mac. You won’t experience any lag or delay in typing. The experience couldn't be closer to a native terminal.
You can explore further, especially the ~/configs folder, where you may find interesting things, like overriding some PHP settings, MySQL, or enabling Xdebug. Everything in your home folder will remain, so you can change and personalize as much as you'd like. Everything should be there once you restart your environment.
Personalizing your Cloud IDE
But we haven't talked a lot about the star here: the IDE itself. Acquia Cloud IDE is based on Eclipse Theia, an extensible platform for developing multi-language cloud and desktop IDEs with state-of-the-art web technologies.
If you haven't tried it before, you’ll find it has pretty much everything you’d expect and need on a good modern code editor. The most surprising thing is that you quickly forget that it’s a cloud editor, not a local running one, which is itself huge.
Key to a good experience is personalizing the editor to your liking. And personalizing Theia is as easy as editing your home theia folder: /home/ide/.theia
Your main file is settings.json, where you can configure from Git, look and feel, to PHP Code Sniffer (CS), your workspace, the diff editor, etc. If you don't want to edit the file manually, you can also access it from the editor itself in File → Settings → Open preferences. Again, it's highly recommended you familiarize yourself as much as possible with the editor to benefit fully from what Acquia Cloud IDE has to offer.
You can have a quick walk-around in our documentation site too: https://docs.acquia.com/ide/ui/
As for the terminal, you can configure pretty much everything, not just the look and feel. Say you want:
- A different PHP version: https://docs.acquia.com/dev-studio/ide/#configuring-the-php-version
- To change php settings: https://docs.acquia.com/dev-studio/ide/#configuring-php-settings
Again, visit the documentation to fully realize the possibilities.
Debugging Time
If you've ever used Xdebug (which you hopefully have), you know it's an amazing tool, more than worth its weight in gold. However, it has a small problem: Configuring Xdebug can be a BIG pain in the . . . ahem, IDE. So much so that developers wouldn't set it up unless they’re working on a long engagement project and must resort to the horrible echo “test” that they’ll later have to chase down and delete from their code.
Thankfully, Cloud IDE comes with a fully featured Xdebug editor. It's disabled for performance purposes by default, but you can easily enable it by following these simple steps:
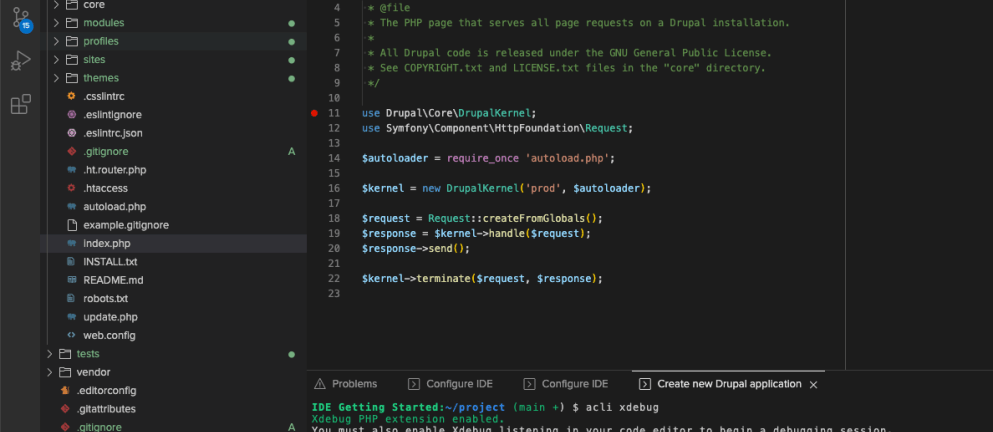
Step 1: Go to the terminal and run acli Xdebug. Lo and behold, you can now set breakpoints and use the full feature set of Xdebug to troubleshoot your code. Once done, run the same command again to disable it.
Step 2: Go to Drupal index.php and put a breakpoint at the beginning of said file. Adding a breakpoint is exactly the same as you’d expect on any editor: Just click to the left of the line numbers of your file, and a red point should appear (see the image below).
Step 3: Start debugging by launching your Drupal site from the “Open Drupal Application” menu. The loading should stop at the point you've set up, highlighting the line where you stopped.
Tips and Tricks
Looking to find fault with Acquia Cloud IDE? Maybe you think it’s not a full application that you can play with your shortcuts or launch easily from your dock, list of applications, or operating systems main menu . . . well, think again.
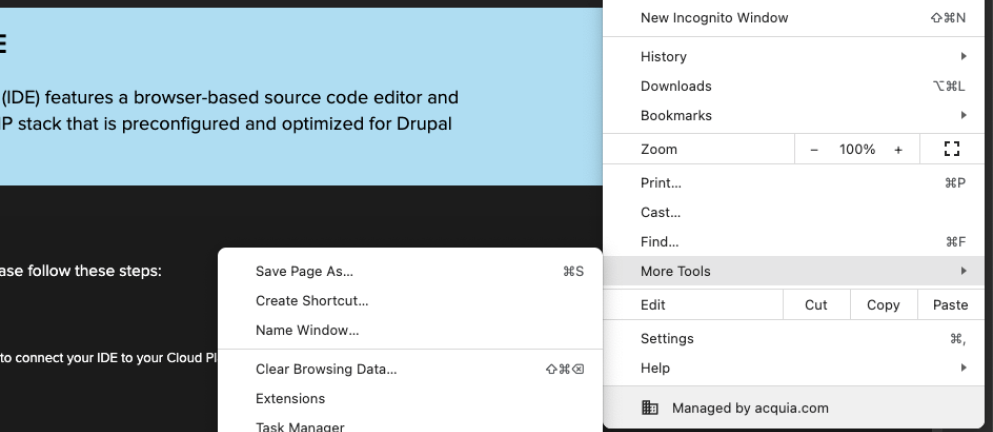
If you're a Chrome user, you're in luck. Just pick the three dots in the upper right hand corner to unfold the Chrome menu. From there, click on “More tools → Create shortcut,” which will let you choose a name for your application. You can also change the focus between your browser and the new application, launch it from menus and shortcuts, and treat the Chrome tab as any other application in your operating system.
Get More Information on Cloud IDE
Our Acquia Cloud IDE technical documentation goes in depth on all the things you can do in the IDE, like personalizing your PHP version, configuring your PHP settings (say memory_limit, max_execution_time, etc.). I also recommend checking out our guide on how to use Cloud IDE, which explains how to enable different user interfaces, navigate the Activity Bar, and use side-by-side editing.
Our FAQ offers even more insight into how to manage the IDE and solutions to common issues.
Try the Acquia Cloud Platform
Any member of the Acquia team would be happy to discuss your platform needs for Drupal applications. Fill out this form, and we’ll be in touch shortly.