
How to set up a new project in Code Studio, using a Cloud IDE
- Last updated
- 1 minute read
Goal
Use a Cloud IDE to create a new Drupal project and then integrate it with Code Studio.
Overview
Code Studio provides a powerful toolchain for making your Drupal development team more efficient than ever. Paired with a Cloud IDE, you’ll be able to work with a Drupal-optimized toolset that’s entirely cloud-based, freeing up your team to focus on actual development. Acquia’s Code Studio documentation talks about getting started, but there are a few different ways you can set things up. The purpose of this tutorial is to give you a step-by-step guide to setting up a new Drupal application, using only a Cloud IDE and Code Studio. No local setup required!
-
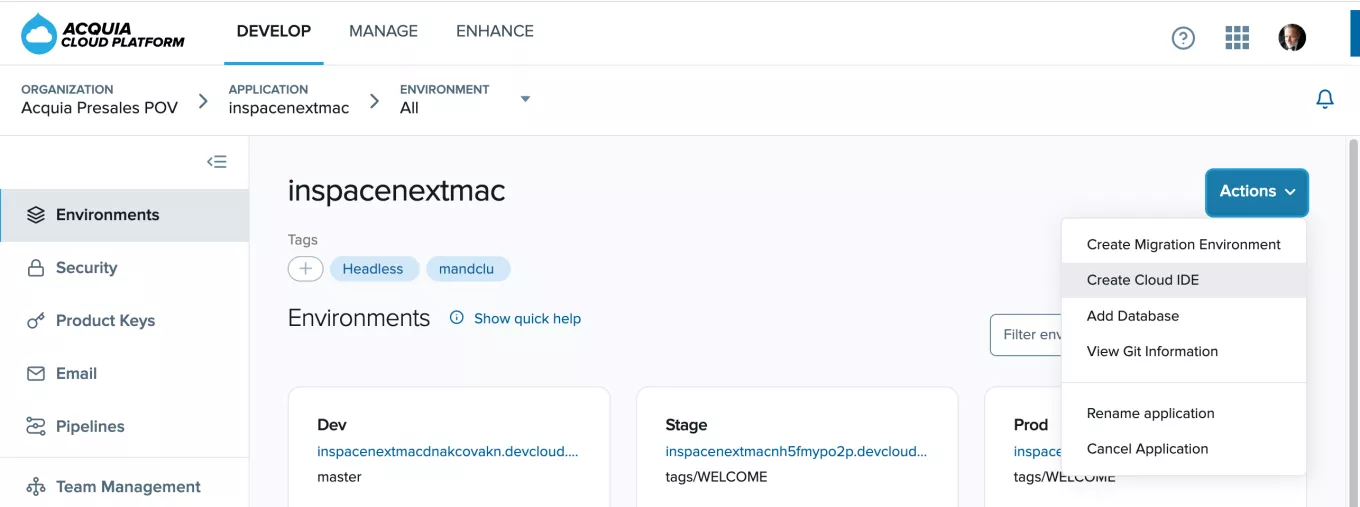
Create a Cloud IDE
The first step is to go into your Acquia Cloud application, and create a Cloud IDE.
![Selecting "Create Cloud IDE" from the Actions dropdown in the Acquia Cloud UI]()
-
Launch the IDE
The process will take a couple of minutes, but then you will see the IDE listed below your environments. Click to launch the IDE.
![In the Acquia Cloud UI, the option to click to launch the created Cloud IDE]()
-
Configure the IDE
Now, you’ll see a prompt to configure the IDE. Click the "CONFIGURE IDE" button to start the process.
![Opening interface of the Cloud IDE after launch]()
-
Create the Drupal Application
Once that’s complete, you can copy from the Cloud platform (if there’s already a working Drupal install there) but since we’re setting up a new application, click the link below the button to “create a new Drupal application in your Cloud IDE”. In the prompt that appears in the command terminal at the bottom, we recommend typing 0 to use acquia/drupal-recommended-project.
![Cloud IDE prompt to choose project]()
-
Install Drupal
That process will take a few minutes, as it pulls down all the files necessary to use the Acquia CMS. Once it has completed, the next step is to go ahead and install Drupal. In the menu at the top of the IDE, you can select Manage Drupal Application > Open Drupal Application to install using Drupal’s installation wizard, but we want to use the Acquia CMS install wizard. In the IDE's command line type
./vendor/bin/acms acms:installto start the process. You can press the return key to use the defaults. It’s another example of how our Cloud IDE is designed to work seamlessly with Drupal, out of the box! The install will take a few minutes, but once it’s done, your Drupal site will be functional.![Composer output during installation]()
-
Track Configuration Changes in git
To take full advantage of Drupal’s configuration management, however, there’s another change we should make. By default Drupal doesn’t assume it can write files anywhere outside the site’s files folder, but by design any files in this directory will be excluded from the git repo. You can still copy them between environments using drush commands, the Acquia CLI, or the Acquia Cloud UI, but doing so means you lose the ability to track changes, maintain version control on the configuration, and easily roll back changes when needed.
Let’s get Drupal to export the configuration files in a location where they will be tracked by git. We could just update the application’s .gitignore file to force the directory to be tracked, or force the directory to be tracked by git on the command line, but it would be better to have these files outside the web root anyway, so let’s give Drupal that direction, in the site’s settings.php file. On the left hand side, open the Project pane to show your files, and navigate to docroot/sites/default and click on settings.php to open it in the IDE’s editor.
![Using the IDE's editor to edit the settings.php file]()
Change the last line of the file, where it sets the value for $settings['config_sync_directory'] to use a value of '../config/sync'. If the file won’t save, in the terminal go to docroot/sites/default and run
chmod 0644 settings.phpand then save the file. After the change has been saved, revert the permissions withchmod 0444 settings.php.In the terminal you can now use
drush cexto export the configuration to code whenever you’re ready to sync configuration changes to another environment. It’s a good idea to do that now, so our code repo will have a snapshot of the initial configuration. -
Connect to Code Studio
Now we’re ready to connect to Code Studio. In the IDE’s terminal, run
glab auth login --hostname=code.acquia.com. You’ll be prompted for a Personal Access Token. You can command-click on the provided URL to open it in a new browser tab.Give the access token a name, and make sure you give it the api and write_repository permission scopes.
![Configuring the Personal Access Token in Code Studio]()
The page will refresh, with the access token value at the top. Click on the button to the right of the token to copy it to the clipboard. Finally, switch back to your IDE, paste the token into the terminal and hit return to complete the authentication.
-
Create the Code Studio Project
Now we’re ready to create the Code Studio project where we will manage our site’s code, and associated issues and merge requests. In the terminal, run
acli codestudio:wizard. You’ll be prompted to enter an API Key, and once again you can command-click on the provided URL to create one.![Running the ACLI command in the Cloud IDE]()
-
Create an Access Token
Click on the Create Token button in the top right to create a new token. You’ll need to provide a label, and then Code Studio will provide an API Key and API Secret. Copy each and paste it into the IDE terminal when prompted. Once the wizard is complete, you’ll see a success message in the terminal:
![IDE output from the ACLI command after it has finished successfully]()
-
Add the git Remote
Let’s finish the setup of the site by adding the git remote, as instructed at the end of the message. Note that if you will only use Code Studio to manage the repo, you can simplify working with the repo by setting the name of the remote to origin, which will allow it to be used by default. In the example here, that would change it to
git remote add origin https://code.acquia.com/presales-demo/inspacenextmac.git. -
Commit and Push Your Site Code
Now we’re ready to push our site code into Code Studio. From the project root at ~/project, in the terminal run
git add .to add all the site’s code, thengit commit -m "Installed site"to commit it. Finally, rungit push codestudio(or simplygit pushif you added the remote as “origin”), and Code Studio is ready to manage the site. -
Push Your Database and Files
As a last step in the IDE, run
acli push:dbandacli push:filesto ensure your dev environment has the database and files for the installed site.


The Code Studio Project
Optionally, you can now customize the Code Studio project that has been created for your application. If you still have the Code Studio tab open from when you created tokens, you can switch to that and click on the Code Studio logo in the top left to see a list of your projects, then click on the name of the project you just created. Alternatively, in the terminal you can scroll back up to the success message from when the project was created, and command-click on the project URL to view your project.
Once you’re in the project, you can customize various aspects: give it a more human-friendly name, upload an image to use as an avatar, assign team members, and so on. You can start using the project’s WIki to document information that will help to onboard new team members, set up issue boards, and more. In particular, a setting to check is In the CI/CD settings, set the preferred deployment strategy, for example to deploy to staging and manually release to production.

Your project is now ready for your team to start their work. Happy coding!


