
Create a Custom Profile for use with Site Factory: Part 2
- Last updated
- 1 minute read
Goal
Create a Custom Profile and install your first site on ACSF.
Overview
This is Part 2 of a comprehensive tutorial covering the set up of a new Drupal 10 codebase for Acquia Cloud Site Factory (ACSF). In this segment, you will set up a custom Drupal installation profile. Additionally, you will gain valuable insights into the ACSF deployment workflow (including configuration management, which is essential if you want to create operational efficiencies, launch websites faster, and scale your platform with confidence. We will be working with Acquia Cloud IDE to simplify the development and deployment process.
This guide has been divided into three parts:
- Set up Cloud IDE, Install Drupal 10, and Prepare your Codebase for Site Factory
- Create a Custom Profile and test New Site Creation with Site Factory
- Implementing Configuration Management and Proving out the Site Factory Deployment Workflow
In the following steps, I will guide you through the process of creating a custom Drupal installation profile.
-
Create a new Custom Profile
We will create a new custom profile named acsfprofile. This custom profile will be used to create new sites on ACSF:
cd docroot/profiles/custom/
mkdir acsfprofile
cd acsfprofile/
touch acsfprofile.info.yml
Set the new profile as default in your codebase
Modify the following files to add the new profile (acsfprofile):
- config/default/core.extension.yml
Go to the end of your core.extension file and make the following changes (Changes are shown using a left arrow <-- ):
tour: 0 update: 0 user: 0 views_ui: 0 views: 10 acsfprofile: 1000 <-- theme: olivero: 0 claro: 0 profile: acsfprofile <--- /home/ide/project/blt/blt.yml
project:
 machine_name: d10acsf
 profile: <--
   name: acsfprofile <--
 prefix: BLT <--
cloud:
 appId: 48efba74-75af-43ef-8455-32e6f043c375
git:
 default_branch: master
 remotes:
   cloud: '[email protected]:acquiatam2.git'
deploy:
 tag_source: true
drush:
 aliases:
   remote: site1.01test
   local: self
   ci: self
 default_alias: '${drush.aliases.local}'
Generate the tamprofile.info.yml file
Using the /home/ide/project/config/default/core.extension.yml file, we will generate the acsfprofile.info.yml file.
/home/ide/project/docroot/profiles/custom/tamprofile/acsfprofile.info.yml
This new file will inform Drupal about the required modules and themes that should get installed when the acsfprofile custom profile is used to create a fresh Drupal install.
To create your acsfprofile.info.yml file do the following:
Add the following 6 lines of code to the beginning of the acsfprofile.info.yml file:
name: acsfprofile
type: profile
base profile: minimal
description: 'ACSF Profile'
core: 9.x
core_version_requirement: '^9 || ^10'
config_install: true
config_install_path: '../config/default'
Copy all the values from the “module” section of your core.extension.yml file to your acsfprofile.info.yml file:
module:
 acsf: 0
 acsf_duplication: 0
 acsf_theme: 0
 acsf_variables: 0
 ...
Now, in your acsfprofile.info.yml file, replace “module:” with “install:” and modify all the modules inside the “install:” section by adding a dash ( - ) to the beginning of each module and removing the leading number after each module ( : 0 ):
install:
 - acsf
 - acsf_duplication
 - acsf_theme
 - acsf_variables
 ...
Copy all the values from the “theme” section of your core.extension.yml file to your acsfprofile.info.yml file:
theme:
 olivero: 0
 claro: 0
In your acsfprofile.info.yml file, modify all the themes inside the “theme:” section by adding a dash ( - ) to the beginning of each theme and removing the leading number after each theme ( : 0 ):
theme:
 - olivero
 - claro
The resulting acsfprofile.info.yml file should look similar to the following example:
name: acsfprofile type: profile base profile: minimal description: 'ACSF Profile' core: 9.x core_version_requirement: '^9 || ^10' config_install: true config_install_path: '../config/default' install: - acsf - acsf_duplication - acsf_theme - acsf_variables - automated_cron - big_pipe - block - block_content - breakpoint - ckeditor5 - comment - config - config_filter - config_ignore - contact - contextual - datetime - dblog - dynamic_page_cache - editor - field - field_ui - file - filter - help - history - image - link - menu_link_content - menu_ui - mysql - node - options - page_cache - path - path_alias - search - shortcut - system - taxonomy - text - toolbar - tour - update - user - views_ui - views - acsfprofile theme: - olivero - claro -
Install a local site from existing configuration with BLT
Make sure you are located inside the project folder:
cd /home/ide/project/Install a new Drupal site using the existing configuration on disk:
blt setup --no-interactionYou should get a successful installation with no configuration differences.
Image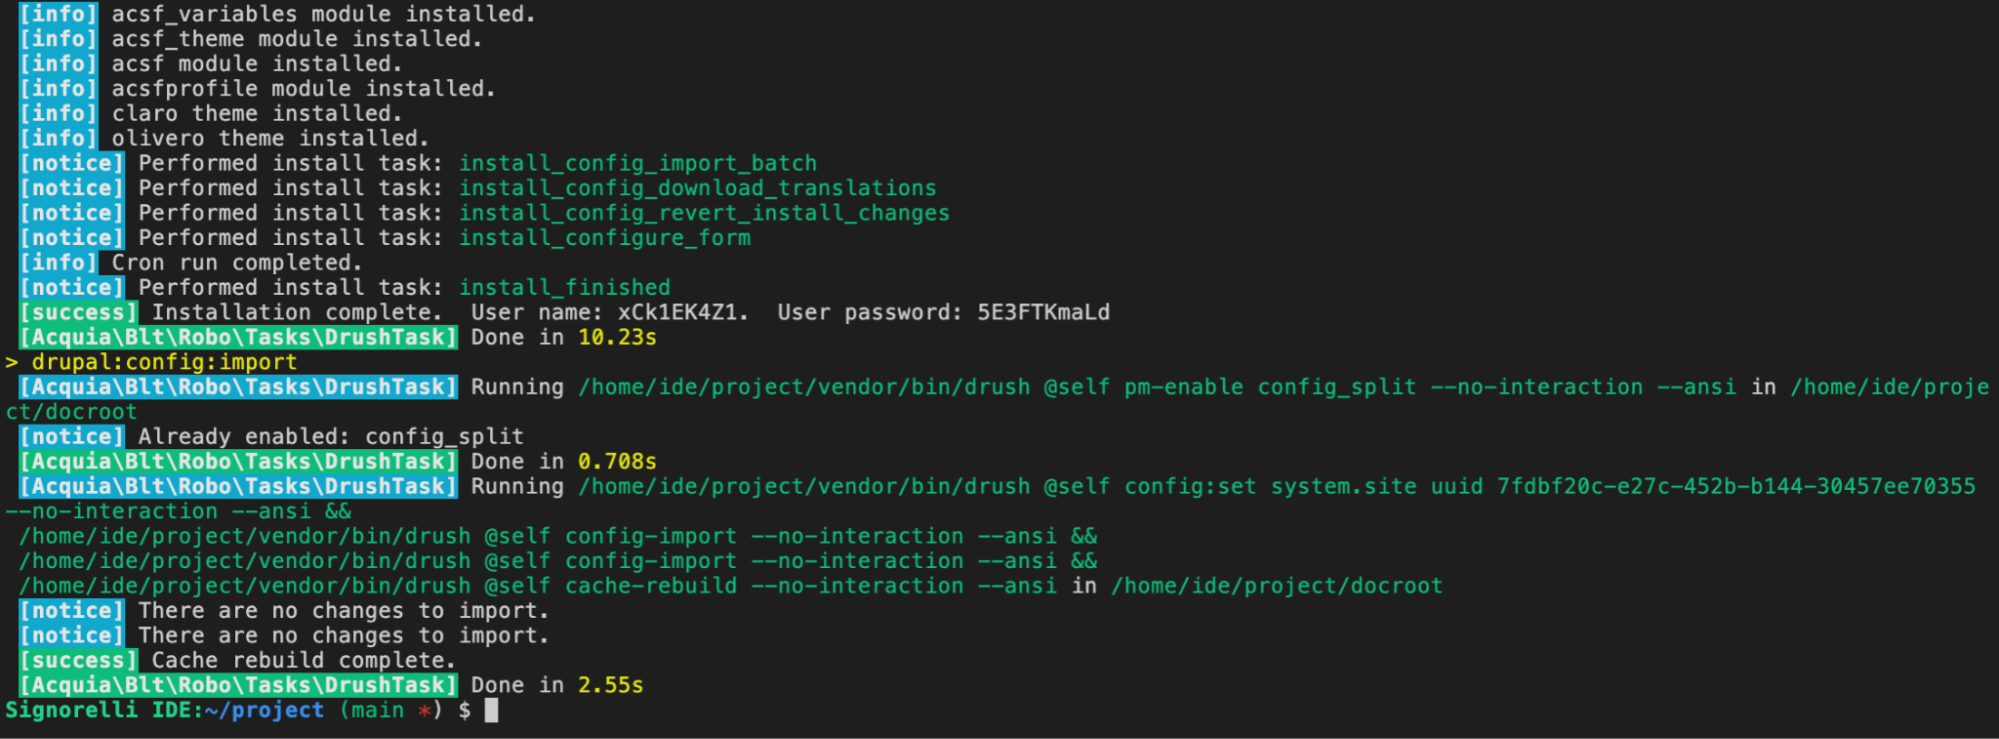
Use the following drush command to make sure there are no configuration differences between the new site’s database and the existing configuration on disk:
drush config:statusSignorelli IDE:~/project (main *) $ drush config:status [notice] No differences between DB and sync directory.If they are different, you will have to run "drush cex" again to resolve the differences, then run "blt install" again.
Check the newly installed site using “drush uli” and make sure everything looks fine:
drush uli -
Test the installation profile simulating Site Factory’s site creation
To make sure everything is working fine, we will reinstall a new site simulating the commands used in Site Factory:
drush site:install acsfprofileSignorelli IDE:~/project (main *) $ drush site:install acsfprofile You are about to: * DROP all tables in your 'drupal' database. Do you want to continue? (yes/no) [yes]: > yes [notice] Starting Drupal installation. This takes a while.Execute the following BLT command to update the database and perform post site install configuration tasks to the new site:
blt drupal:updateCheck the newly installed site with dush uli:
drush uli -
Push all the changes to your repository
If everything looks good, we should now be able to push the new codebase to ACSF.
Execute the following composer command to generate a new hash in your lock file so that your composer.json and composer.lock files are in sync:
composer update --lockPush your new codebase to your repository:
git add -A git commit -m "BLT-002: Added a custom profile for ACSF." git push -
Deploy your codebase to ACSF
Use the following BLT command to deploy your codebase to ACSF:
blt artifact:deployThis command gives you the ability to add a tag to your new codebase that will be available to choose from on any of your ACSF environments.
When prompted, enter “y” to create a new tag:
Signorelli IDE:~/project (main) $ blt artifact:deploy
Would you like to create a tag? (y/n) y
Press Enter to use the same commit message:
 Enter a valid commit message [BLT-002: New codebase with social media icons and assets fix.] (Press ENTER)
Enter the tag name for the deployment artifact, e.g., 1.0.0-build 1.0.0-d10acsf
I named my new deployed code: 1.0.0-d10acsf
-
Update your ACSF code
Go to the ACSF Console UI of one of your lower environments. For this tutorial, I will use the test environment.
Go to Administration -> Update code:
Image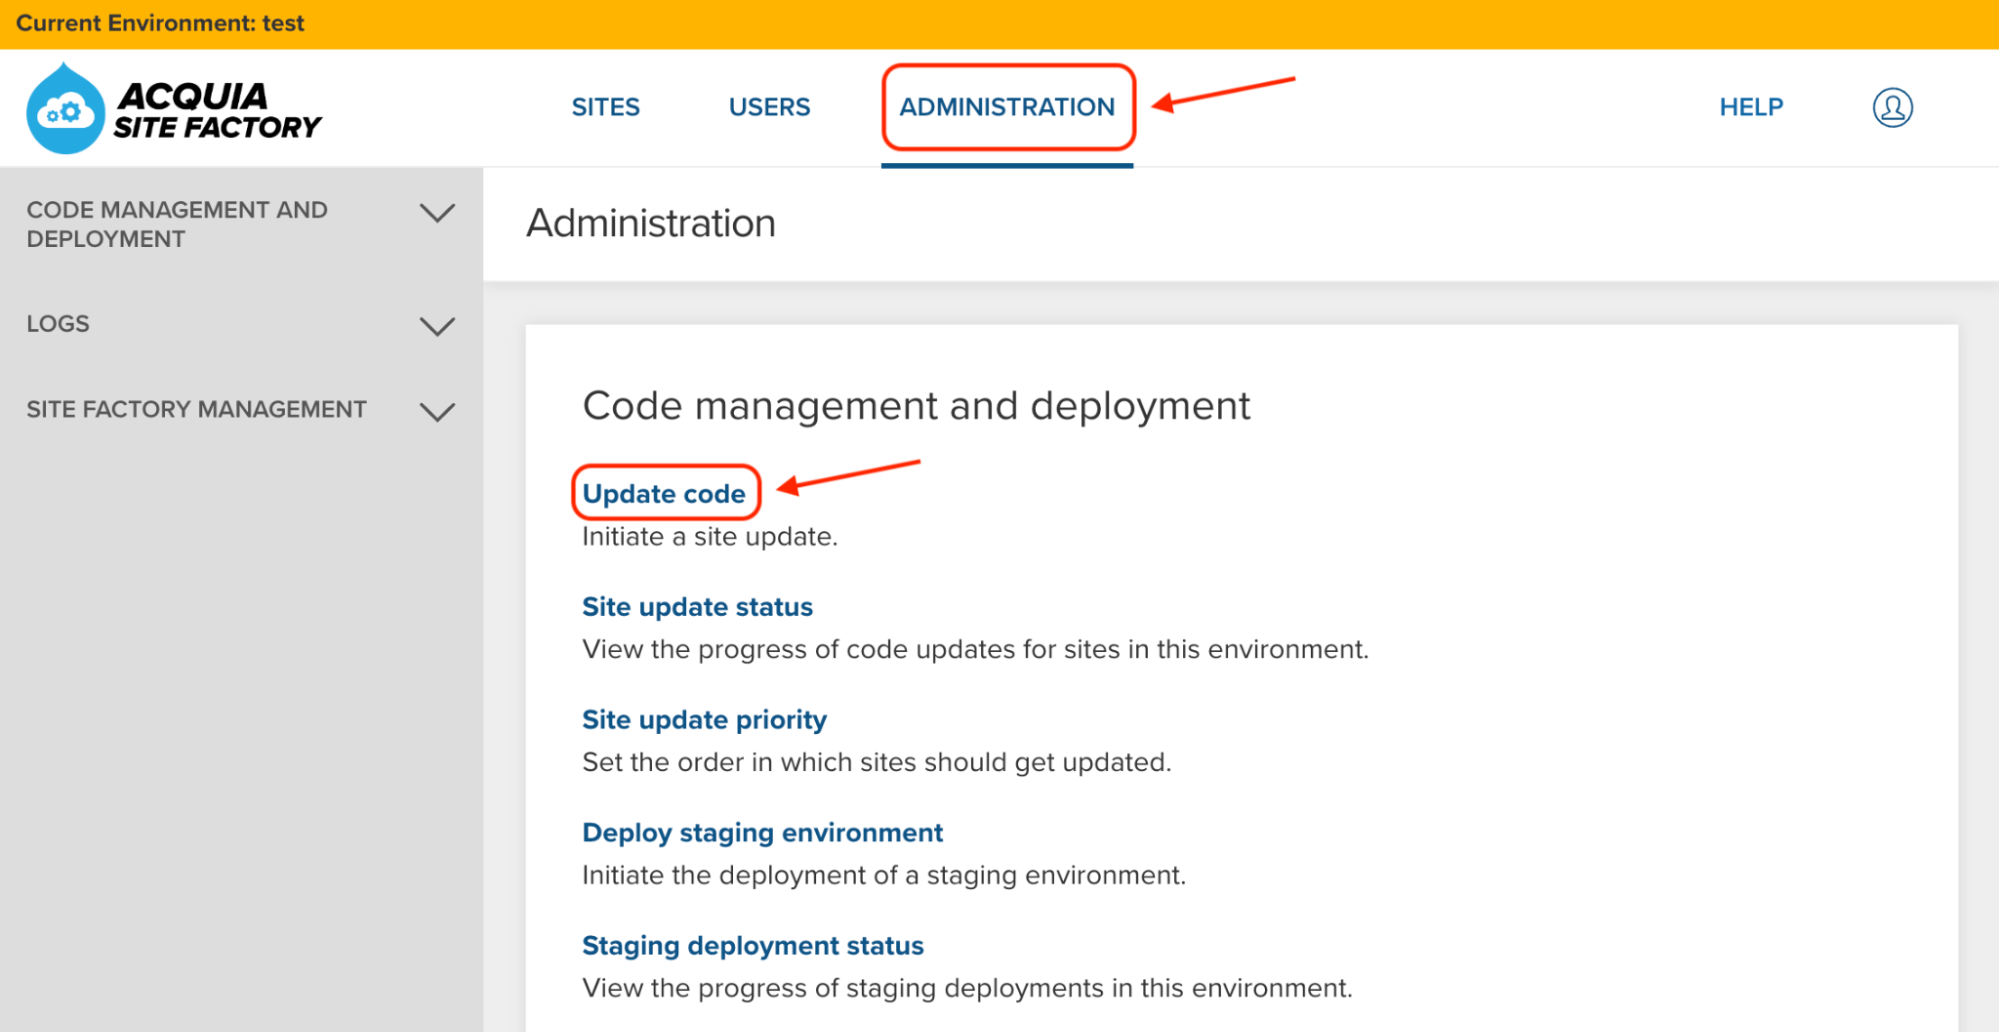
In the Site Update page, use the dropdown to select your new codebase (1.0.0-d10acsf):
Image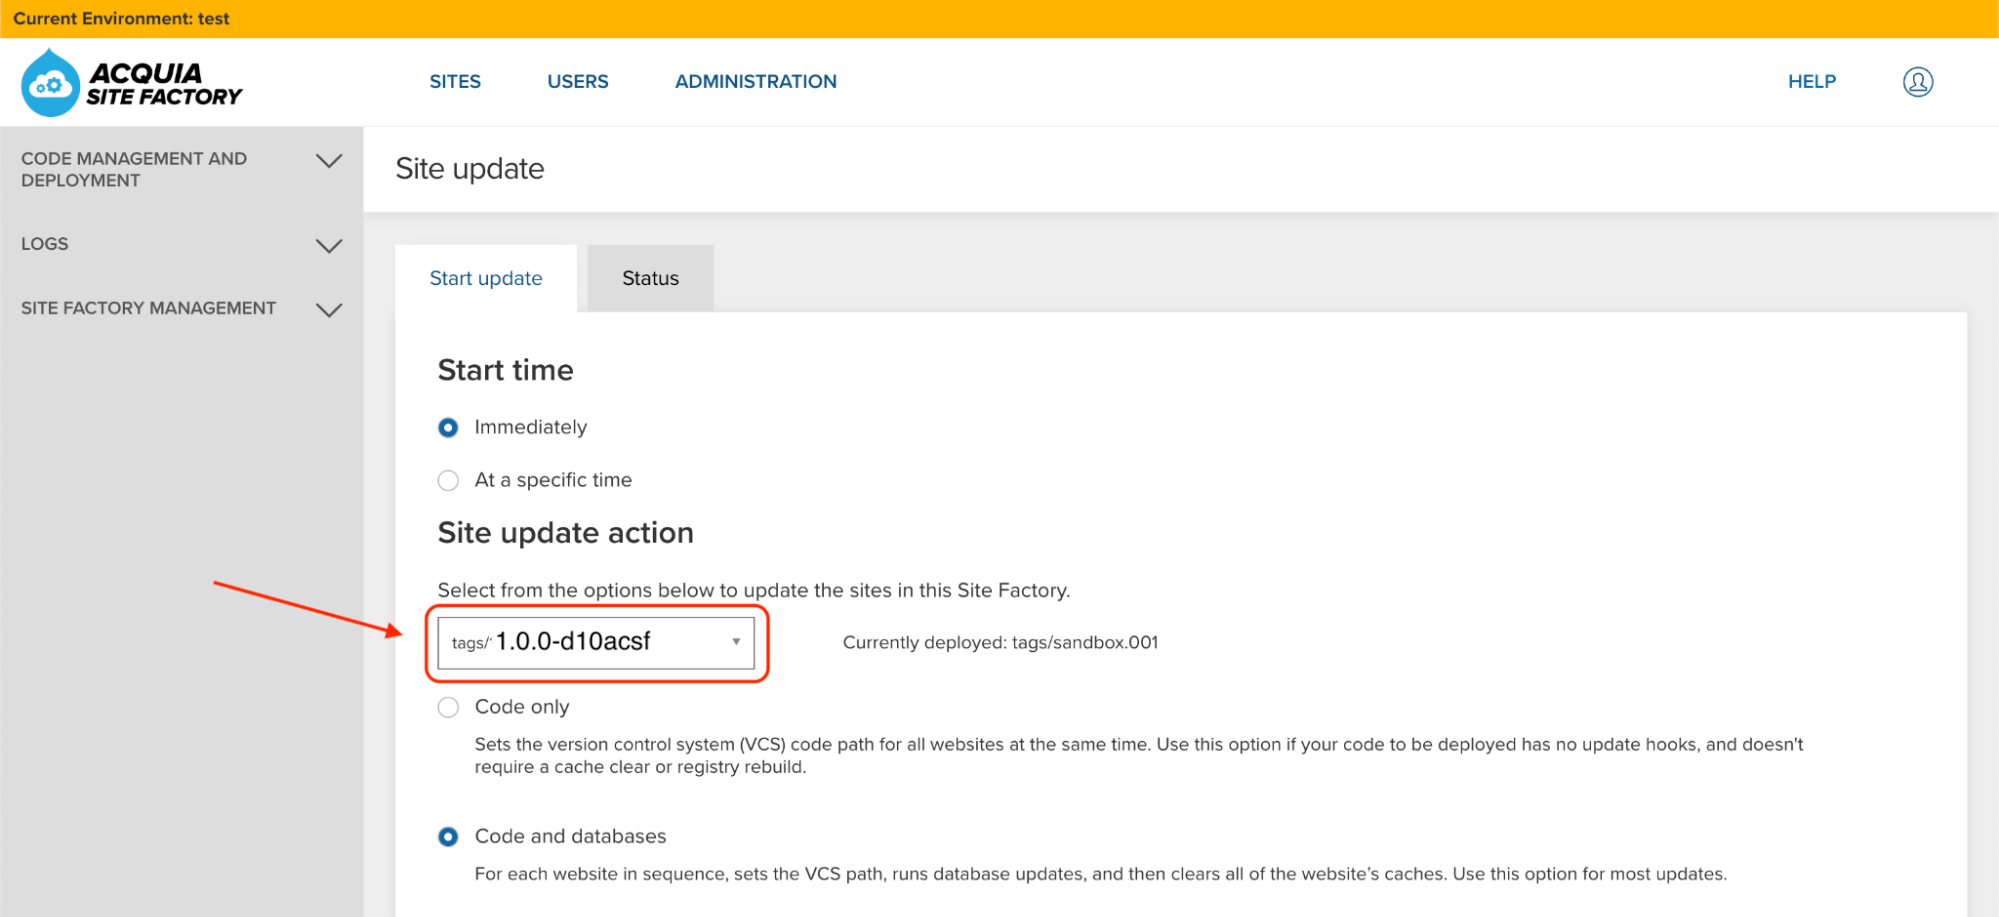
Click the Update button and wait until the update process finishes:
Image
-
Add the new profile to ACSF
Go to Administration -> Installation profile management, enable the acsfprofile profile and make it REST API Default:
Image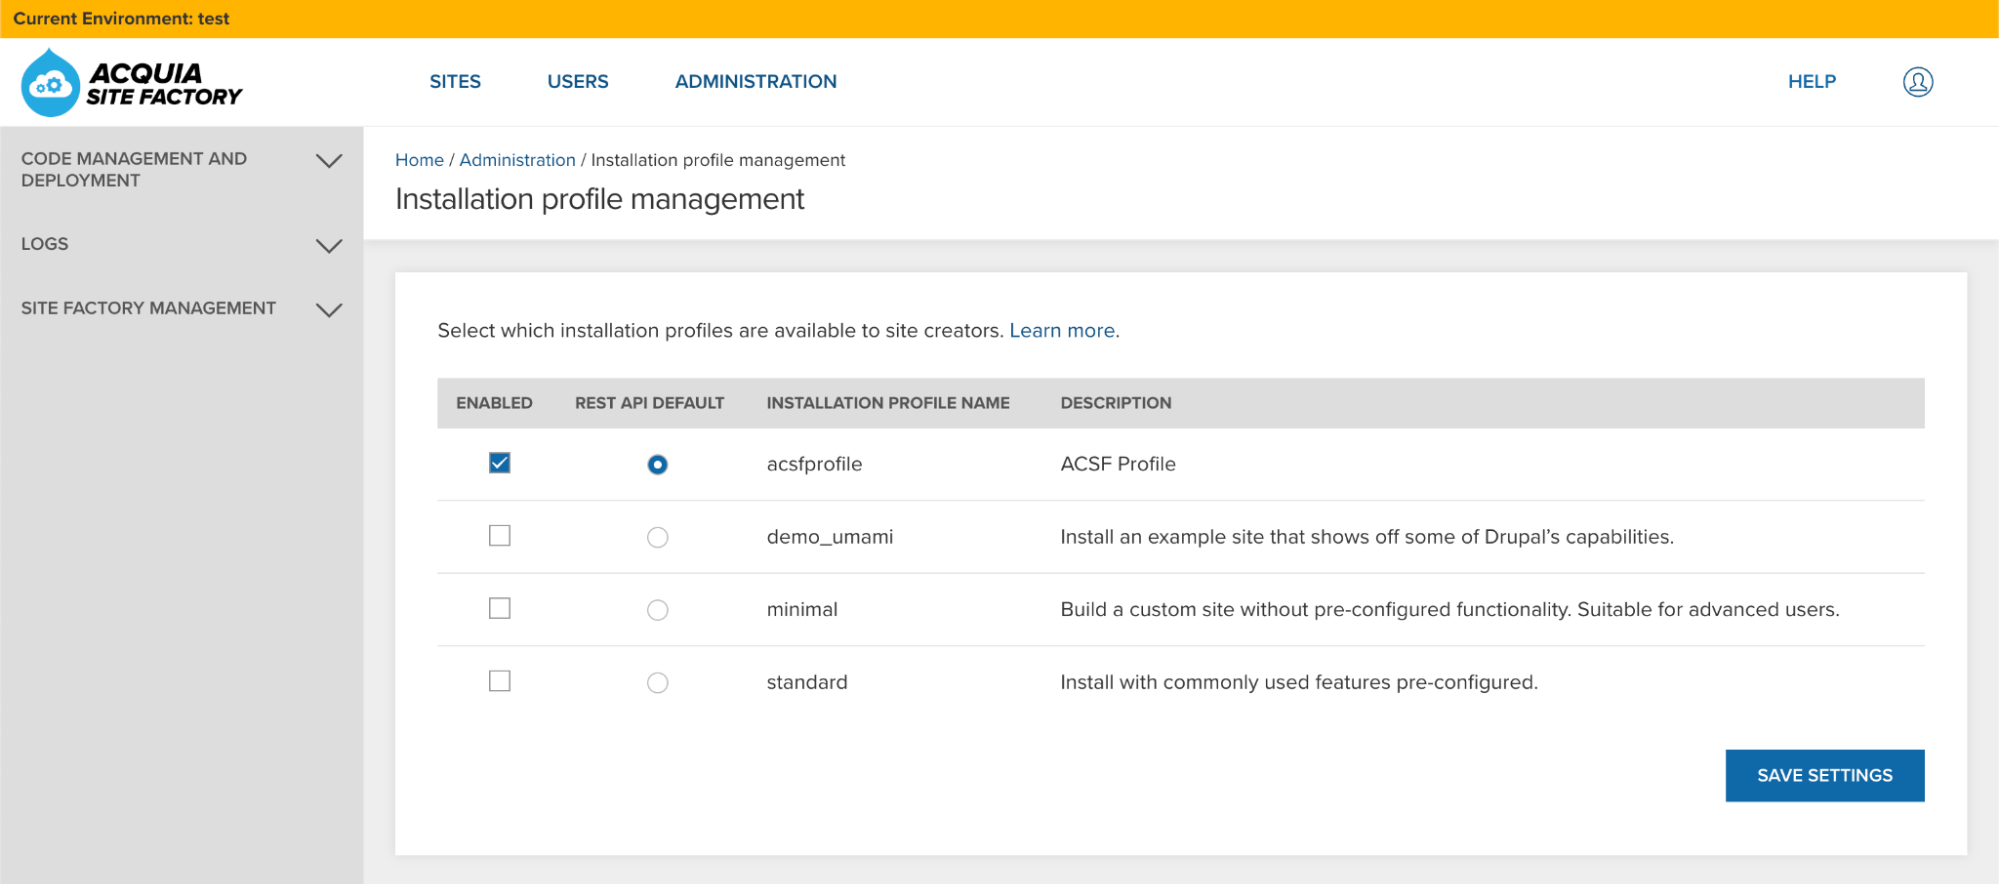
Click the “Save settings” button.
-
Create a new Site Group in your ACSF account
Login to your ACSF Console UI and click the “New Group” button:
Image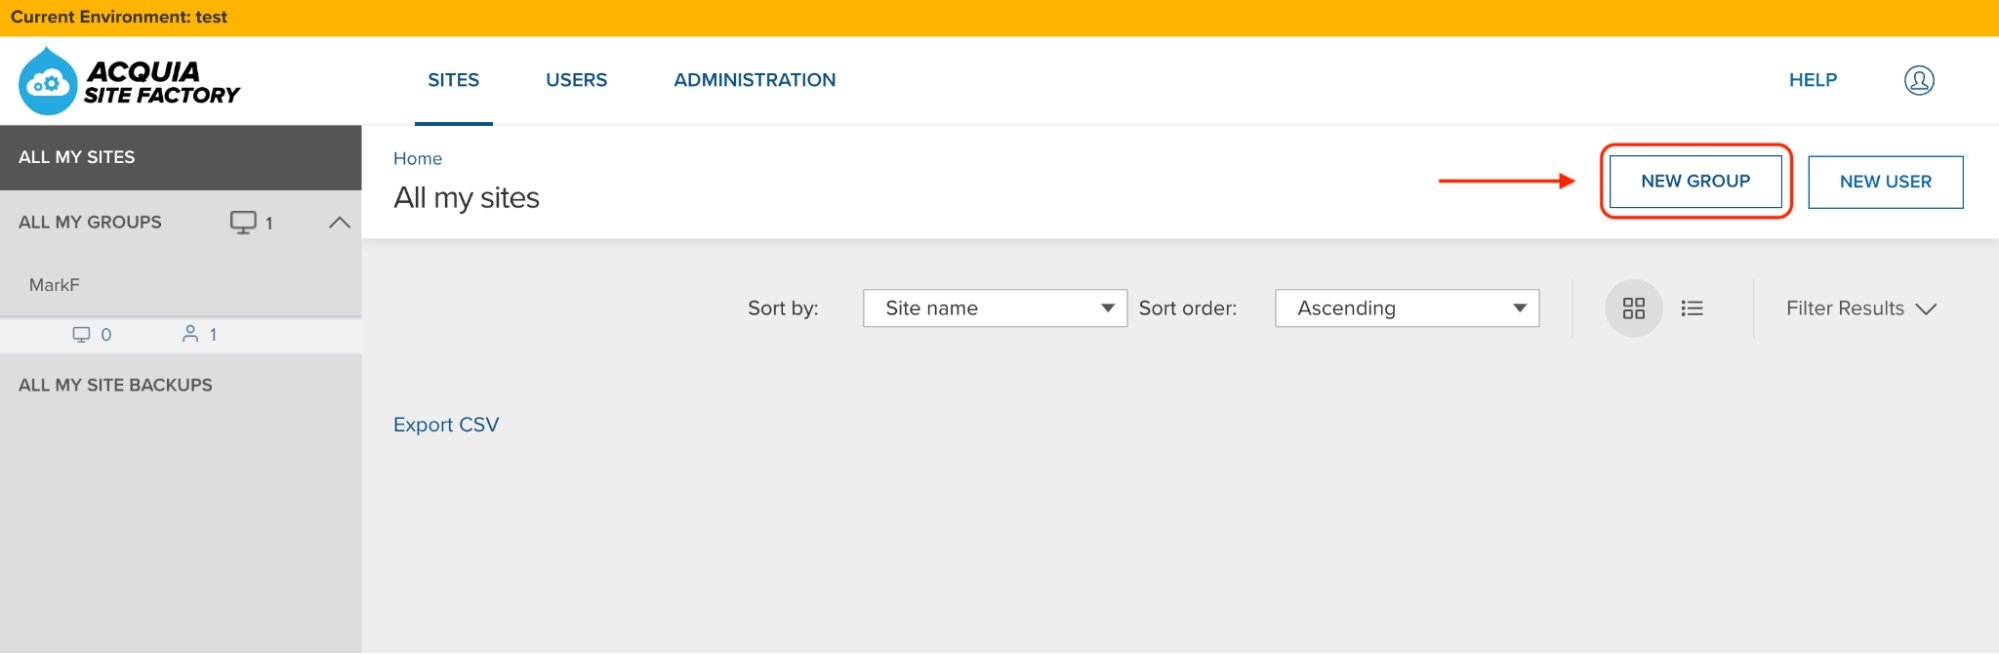
Assign a name to your new Site Group and save your changes:
Image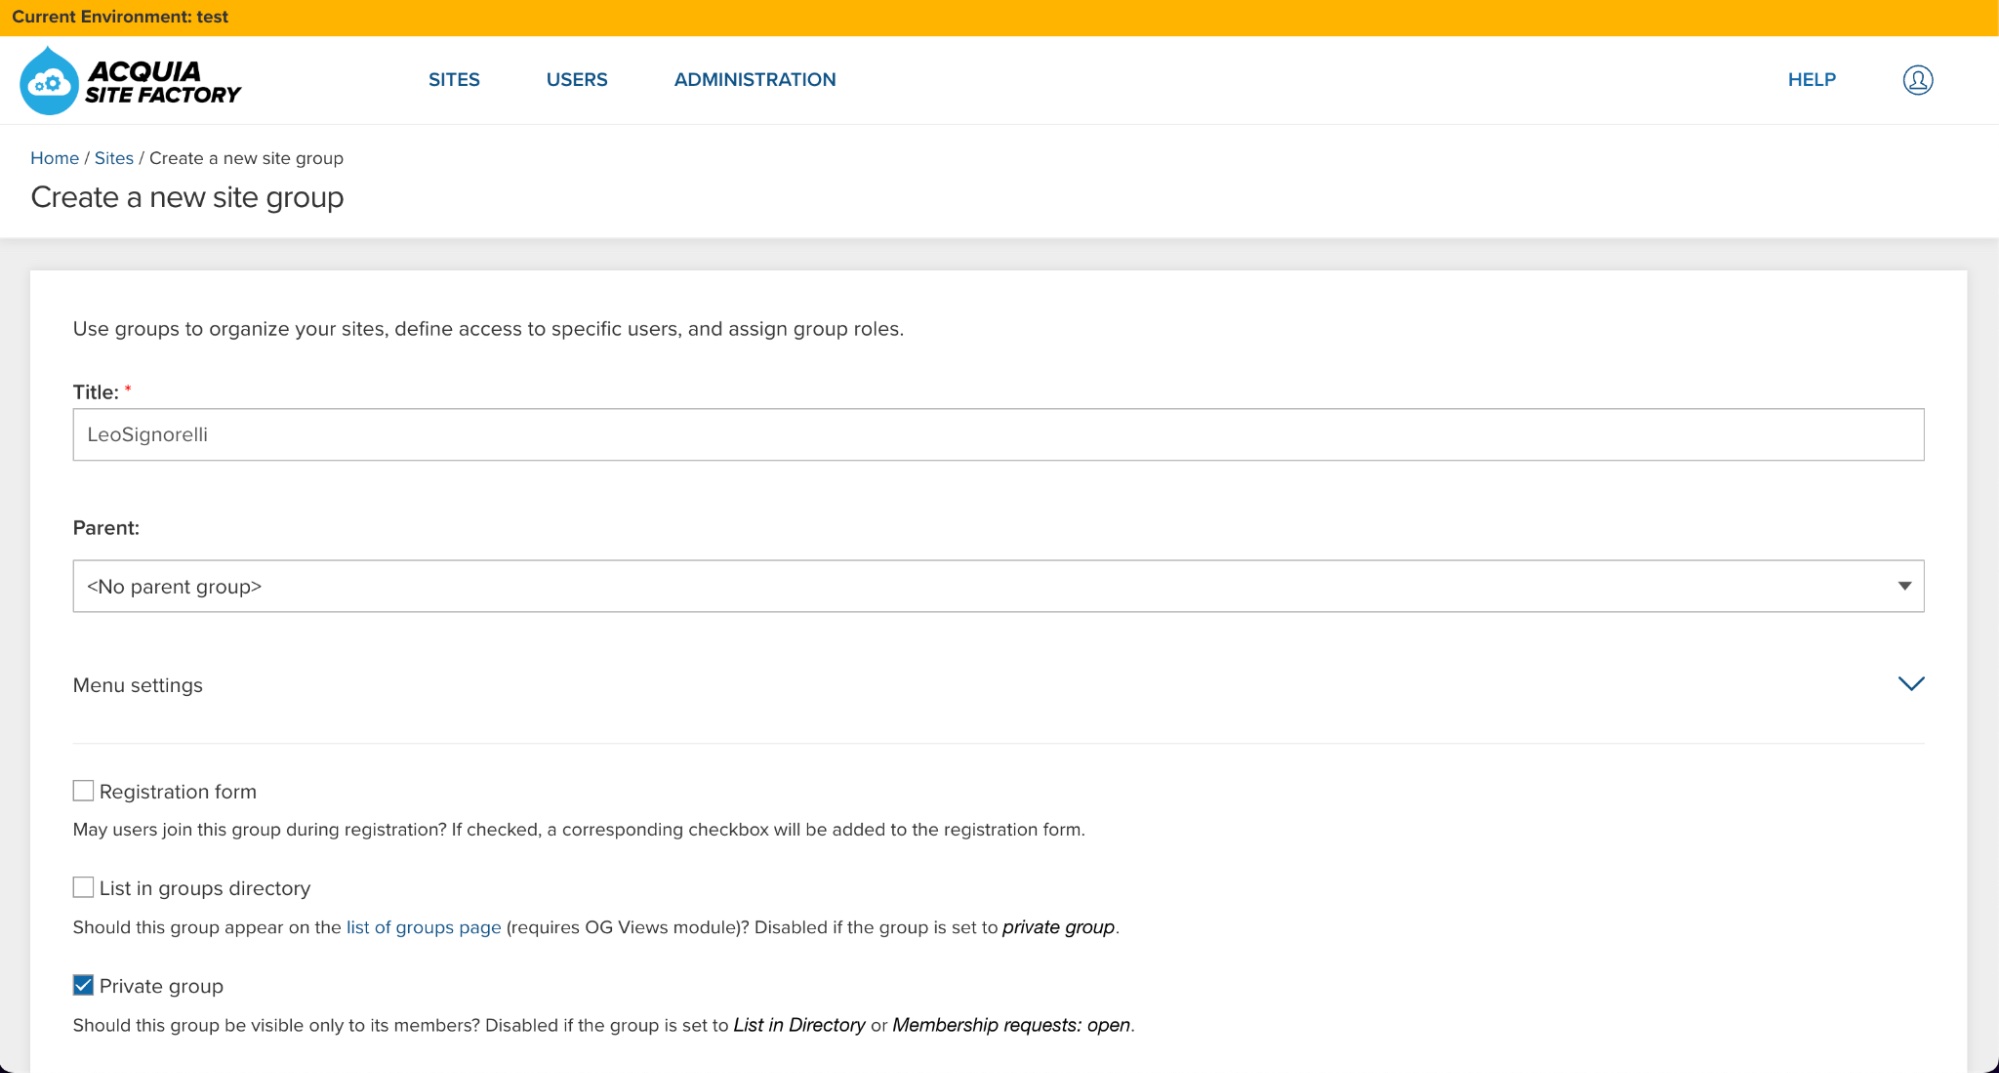 Image
Image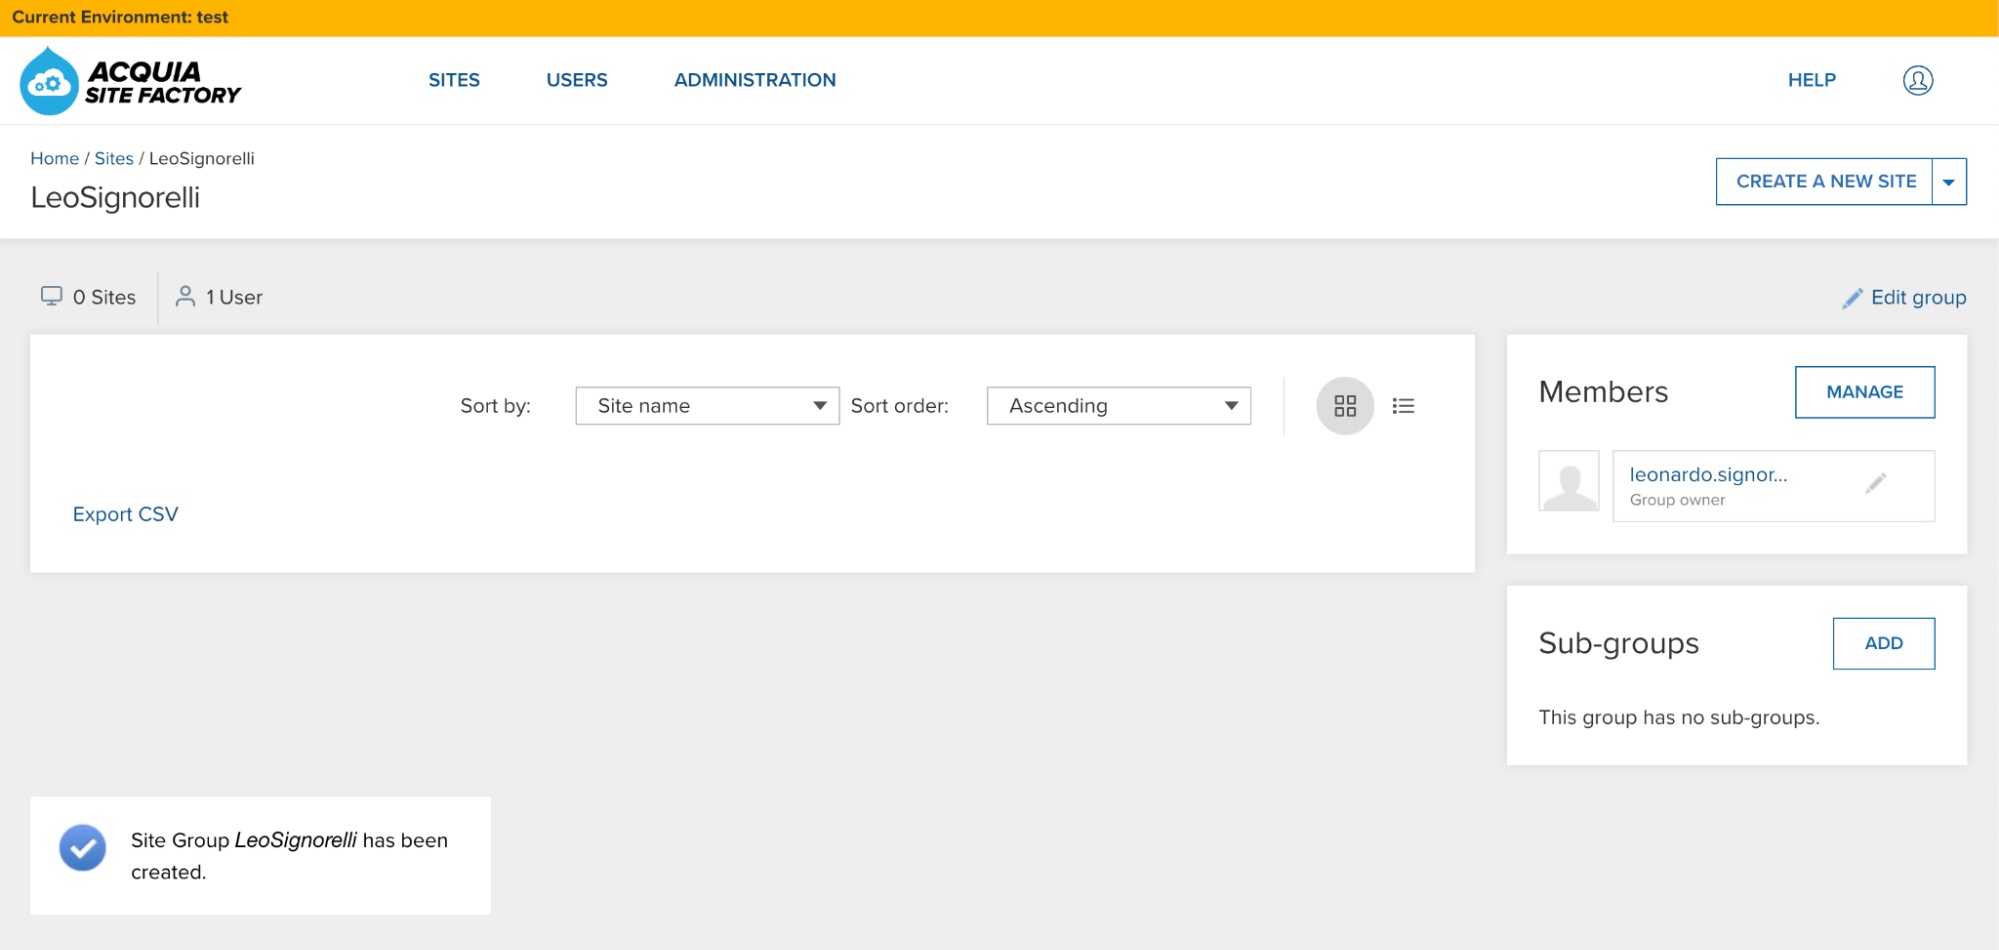
-
Create your first ACSF site
Create a new ACSF site using your new codebase. Go to Sites and select your group:
Image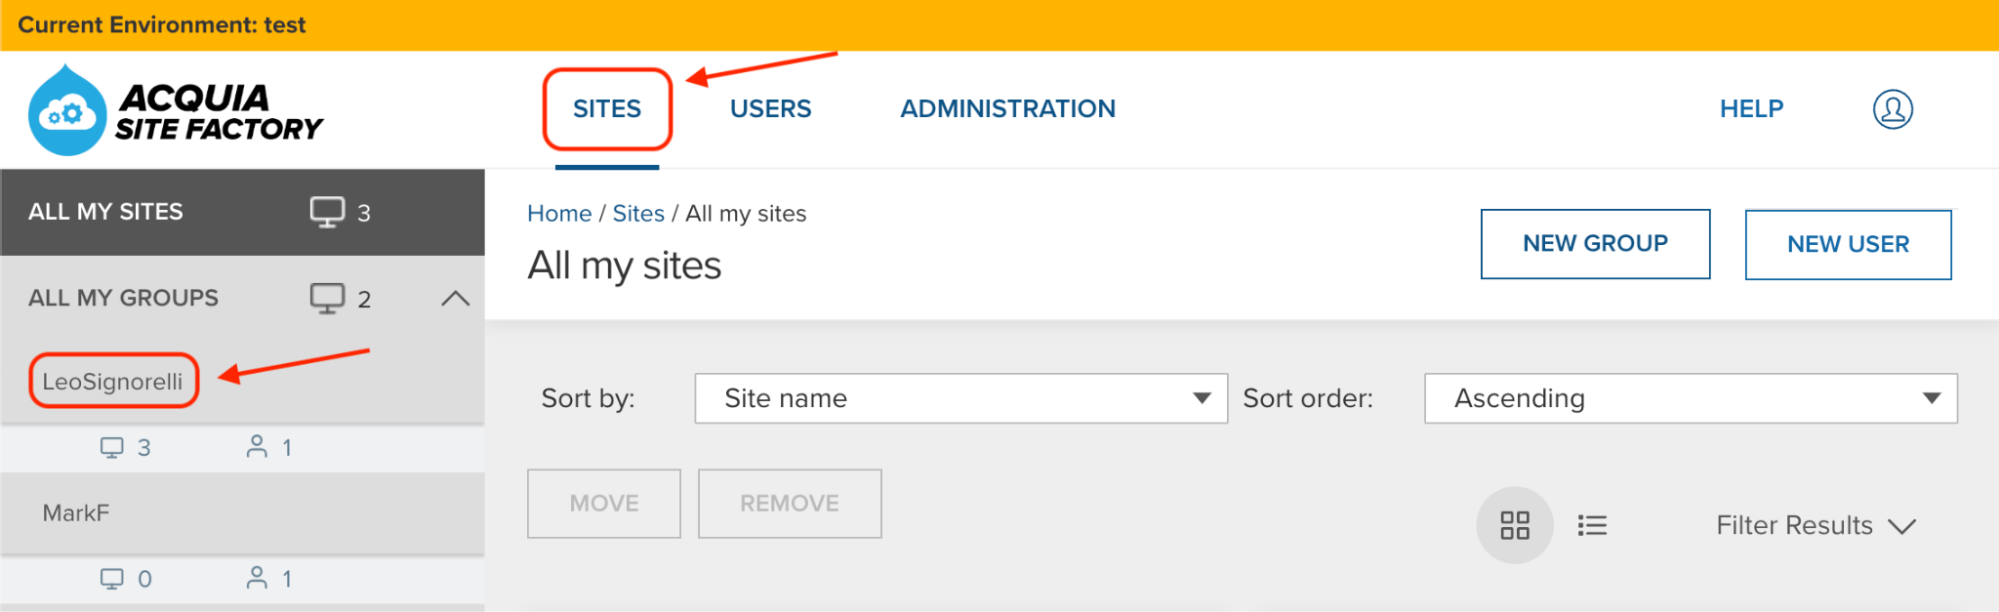
Click the “Create a new Site” button.
Give a name to your new site (Example: site1), and click the “Create Site” button:
Image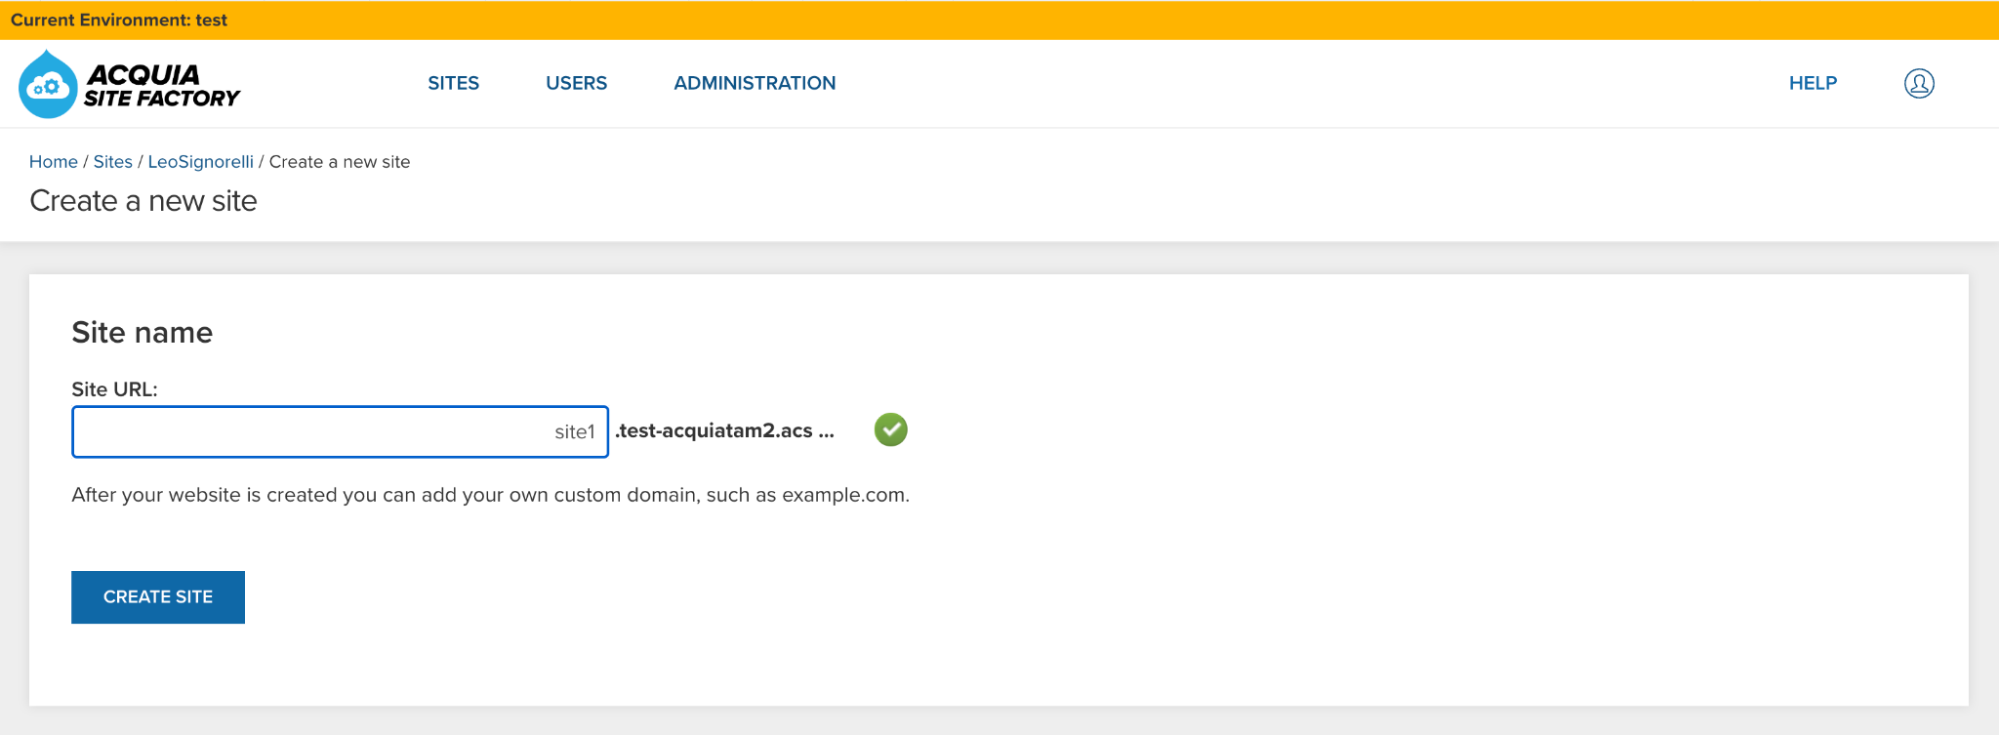 Image
Image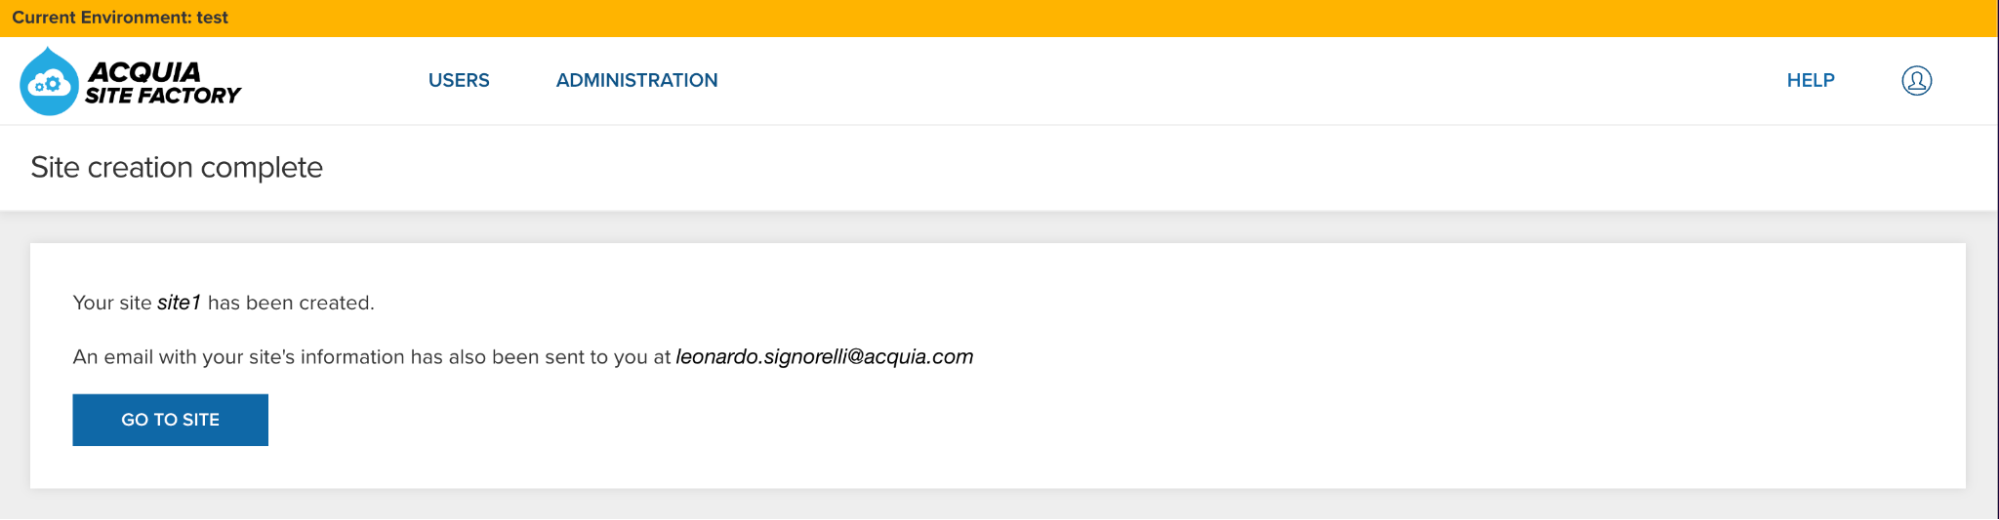
-
Login to your new ACSF site
In your Cloud IDE instance, create a new drush alias for your new ACSF site using the aliasgenerator.sh bash script. Execute the aliasgenerator.sh bash script and follow the instructions:
./aliasgenerator.shSignorelli IDE:~/project (main) $ ./aliasgenerator.sh <-------> <---------------> <---------------------------------> | Drush Alias Generator | <---------------------------------> <---------------> <-------> |---------------------| | Main Menu | |---------------------| | 1 - New Drush Alias | | 2 - Exit | |---------------------| Select a number from the Main Menu: 1 Selected: New Drush Alias ------------------------- Make sure to enter the name of a site you already created in your ACSF account. Example: If the ACSF URL assigned to your new site is site1.acquiatam2.acsitefactory.com Enter site1 Provide the name of the site you want to create a Drush alias: site1 Is this site name correct?: "site1" (Yes/No/Cancel = y/n/c) y Generating the drush alias for site1.. Ready! Going back to the Main Menu... |---------------------| | Main Menu | |---------------------| | 1 - New Drush Alias | | 2 - Exit | |---------------------| Select a number from the Main Menu: 2 Selected: Exit -------------- Exiting this script...Now you can execute drush commands from your Cloud IDE instance against your ACSF site following this structure:
drush @SITE_NAME.ENVIRONMENT statusBecause we created site1 in the test environment, the drush commands should look like this:
drush @site1.01test statusSignorelli IDE:~/project (main) $ drush @site1.01test status Drupal version : 10.0.7 Site URI : http://site1.test-acquiatam2.acsitefactory.com DB driver : mysql DB hostname : staging-4341 DB port : 3306 DB username : vi5zdAJ5iWYWDWKH DB name : acquiatamdb1278246 Database : Connected Drupal bootstrap : Successful Default theme : olivero Admin theme : claro PHP binary : /usr/local/php8.1/bin/php PHP config : /usr/local/php8.1/etc/cli/php.ini PHP OS : Linux PHP version : 8.1.12 Drush script : /mnt/www/html/acquiatam201test/vendor/bin/drush Drush version : 11.5.1 Drush temp : /mnt/tmp/acquiatam201test Drush configs : /etc/drush/drush.yml /mnt/www/html/acquiatam201test/vendor/drush/drush/drush.yml Install profile : acsfprofile Drupal root : /mnt/www/html/acquiatam201test/docroot Site path : sites/g/files/utfjsx5000426test Files, Public : sites/g/files/utfjsx5000426test/files Files, Private : /mnt/files/acquiatam2.01test/sites/g/files-private/utfjsx5000426test Files, Temp : /mnt/tmp/acquiatam201test Connection to acquiatam201test.ssh.enterprise-g1.acquia-sites.com closed. Signorelli IDE:~/project (main) $Check your new site for configuration differences:
drush @site1.01test cexSignorelli IDE:~/project (main) $ drush @site1.01test cex [notice] The active configuration is identical to the configuration in the export directory (../config/default). ../config/default Connection to acquiatam201test.ssh.enterprise-g1.acquia-sites.com closed. Signorelli IDE:~/project (main) $Access your new ACSF site using drush uli:
drush @site1.01test uli
Congratulations on completing the second phase of the three-step guide! You have navigated through the process of creating a custom Drupal installation profile. Now, let's head to the last phase where you will learn about configuration management and deployment workflow on Site Factory.
Next phase: Implementing Configuration Management and Proving out the Site Factory Deployment Workflow


