
Configure a Drupal 10 codebase with Drupal CMS and Site Studio for Site Factory: Part 2
- Last updated
- 1 minute read
Goal
Install a Drupal 10 with Acquia CMS and Site Studio and prepare a codebase for Acquia Site Factory (ACSF) using Acquia Cloud IDE.
Overview
This is Part 2 of a five-part comprehensive tutorial covering the set up of a new Drupal 10 codebase with Acquia CMS and Site Studio for Acquia Cloud Site Factory (ACSF). In this segment, you will install Acquia CMS and gain valuable insights into how to properly configure Site Studio to separate its configuration files and assets from the Drupal configuration files.
This guide has been divided into five parts:
- Set up Cloud IDE, Install Drupal 10, and Prepare your Codebase for Site Factory
- Acquia CMS and Site Studio installation and configuration for Site Factory
- Create a Custom Profile and test New Site Creation with Site Factory
- ACSF Deployment Workflow with Site Studio
- Optional: Configure multiple Site Studio sync directories
In the following steps, I will guide you through the installation and configuration of Acquia CMS and Site Studio.
-
Install Acquia CMS using the Enterprise Low-Code Starter Kit
https://docs.acquia.com/acquia-cms/install-cms/
https://docs.acquia.com/acquia-cms/enterprise-low-code-starter-kit/getting-started/Run the ./vendor/bin/acms acms:install command to begin the Acquia CMS installation using the Starter Kit wizard:
./vendor/bin/acms acms:installImage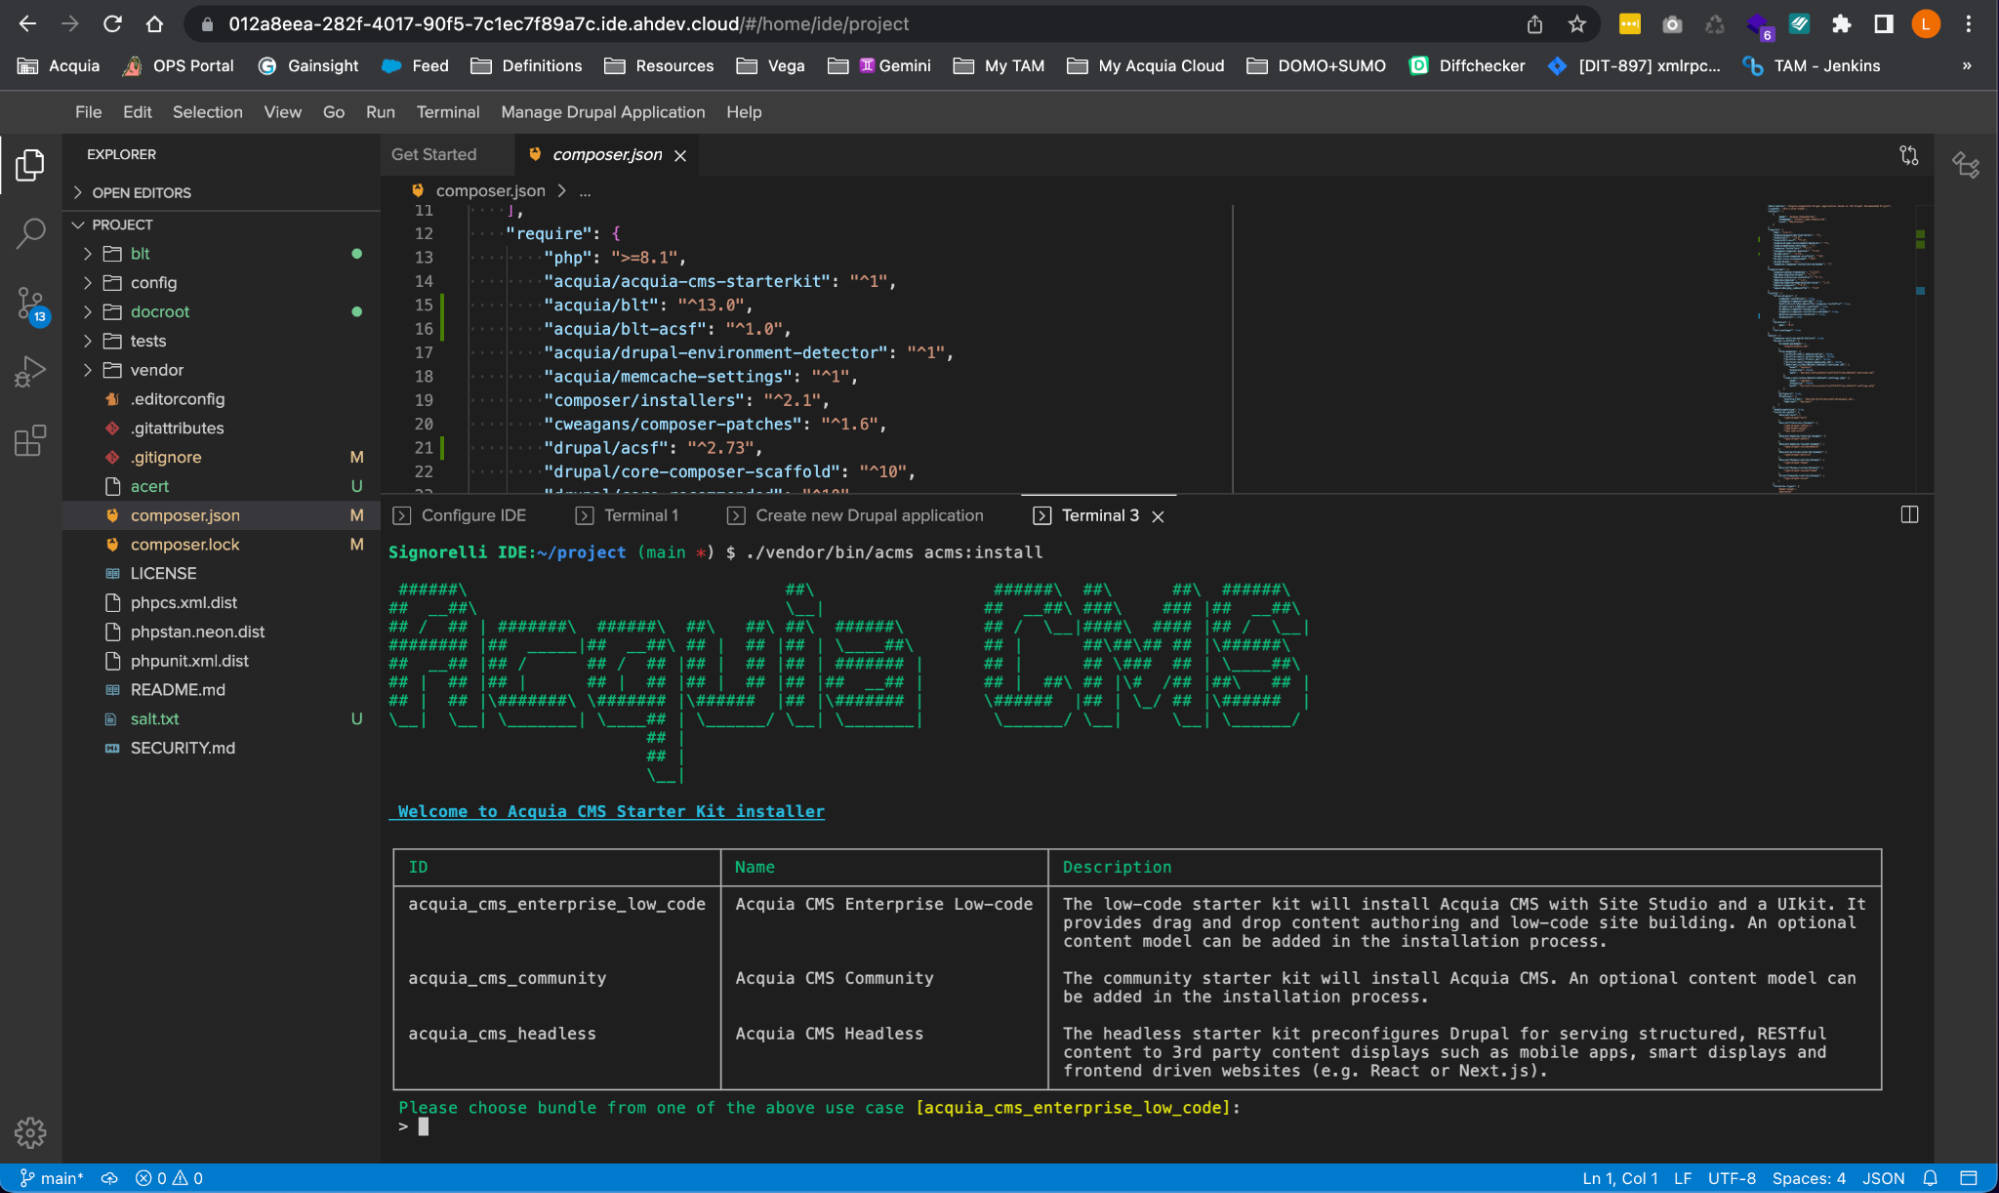
When prompted, use the Up and Down arrow keys to select “acquia_cms_enterprise_low_code” and press Enter.
Do you want a demo with demo content?, NO
Do you want to include the content model?, type YES and press Enter.
Would you like to enable the Acquia DAM modules (configuration will need to be done manually later after site installation) ? [no]: NO
Would you like to add GDPR functionality to the site (Yes/No) ? [no]:
> NOPlease provide the Google Maps API Key:
> (Press Enter)Please provide the Site Studio API Key:
> yoursitestudiokey-12345Please provide the Site Studio Organization Key:
> yoursitestudioorganizationkey-12345657aType yes and press Enter to the following prompt:
 You are about to:
* DROP all tables in your 'drupal' database.
Do you want to continue? (yes/no) [yes]:
> yes
Wait until the script installs Acquia CMS:
Image
Clear the cache:
drush crLogin to the new installed Acquia CMS site:
drush uliIf you go to the homepage you should see the new Acquia CMS site:
Image
Disable the Site Studio Configuration Management module
The Site Studio Configuration Management module offers a comprehensive out-of-the-box configuration, eliminating the need for manual setup. Additionally, it automates the export and import of Site Studio configuration with every configuration export/import Drush command (i.e drush cex or drush cim). Although it sounds great, it is essential for us to have the flexibility to execute the Drupal configuration export and import commands independently from the Site Studio package configuration export and import commands.
Execute the following Drush command to disable the Site Studio Configuration Management module:
drush pm:uninstall sitestudio_config_managementExport the new Acquia CMS configuration
Now that we have a fresh Drupal install using Acquia CMS, we need to export the current Drupal configuration so we can access the core.extension.yml file on a later step. Execute “drush cex” to export the configuration:
drush cexSignorelli IDE:~/project (main *) $ drush cex [success] Configuration successfully exported to /home/ide/project/config/default. /home/ide/project/config/default Signorelli IDE:~/project (main *) $ -
Configure the blt.yml file for Site Studio
Add the following code to the end if your blt/blt.yml file:
site-studio: cohesion-import: true sync-import: false package-import: true rebuild: true -
Site Studio Full Package Export configuration
https://sitestudiodocs.acquia.com/7.4/user-guide/configure-full-package-export
You can export all of your Site Studio configuration as a single package file. Before you run a full package export you must define the export settings. This setting is used if you are using either the UI or drush to export your configuration.
Navigate to the Site Studio “Full export settings” page (/admin/cohesion/sync/export_settings), and make sure you have the following configuration. All the entity types should be checked making sure that the “Image styles” and “views” entity types are unchecked:
Image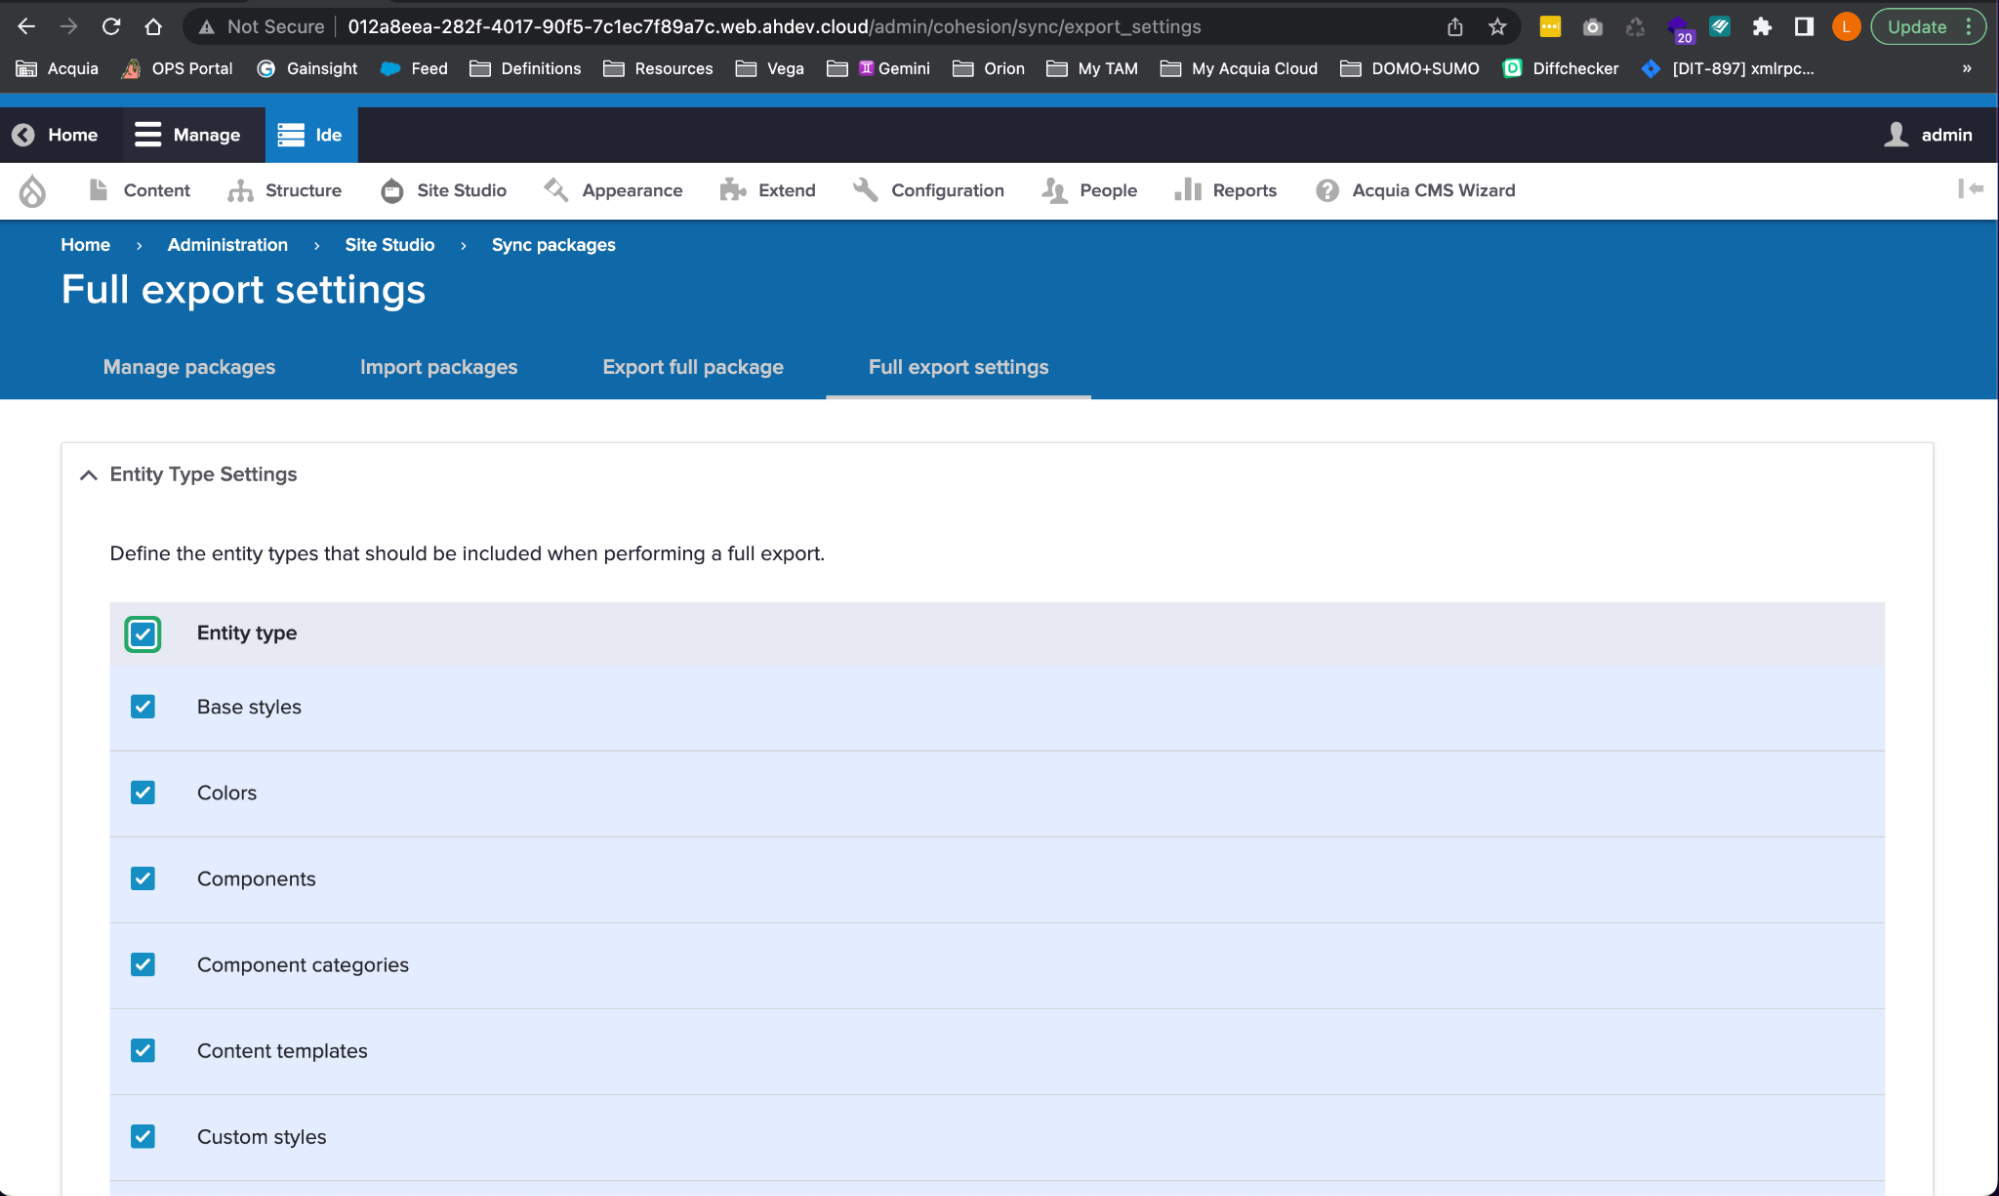 Image
Image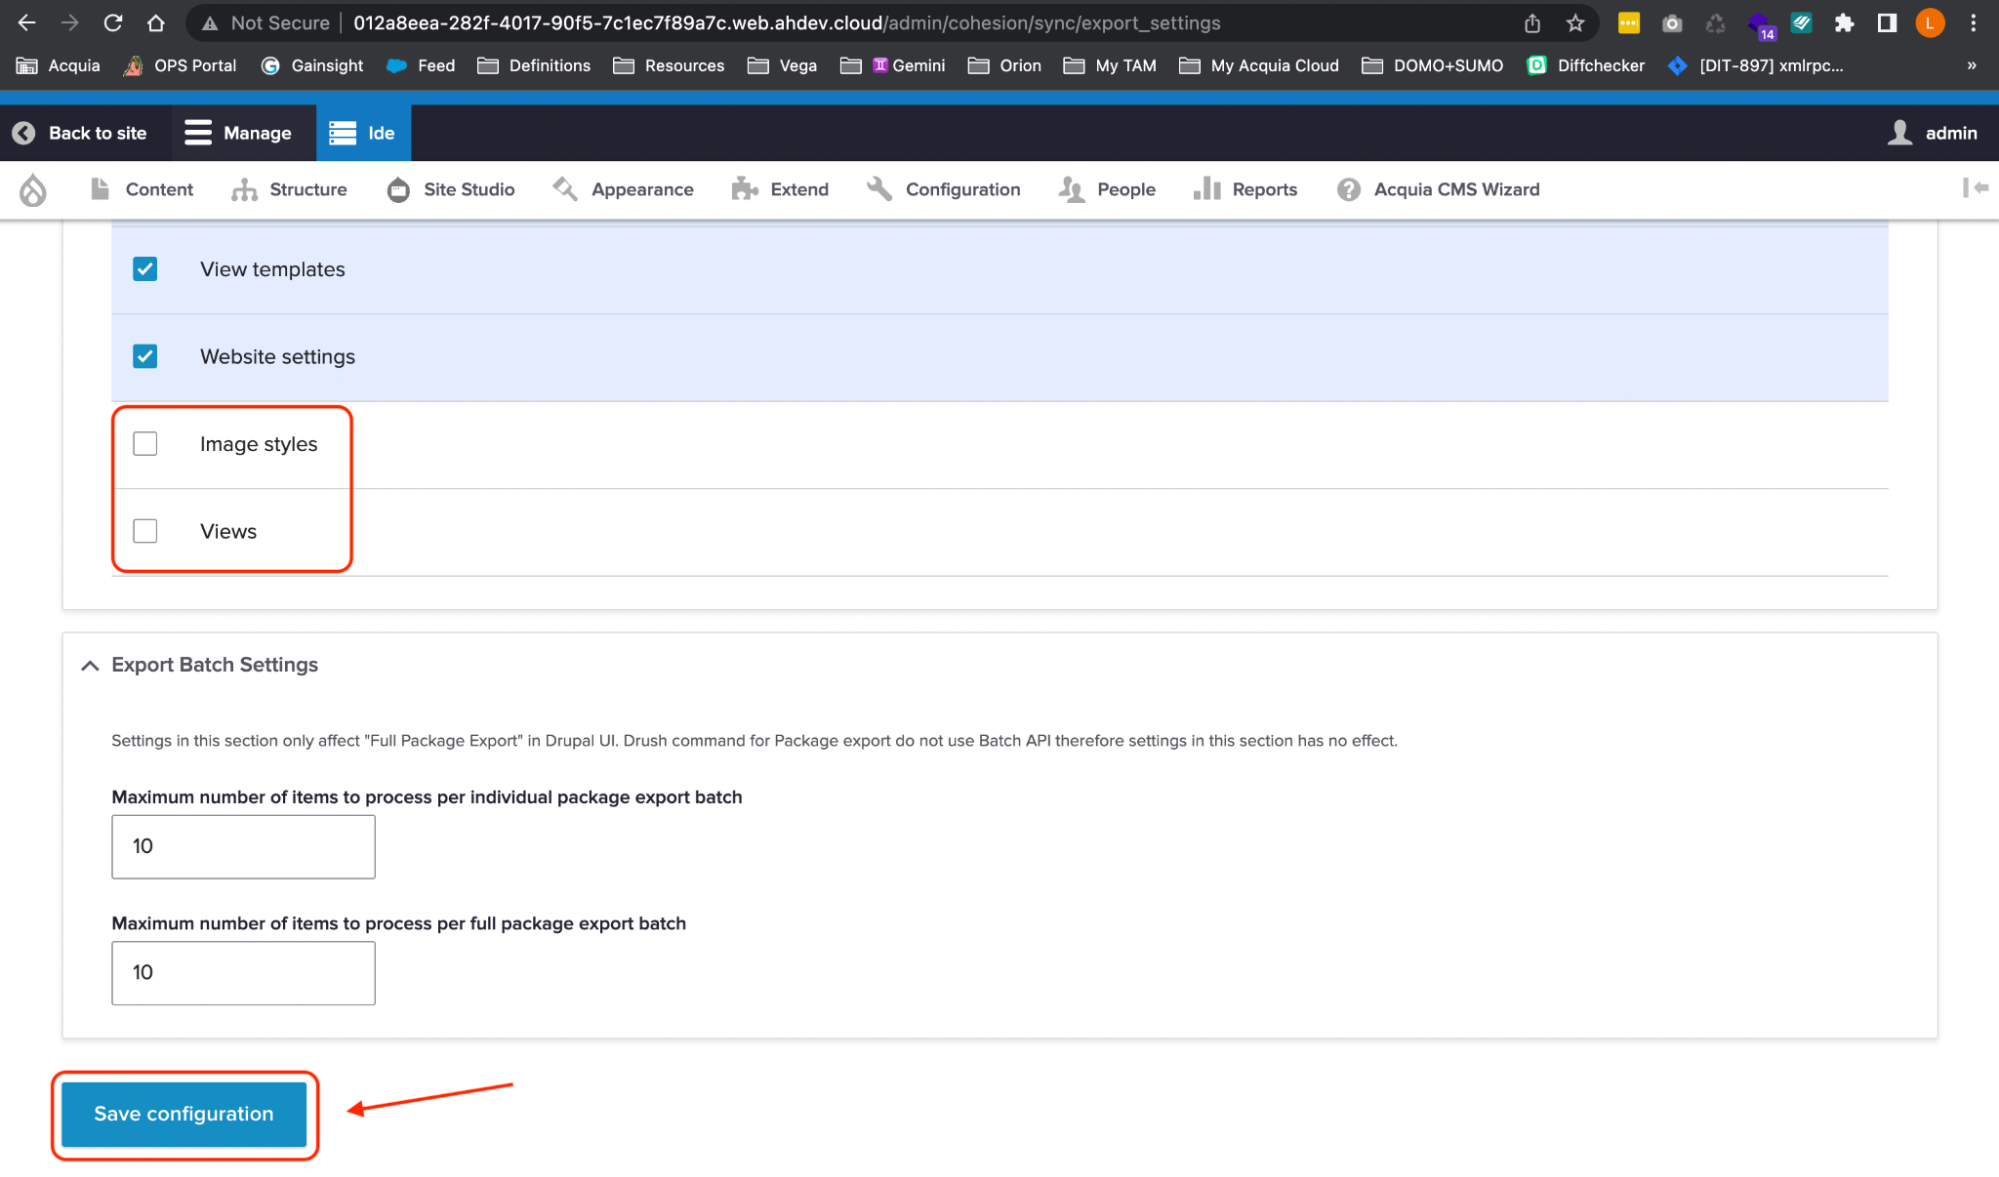
-
Enable the ACSF, Config Split, and Config Filter modules
Enable the ACSF module:
drush en acsfSignorelli IDE:~/project (main *) $ drush en acsf The following module(s) will be enabled: acsf, acsf_duplication, acsf_theme, acsf_variables Do you want to continue? (yes/no) [yes]: > yes [success] Successfully enabled: acsf, acsf_duplication, acsf_theme, acsf_variables Signorelli IDE:~/project (main *) $Make sure the Config Split module is enabled:
drush en config_splitAnd make sure the Config Filter module is enabled as well:
drush en config_filter -
Site Studio Configuration Split
Navigate to “Configuration -> Development -> Configuration Split settings” (/admin/config/development/configuration/config-split) and click the “+Add Configuration Split setting” button.
On the “Add configuration split setting” page, label the new configuration split as "Site Studio". In the "Static Settings" section, select "Database" as the storage type. Make sure to check the "Active" checkbox under the "Status" section. Lastly, enter "cohesion_*" in the "Additional configuration" text area. Click the “Save” button to save the new configuration split:
Image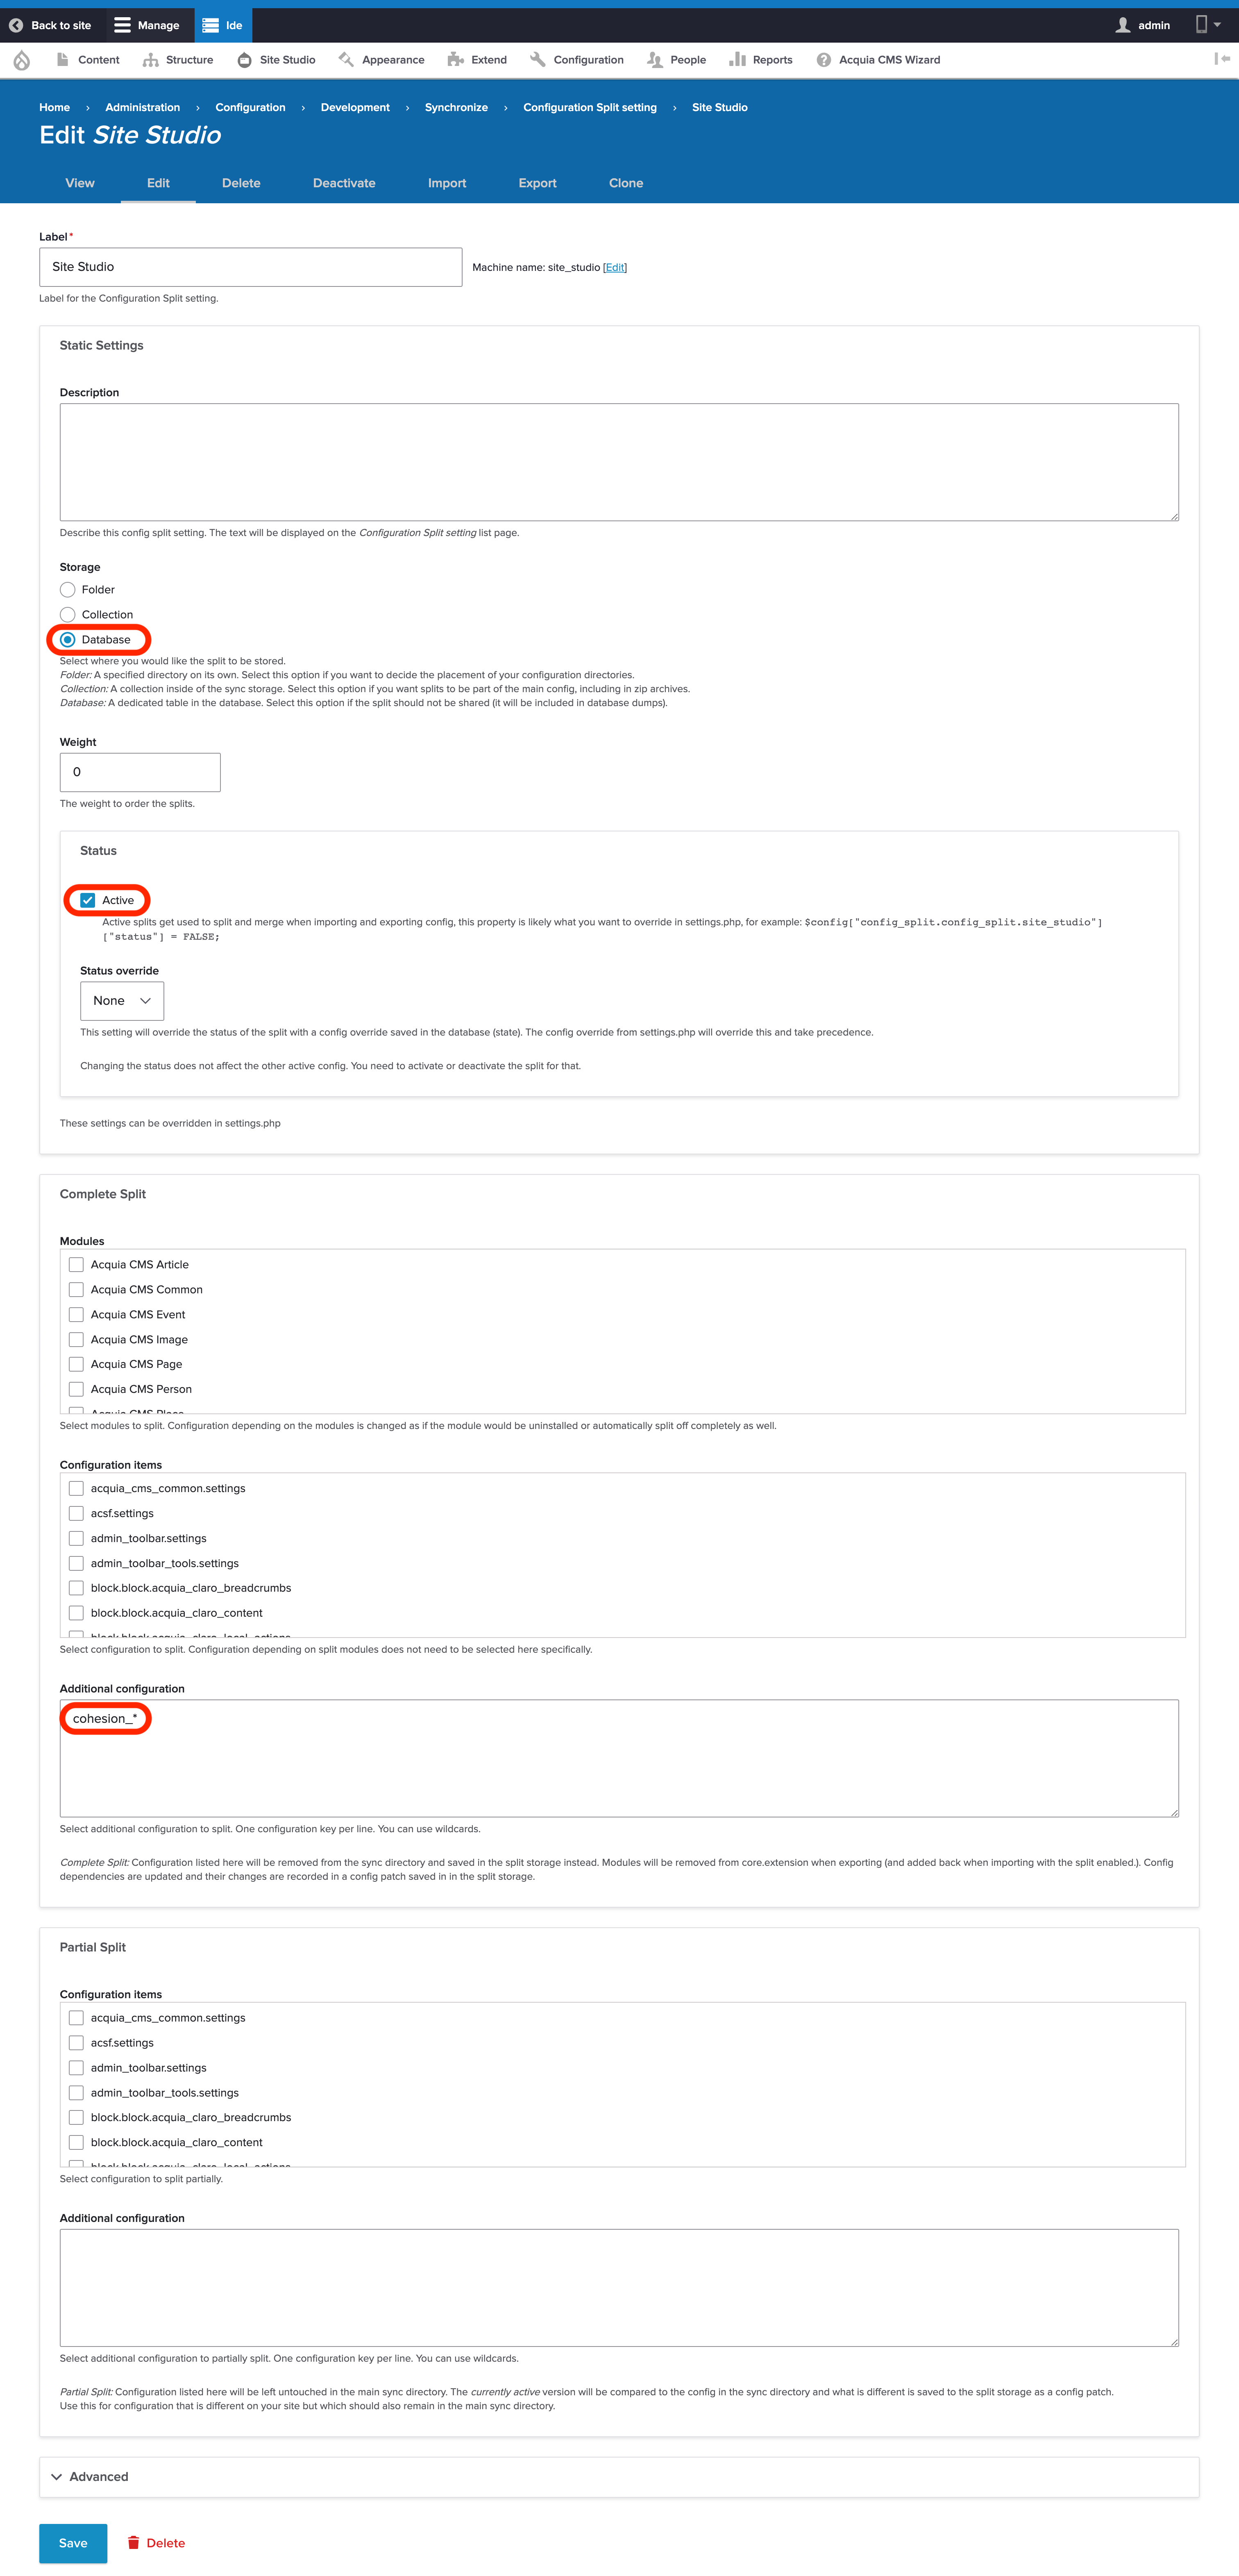
-
Config Ignore Configuration
Navigate to “Configuration -> Development -> Configuration synchronization -> Ignore” (/admin/config/development/configuration/ignore).
On the “Ignore” page, you should see the following configuration entities listed on the text area:
- cohesion_*
- language.entity.*
Add “cohesion.settings” to the list and click the “Save configuration” button to save the changes:
Image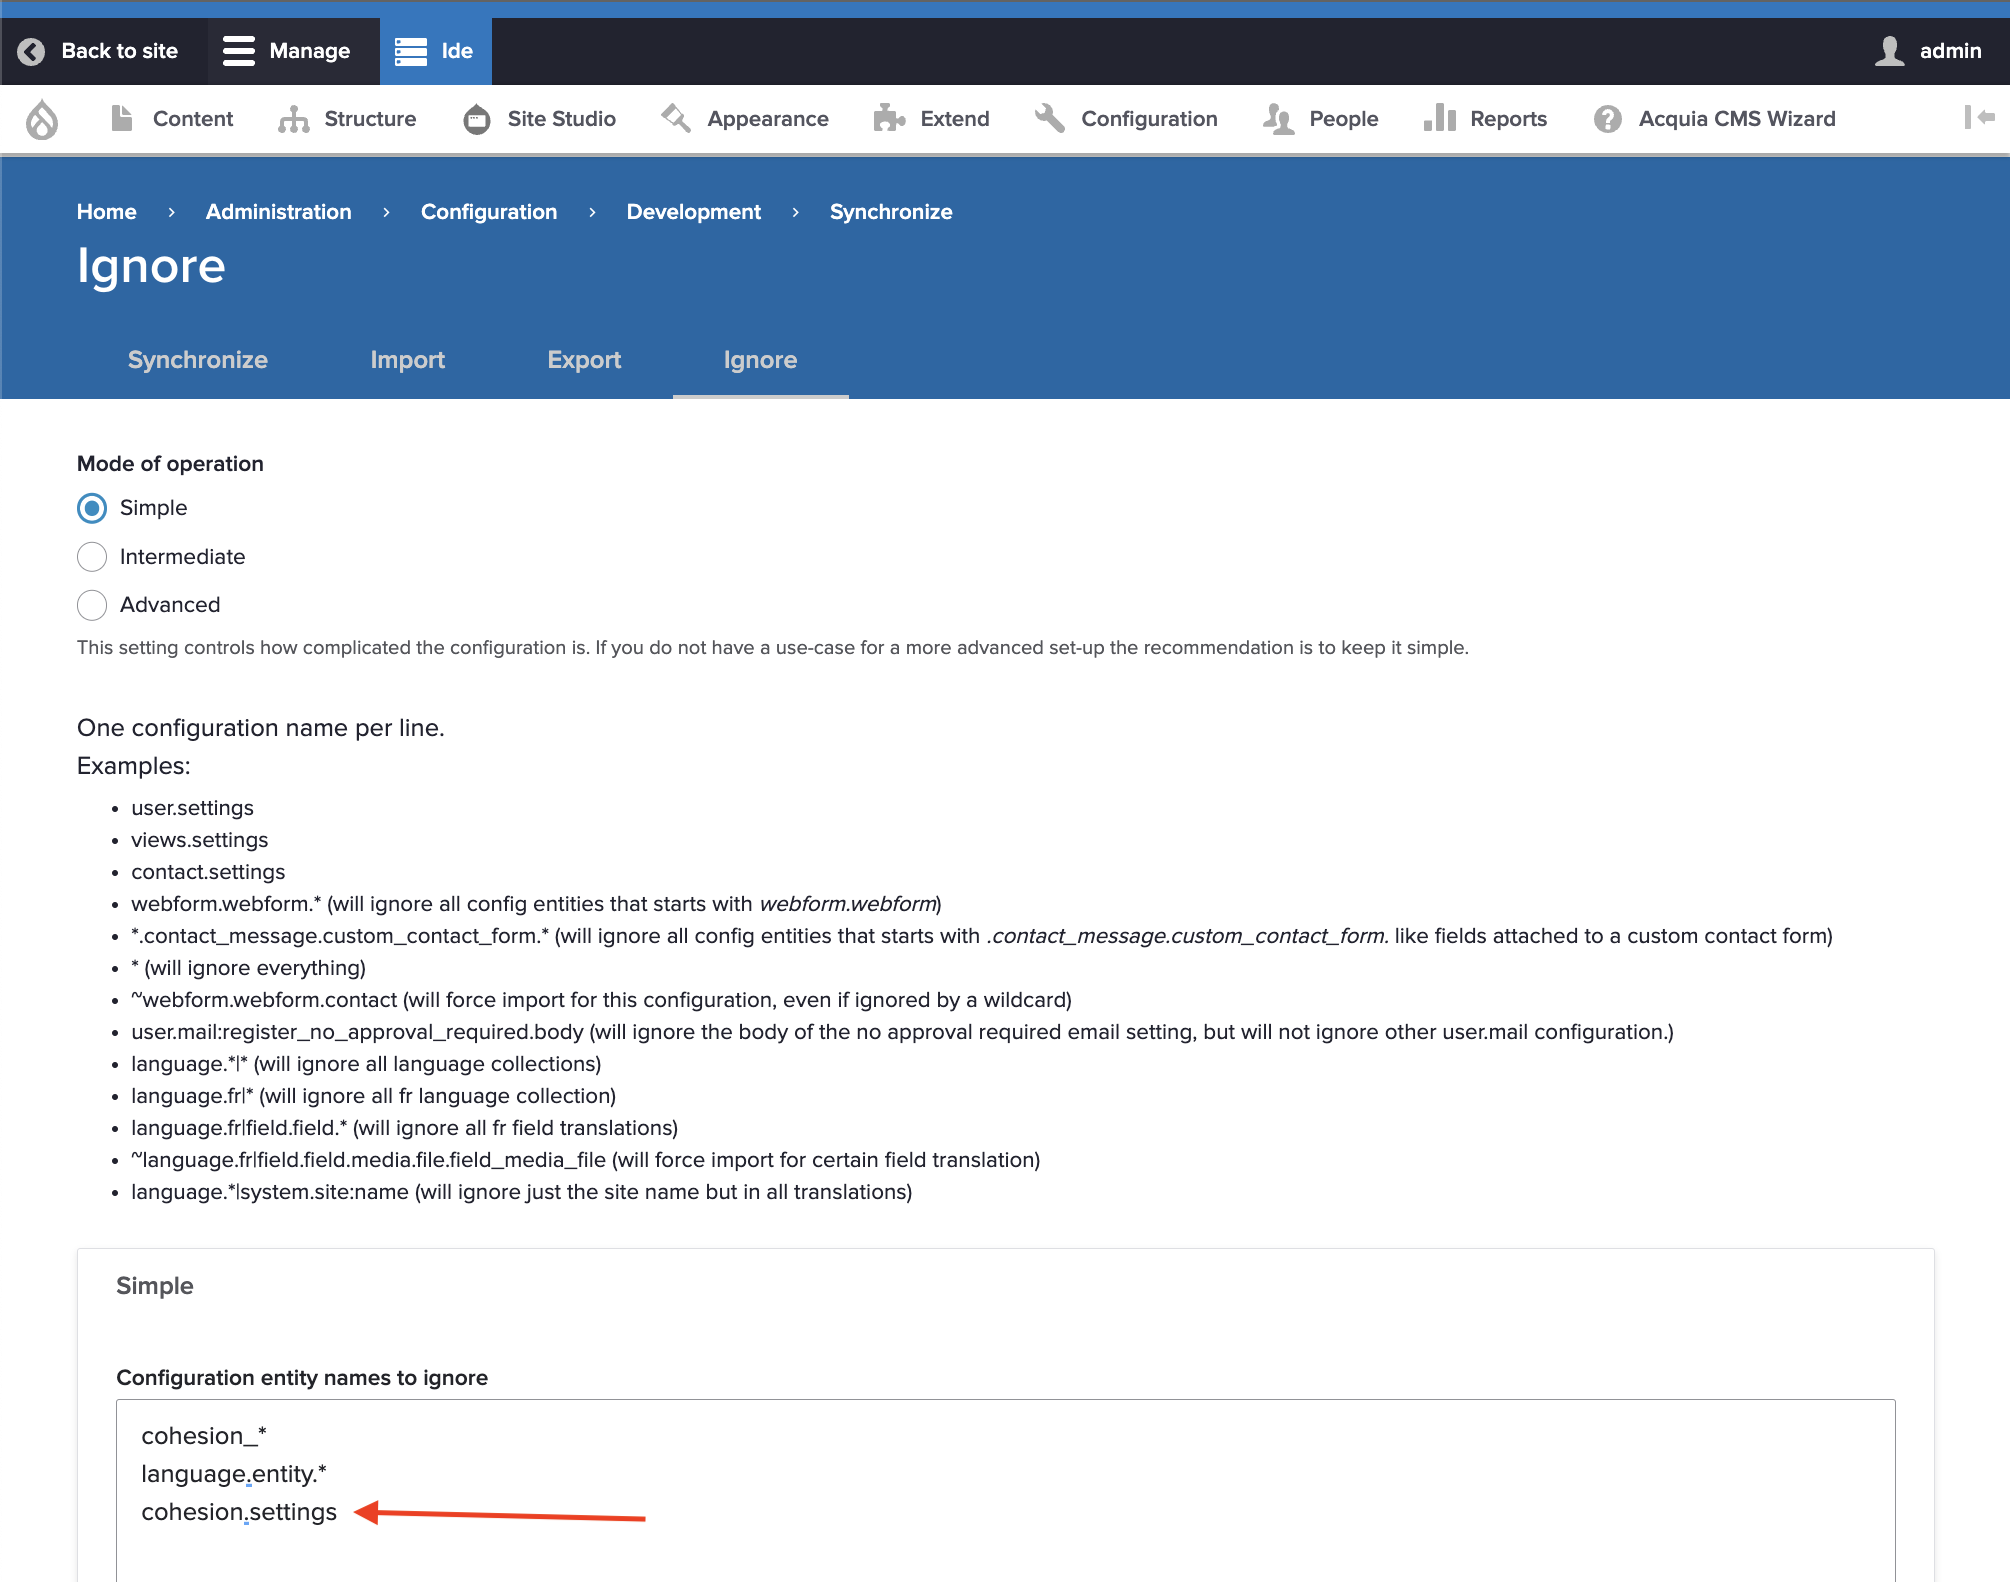
-
Export the modified Drupal and Site Studio configuration
Export the new Acquia CMS configuration:
drush cexSignorelli IDE:~/project (master *) $ drush cex [notice] Differences of the active config to the export directory: +------------+---------------------------------------+-----------+ | Collection | Config | Operation | +------------+---------------------------------------+-----------+ | | acsf.settings | Create | | | config_split.config_split.site_studio | Create | | | core.extension | Update | | | user.role.content_editor | Update | | | user.role.content_author | Update | | | user.role.content_administrator | Update | | | config_ignore.settings | Update | +------------+---------------------------------------+-----------+ The .yml files in your export directory (/home/ide/project/config/default) will be deleted and replaced with the active config. (yes/no) [yes]: > yes [success] Configuration successfully exported to /home/ide/project/config/default. /home/ide/project/config/default Signorelli IDE:~/project (master *) $Export the new Site Studio configuration:
drush sitestudio:package:exportSignorelli IDE:~/project (main *) $ drush sitestudio:package:export ➜ ➜ Exported 264 config and 38 non-config files. ➜ Signorelli IDE:~/project (main *) $ -
Storing your Site Studio credentials outside of your codebase
If you must store the Site Studio credentials outside of your codebase, you can create a secrets.settings.php file and then make its contents available to Drupal with a post-settings.php hook. By doing so, sensitive credentials are not kept in your database backups or your version control repository, allowing you to distribute database backups or grant repository access to team members who must not possess sensitive credentials. Visit the following Acquia documentation to get more information and instructions on how to store sensitive information outside of your codebase:
Storing sensitive information outside of your codebase
https://docs.acquia.com/secrets
Congratulations on completing the second phase of the five-step guide! You have successfully navigated through the process of installing Acquia CMS and correctly configuring Site Studio to separate the Drupal configuration from the Site Studio configuration and assets. Now, let us move on to the next phase where you will learn how to create a custom Drupal installation profile for Acquia Cloud Site Factory.
Next phase: Create a Custom Profile and test New Site Creation with Site Factory


