
Configure a Drupal 10 codebase with Drupal CMS and Site Studio for Site Factory: Part 3
- Last updated
- 2 minute read
Goal
Create and configure a new custom Drupal installation Profile and test new site creation on Site Factory.
Overview
This is Part 3 of a five-part comprehensive tutorial covering the set up of a new Drupal 10 codebase with Acquia CMS and Site Studio for Acquia Cloud Site Factory (ACSF). In this section, I will guide you through the process of creating a new custom Drupal installation Profile. I will also provide detailed instructions on how to configure it effectively, ensuring its compatibility with the Site Factory platform. Additionally, you will learn how to properly deploy your codebase to Site Factory.
This guide has been divided into five parts:
- Set up Cloud IDE, Install Drupal 10, and Prepare your Codebase for Site Factory
- Acquia CMS and Site Studio installation and configuration for Site Factory
- Create a Custom Profile and test New Site Creation with Site Factory
- ACSF Deployment Workflow with Site Studio
- Optional: Configure multiple Site Studio sync directories
In the following steps, I will guide you through the creation and configuration of a new custom Drupal installation Profile and how to configure it for Site Factory.
-
Create a new Custom Profile
Execute the following commands in your Cloud IDE terminal to create a new custom profile named tamprofile:
cd docroot/profiles/custom/
mkdir tamprofile
cd tamprofile/
touch tamprofile.info.yml
Set the new profile as default in your codebase
Modify the following files in your codebase to add the new profile (tamprofile):
- /home/ide/project/config/default/core.extension.yml
password_policy: 10 views: 10 tamprofile: 1000 theme: stark: 0 olivero: 0 claro: 0 acquia_claro: 0 stable: 0 cohesion_theme: 0 profile: tamprofile- /home/ide/project/blt/blt.yml
Add the following code after the machine_name key:
  profile:
   name: tamprofile
  prefix: BLT
Example:
project:
 machine_name: tamacsf
 profile:
   name: tamprofile
 prefix: BLT
cloud:
 appId: 48efba74-75af-43ef-8455-32e6f043c375
git:
 default_branch: master
 remotes:
   cloud: '[email protected]:acquiatam2.git'
deploy:
 tag_source: true
drush:
 aliases:
   remote: site1.01test
   local: self
   ci: self
 default_alias: '${drush.aliases.local}'
site-studio:
 cohesion-import: true
 sync-import: false
 package-import: true
 rebuild: true
Generate the tamprofile.info.yml file
This new file will inform Drupal about the required modules and themes that should get installed when the tamprofile custom profile is used to create a fresh Drupal install.
- /home/ide/project/docroot/profiles/custom/tamprofile/tamprofile.info.yml
Add the following lines of code to your tamprofile.info.yml file and save your changes:
name: tamprofile type: profile base profile: minimal description: 'TAM Base Default Profile' core: 9.x core_version_requirement: '^9 || ^10' config_install: true config_install_path: '../config/default' -
Install a local Site with BLT and export the resulting configuration
Note: Acquia BLT will be EOL on December 31, 2024. Please also see You don't need BLT on Acquia Cloud .
With the help of the following BLT command, we will install a new site from the existing configuration on disk by using the new custom installation profile (tamprofile):
cd /home/ide/project
blt setup --no-interaction
You should get the following successful messages:
[Acquia\Blt\Robo\Tasks\DrushTask] Running /home/ide/project/vendor/bin/drush @self config-status --no-interaction --ansi in /home/ide/project/docroot
[warning] Undefined array key "uuid" StorageComparer.php:259
[warning] Undefined array key "uuid" StorageComparer.php:259
[warning] Undefined array key "uuid" StorageComparer.php:259
[warning] Undefined array key "uuid" StorageComparer.php:259
---------------------------------------------- ----------
 Name                                           State
---------------------------------------------- ----------
 block.block.breadcrumbs                        Diffe
                                                rent
 block.block.site_branding                      Diffe
                                                rent
 config_split.config_split.site_studio_ignore   Diffe
 d_config                                       rent
 crop.type.focal_point                          Diffe
                                                rent
 editor.editor.cohesion                         Only in
                                                sync dir
 facets.facet.articles_article_type             Diffe
                                                rent
 facets.facet.articles_category                 Diffe
                                                rent
 facets.facet.events_category                   Diffe
                                                rent
 facets.facet.events_event_type                 Diffe
                                                rent
 facets.facet.people_category                   Diffe
                                                rent
 facets.facet.people_person_type                Diffe
                                                rent
 facets.facet.places_category                   Diffe
                                                rent
 facets.facet.places_place_type                 Diffe
                                                rent
 facets.facet.search_article_type               Diffe
                                                rent
 facets.facet.search_content_type               Diffe
                                                rent
 facets.facet.search_event_type                 Diffe
                                                rent
 facets.facet.search_person_type                Diffe
                                                rent
 facets.facet.search_place_type                 Diffe
                                                rent
 filter.format.cohesion                         Only in
                                                sync dir
 imce.profile.admin                             Diffe
                                                rent
 imce.profile.member                            Diffe
                                                rent
 node.type.article                              Diffe
                                                rent
 password_policy.password_policy.acquia_cms     Diffe
                                                rent
 pathauto.pattern.article_taxonomy_path         Diffe
                                                rent
 responsive_preview.device.large                Diffe
                                                rent
 responsive_preview.device.small                Diffe
                                                rent
 search_api_autocomplete.search.search          Diffe
                                                rent
 views.view.content                             Only in
                                                sync dir
 views.view.content_moderation_dashboard_in_r   Diffe
 eview                                          rent
 views.view.media                               Only in
                                                sync dir
 views.view.moderation_dashboard                Diffe
                                                rent
 views.view.moderation_dashboard_recent_chang   Diffe
 es                                             rent
 views.view.moderation_dashboard_recently_cre   Diffe
 ated                                           rent
 views.view.redirect                            Diffe
                                                rent
 workbench_email.workbench_email_template.bac   Diffe
 k_to_draft                                     rent
 workbench_email.workbench_email_template.to_   Diffe
 archived                                       rent
 workbench_email.workbench_email_template.to_   Diffe
 published                                      rent
 workbench_email.workbench_email_template.tra   Diffe
 nsition_to_review                              rent
---------------------------------------------- ----------
[Acquia\Blt\Robo\Tasks\DrushTask] Done in 2.095s
[Acquia\Blt\Robo\Tasks\DrushTask] Running /home/ide/project/vendor/bin/drush @self cc drush --no-interaction --ansi in /home/ide/project/docroot
[success] 'drush' cache was cleared.
[Acquia\Blt\Robo\Tasks\DrushTask] Done in 0.282s
[Acquia\Blt\Robo\Tasks\DrushTask] Running /home/ide/project/vendor/bin/drush @self pm:list --filter="cohesion_sync" --status=Enabled --field=status --no-interaction --ansi in /home/ide/project/docroot
Enabled
[Acquia\Blt\Robo\Tasks\DrushTask] Done in 0.632s
[Acquia\Blt\Robo\Tasks\DrushTask] Running /home/ide/project/vendor/bin/drush @self cr --no-interaction --ansi in /home/ide/project/docroot
[success] Cache rebuild complete.
[Acquia\Blt\Robo\Tasks\DrushTask] Done in 2.784s
[Acquia\Blt\Robo\Tasks\DrushTask] Running /home/ide/project/vendor/bin/drush @self cohesion:import --no-interaction --ansi in /home/ide/project/docroot
➜  Importing assets.
➜
➜   Congratulations. Site Studio is installed and up to date. You can now build your website.
➜
Then, the new site installation script will proceed to import and rebuild the Site Studio components. Once the installation process for the new Drupal site is complete, you will encounter the following error message:
[error] Configuration in the database does not match configuration on disk.[Acquia\Blt\Robo\Tasks\DrushTask] Done in 0.285s [error] Configuration in the database does not match configuration on disk. This indicates that your configuration on disk needs attention. Please read https://support.acquia.com/hc/en-us/articles/360034687394--Configuration-in-the-database-does-not-match-configuration-on-disk-when-using-BLT For troubleshooting guidance and support, see https://docs.acquia.com/blt/support/ The command failed. This often indicates a problem with your configuration. Review the command output above for more detailed errors, and consider re-running with verbose output for more information. [error] Command `drupal:config:import ` exited with code 1. For troubleshooting guidance and support, see https://docs.acquia.com/blt/support/ The command failed. This often indicates a problem with your configuration. Review the command output above for more detailed errors, and consider re-running with verbose output for more information. [error] Command `drupal:install ` exited with code 1. For troubleshooting guidance and support, see https://docs.acquia.com/blt/support/ Signorelli IDE:~/project (main *) $This is expected. To fix this, import the existing configuration on disk to your new site:
drush cim -yThen, export the resulting configuration differences:
drush cex -yNow you should have no configuration differences between the new site’s database and the existing configuration on disk:
drush config:statusSignorelli IDE:~/project (main *) $ drush config:status [notice] No differences between DB and sync directory.Clear the cache:
drush crCheck the new installed site with “drush uli”:
drush uliImage
-
Test the installation profile simulating Site Factory’s site creation
To make sure everything is working fine, we will reinstall a new site simulating the commands used by Site Factory:
drush site:install tamprofileSignorelli IDE:~/project (main *) $ drush site:install tamprofile You are about to: * DROP all tables in your 'drupal' database. Do you want to continue? (yes/no) [yes]: > yes [notice] Starting Drupal installation. This takes a while.Execute the following BLT command to update the database and perform post site install configuration tasks for the new site. This command will also perform a Site Studio import and Site Studio rebuild:
blt drupal:updateClear the cache:
drush crCheck the new installed site with drush uli:
drush uliProceed to the homepage to verify that the installation of the new website has been completed successfully:
Image
-
Push your codebase to your remote repository
Create a new repository on GitHub.com (https://github.com/new). To avoid errors, do not initialize the new repository with README, license, or gitignore files.
https://github.com/newI named my repository “tamacsf”:
Image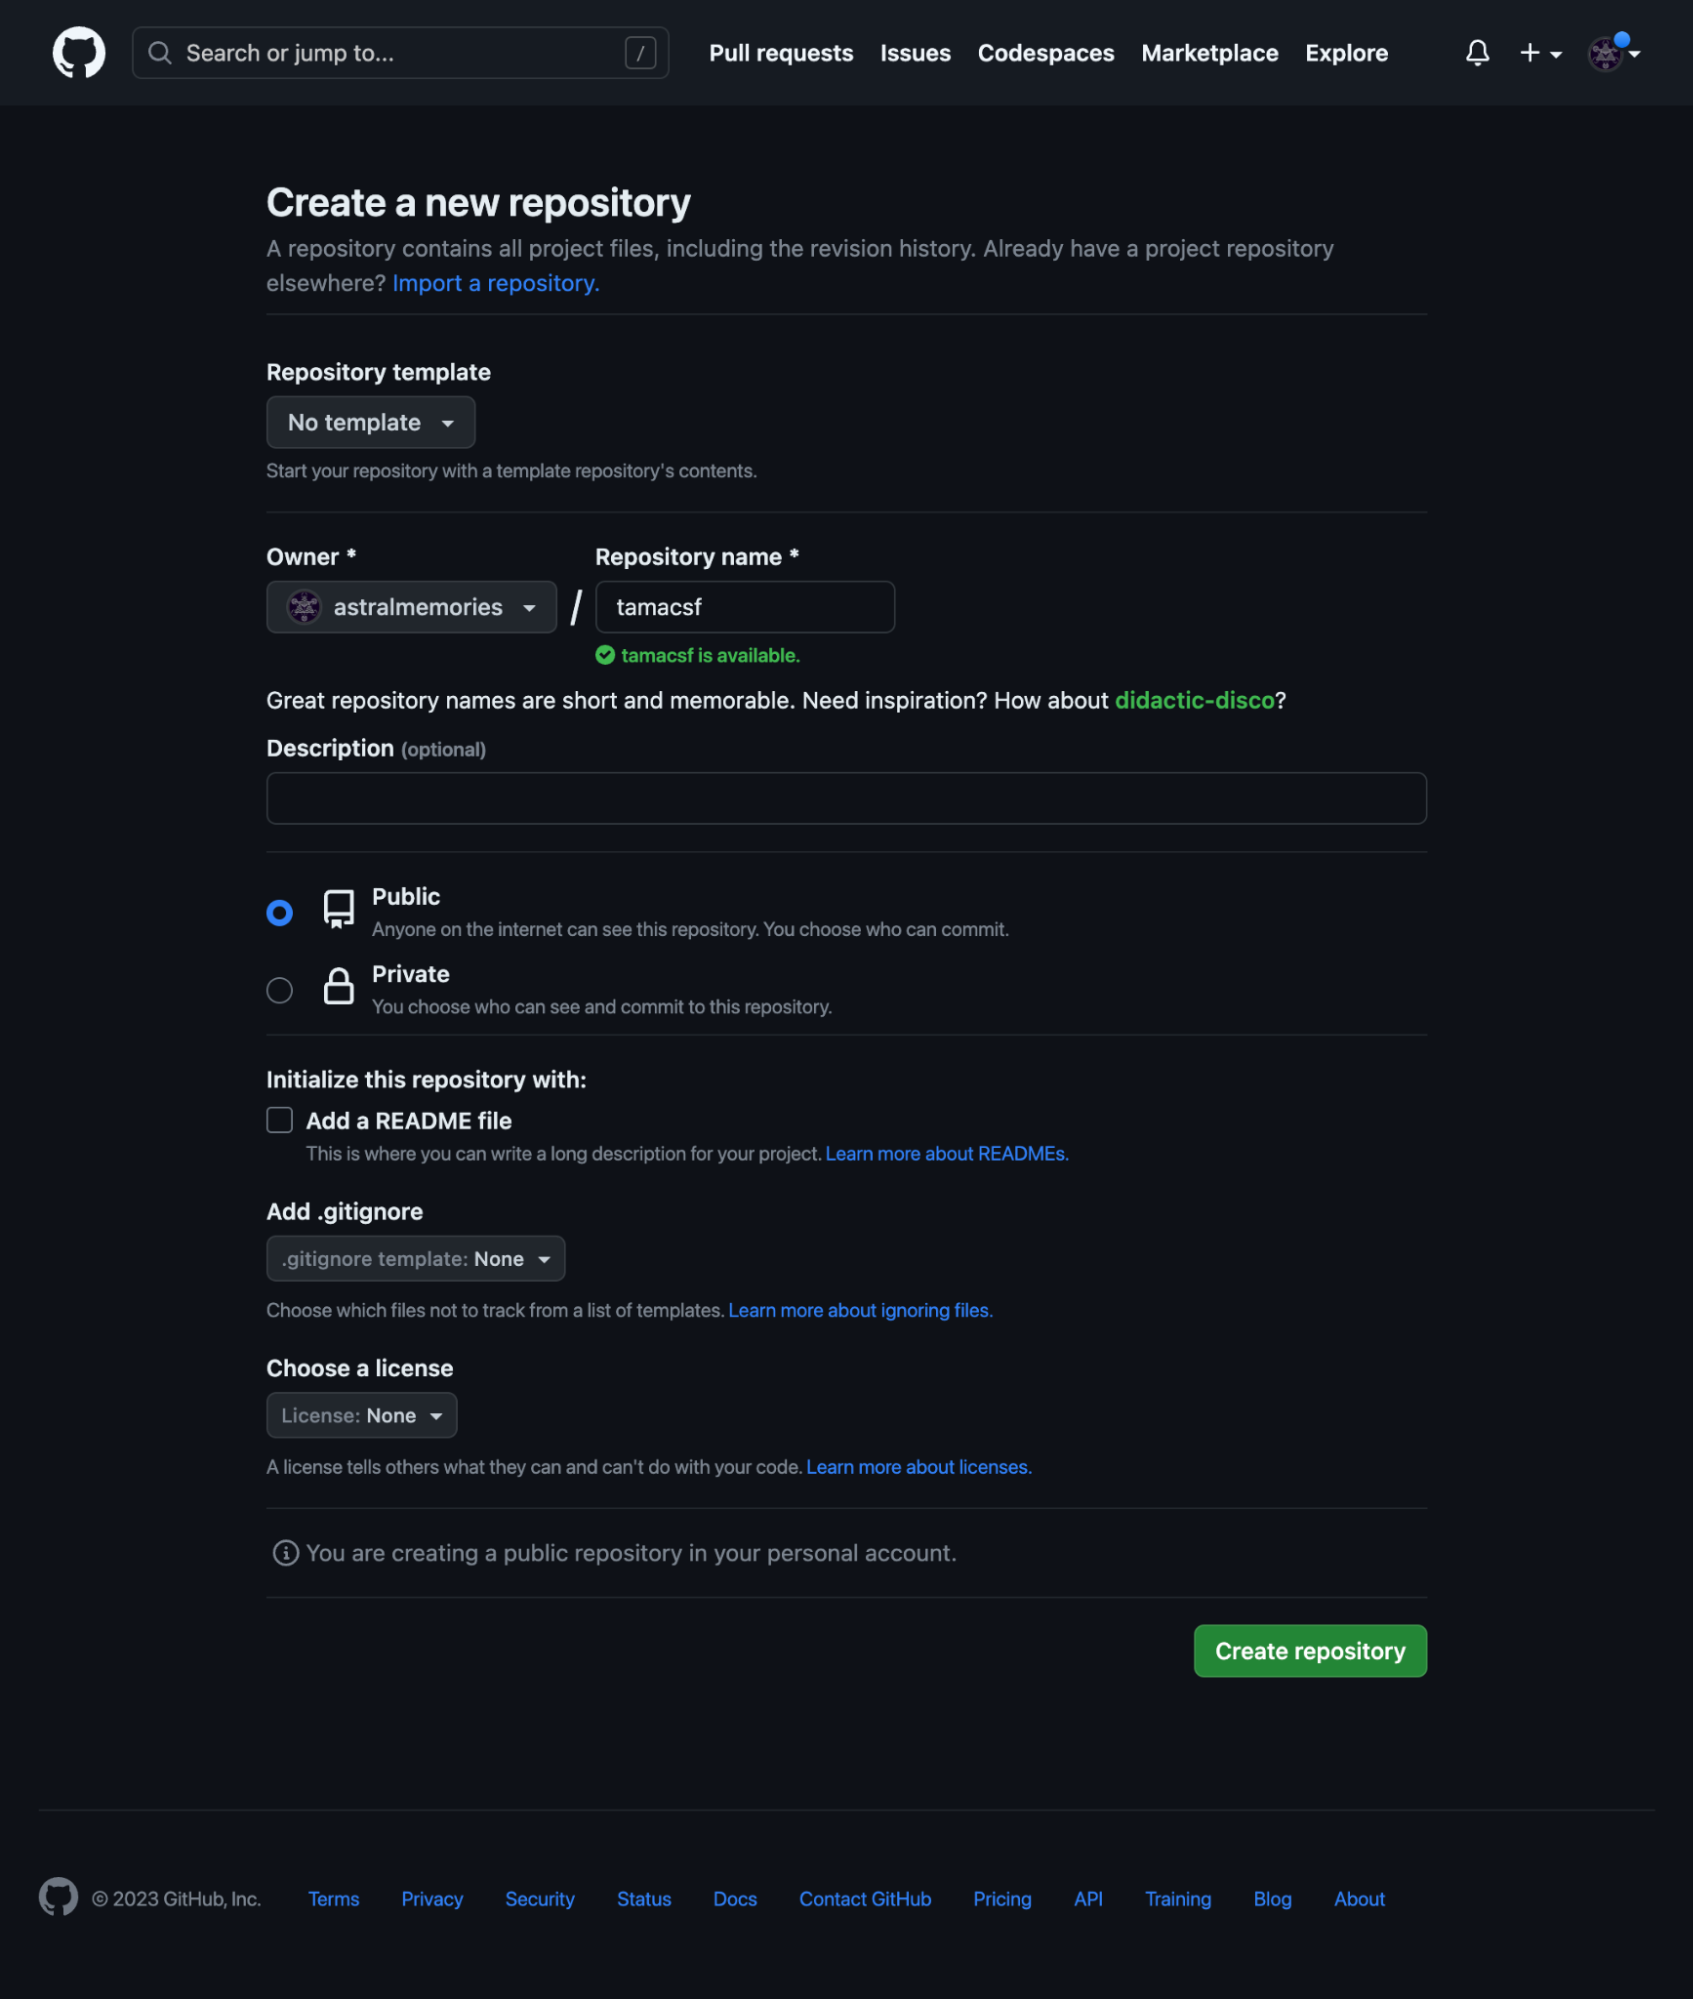
Click the “Create Repository” button.
Connecting Cloud IDE to GitHub, Bitbucket or any other code repository
Follow steps 1, 2, and 3 of the following Acquia Developer Portal article:
Connect Cloud IDE to a non-Acquia Git repository
https://dev.acquia.com/tutorial/connecting-cloud-ide-github-bitbucket-or-any-other-code-repository
Go back to your Cloud IDE instance and execute the following git commands to push your new codebase to your repository:git remote add origin https://github.com/astralmemories/tamacsf.git git branch -M main git push -u origin mainMake sure to replace https://github.com/astralmemories/tamacsf.git with your own remote repository URL.
Execute the following composer command to generate a new hash in your lock file so that your composer.json and composer.lock files are in sync:
composer update --lockDownload and extract the updated Acquia Cloud Site Factory Connector:
https://docs.acquia.com/site-factory/workflow/deployments/acsf-init/#executing-acsf-init-after-module-or-drupal-core-updatesblt recipes:acsf:init:drushPush your new codebase to your repository:
git add -A git commit -m "BLT-001: New D10 ACSF codebase with a custom profile." git push -
Deploy your codebase to Site Factory
Use the following BLT command to deploy your codebase to ACSF:
blt artifact:deployThis command gives you the ability to add a tag to your new codebase that will be available to choose from on any of your ACSF environments.
When prompted, press “y” to create a new tag:
Signorelli IDE:~/project (main) $ blt artifact:deploy
Would you like to create a tag? (y/n) y
Press Enter to use the same commit message:
 Enter a valid commit message [BLT-002: New codebase with social media icons and assets fix.] (Press ENTER)
Enter the tag name for the deployment artifact, e.g., 1.0.0-build 1.0.0-tamacsf
For the tag name of the deployment artifact I used: 1.0.0-tamacsf
-
Update the code in your Site Factory account
Go to the ACSF Console UI of one of your environments, for this tutorial, I will use the test environment.
Note: For this tutorial, I’m assuming that there are no installed sites in your ACSF environment. Use an ACSF environment that doesn’t have any Drupal sites, or delete all the sites from the ACSF environment that you want to use. Also, your ACSF environment should be configured to use PHP 8.1.
Navigate to Administration -> Update code:
Image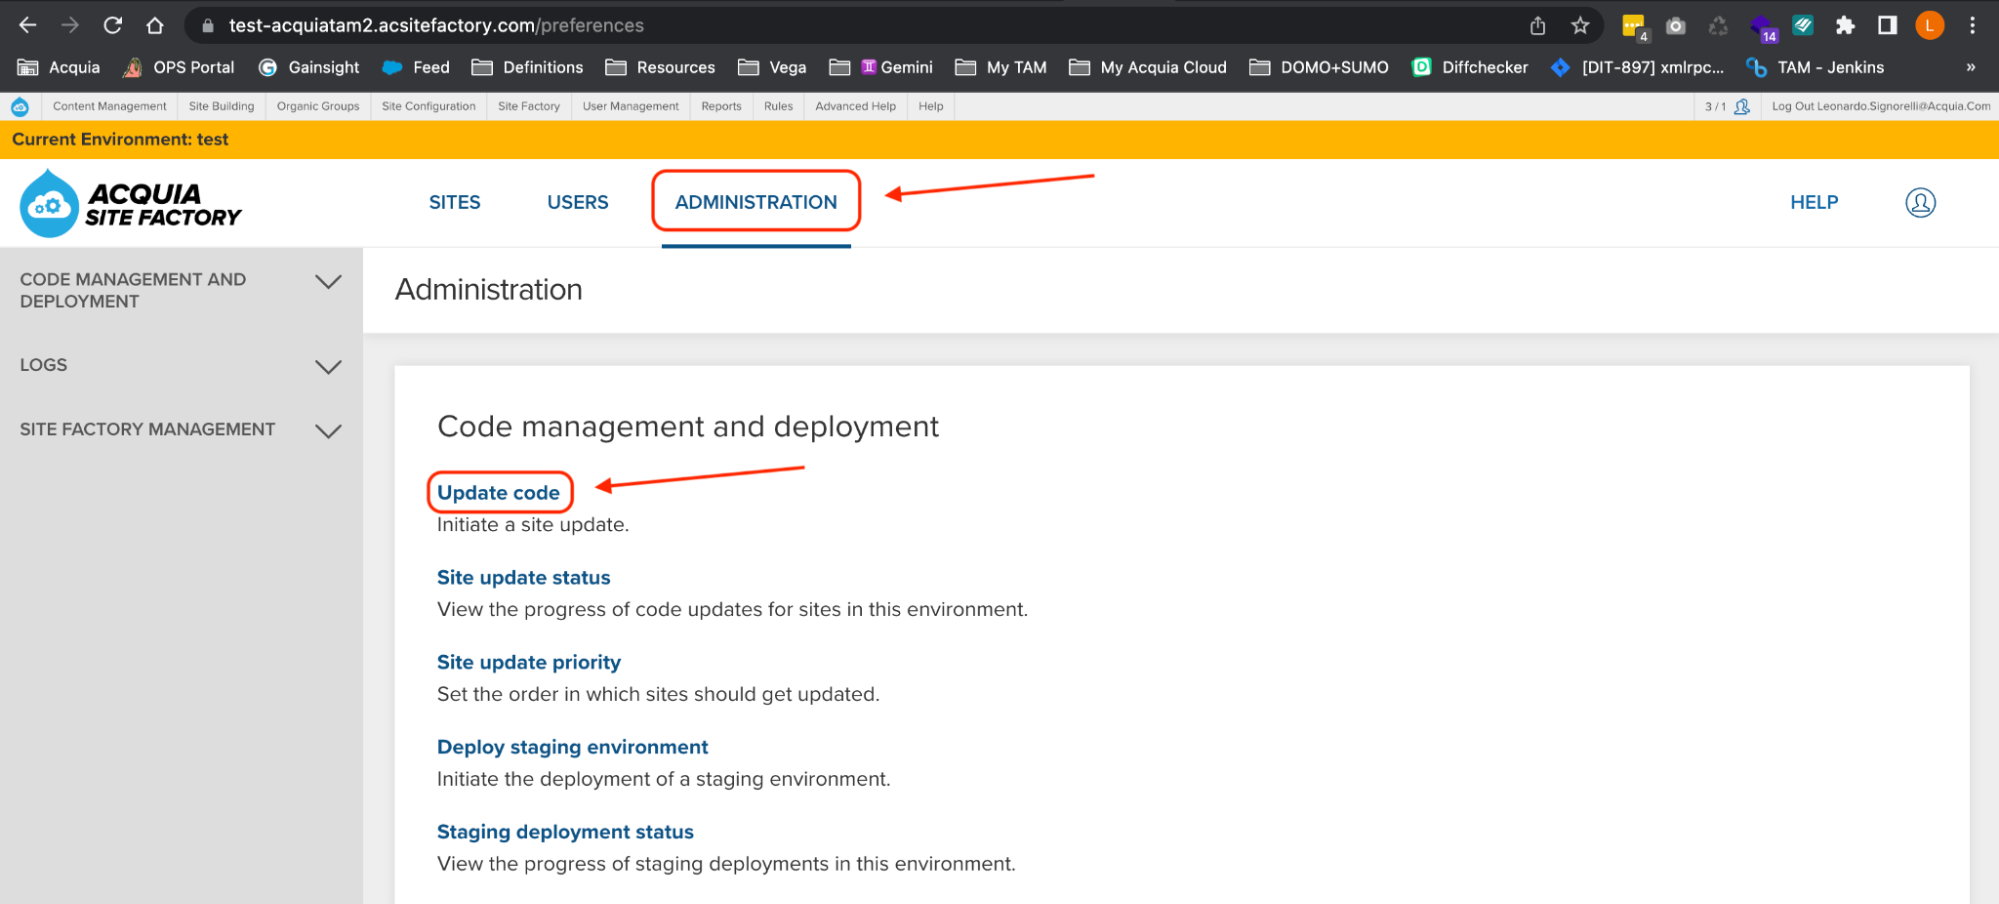
In the Site Update page, use the dropdown to select your new codebase (1.0.0-tamacsf):
Image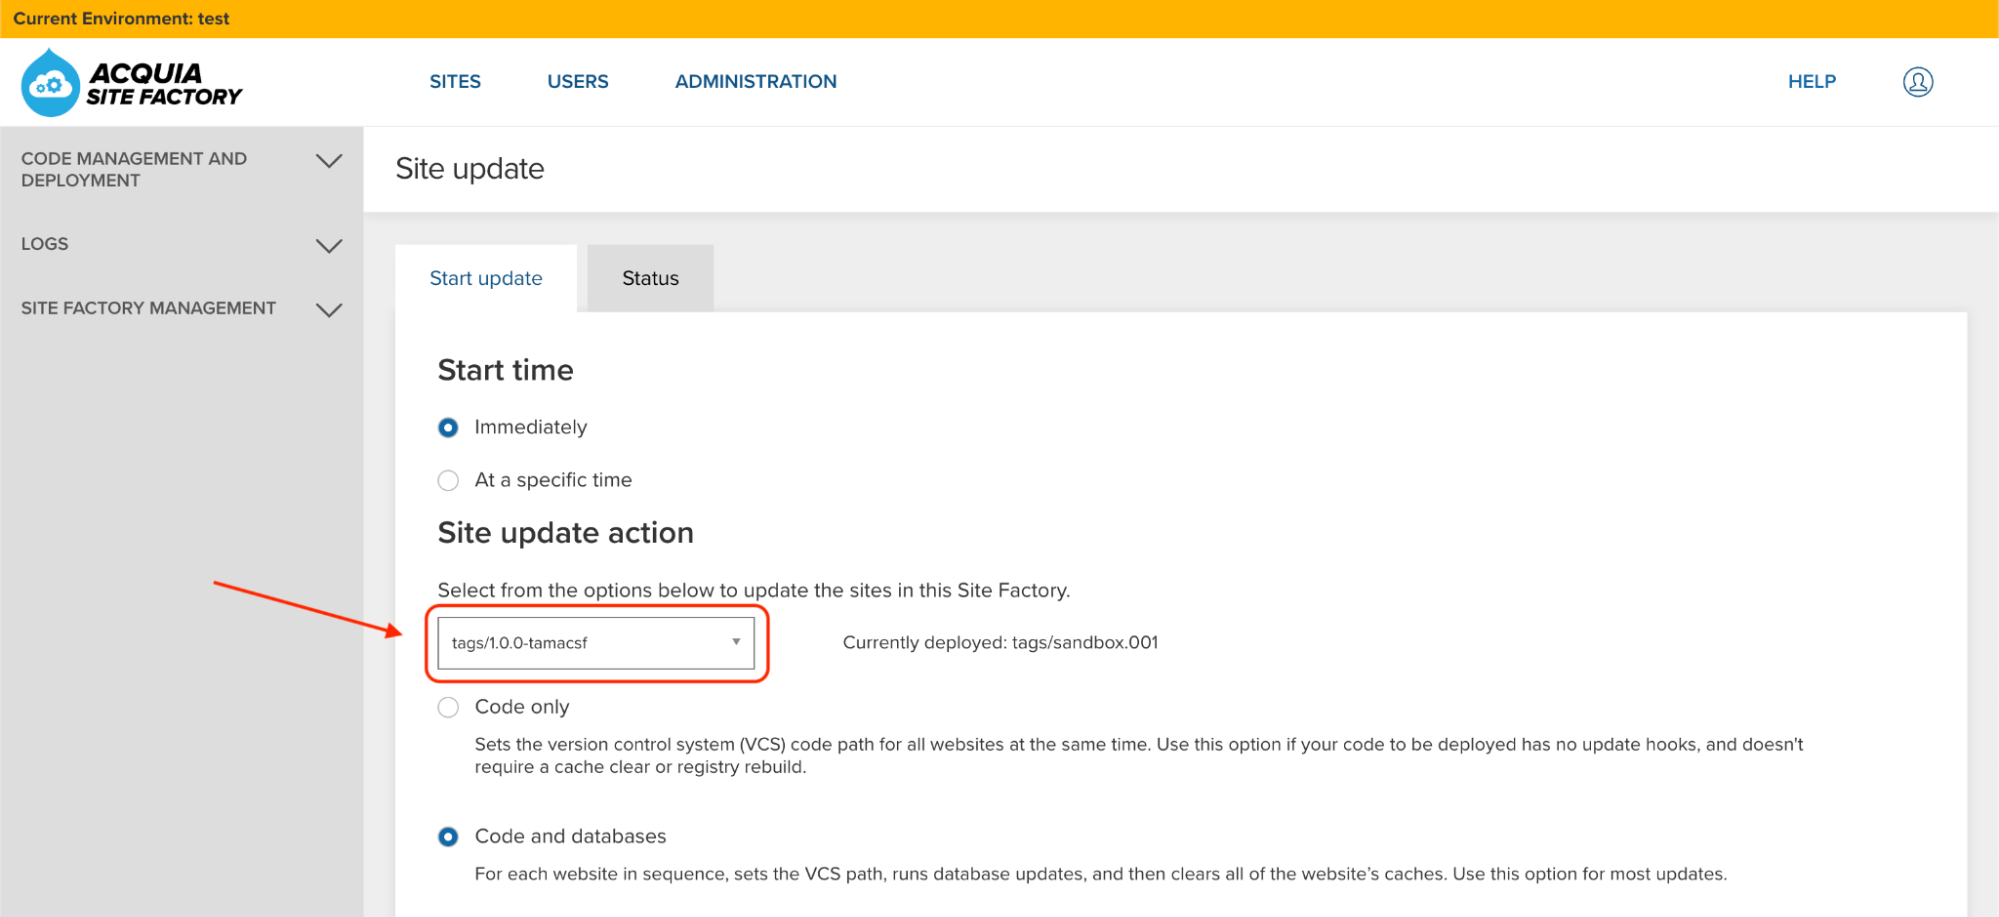
Click the Update button and wait until the update process finishes:
Image
-
Add the new profile to Site Factory
Navigate to Administration -> Installation profile management, enable the tamprofile profile and make it REST API Default:
Image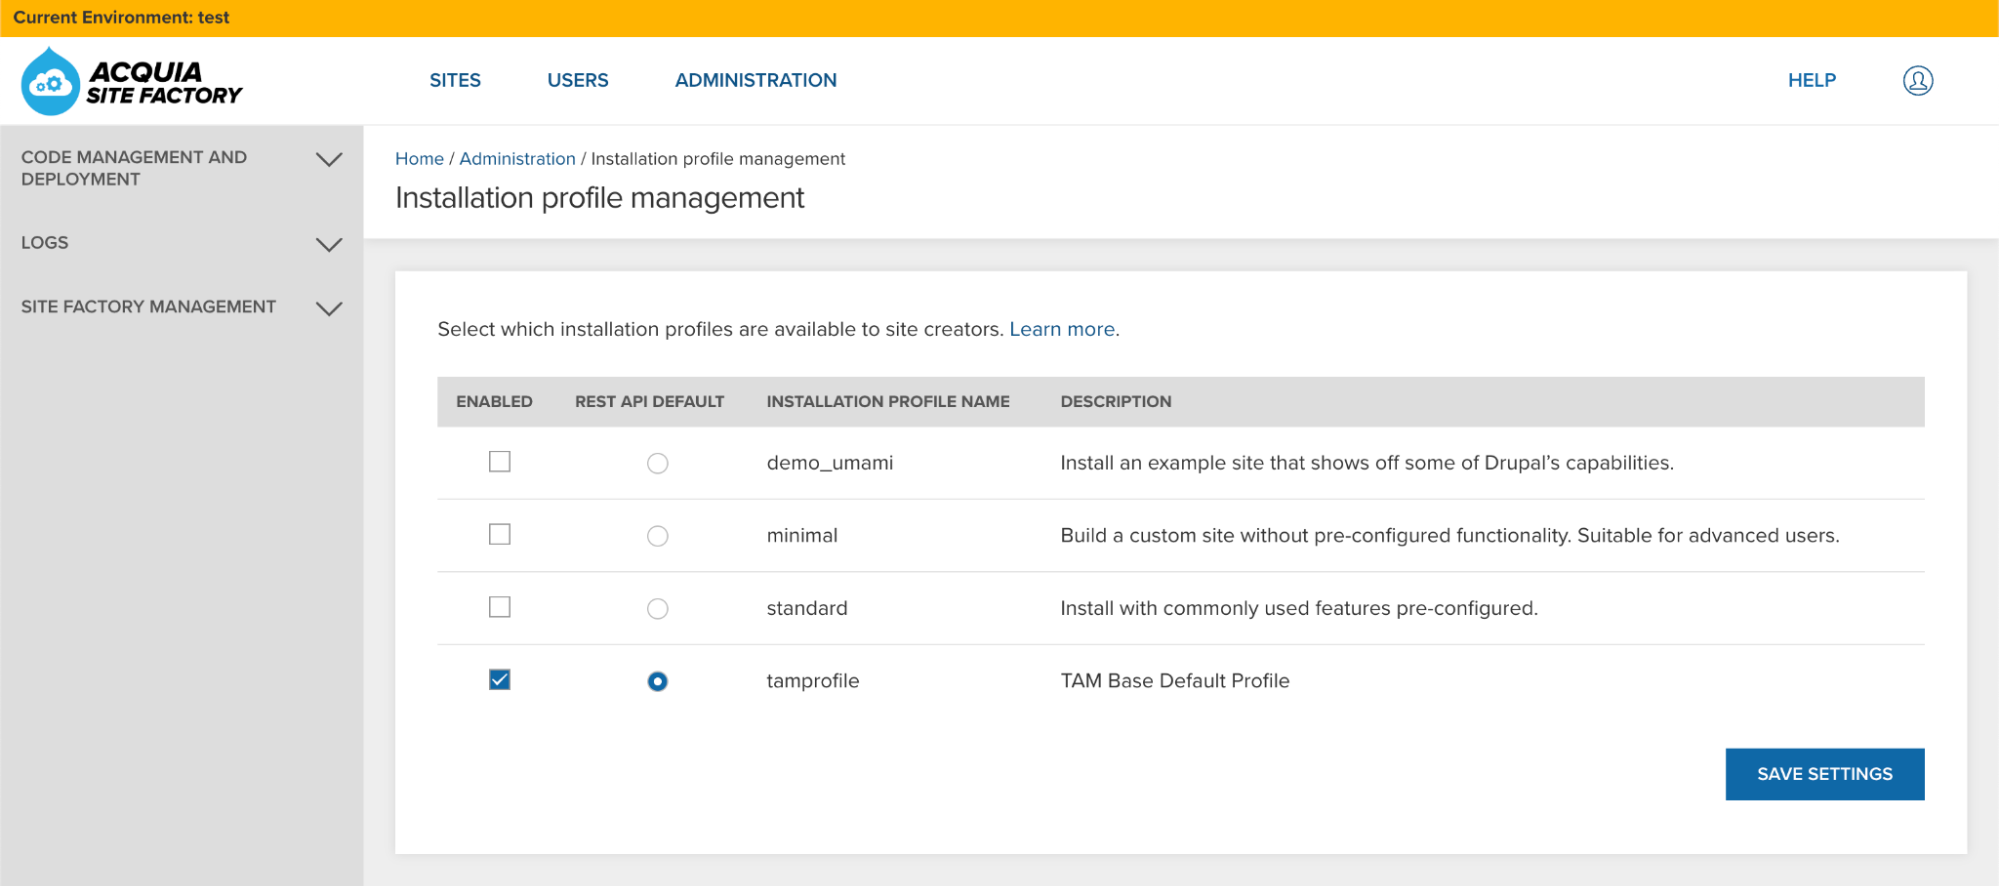
Click the “Save settings” button.
-
Create a new Site Group in your Site Factory account
Login to your Site Factory Console UI and click the “New Group” button:
Image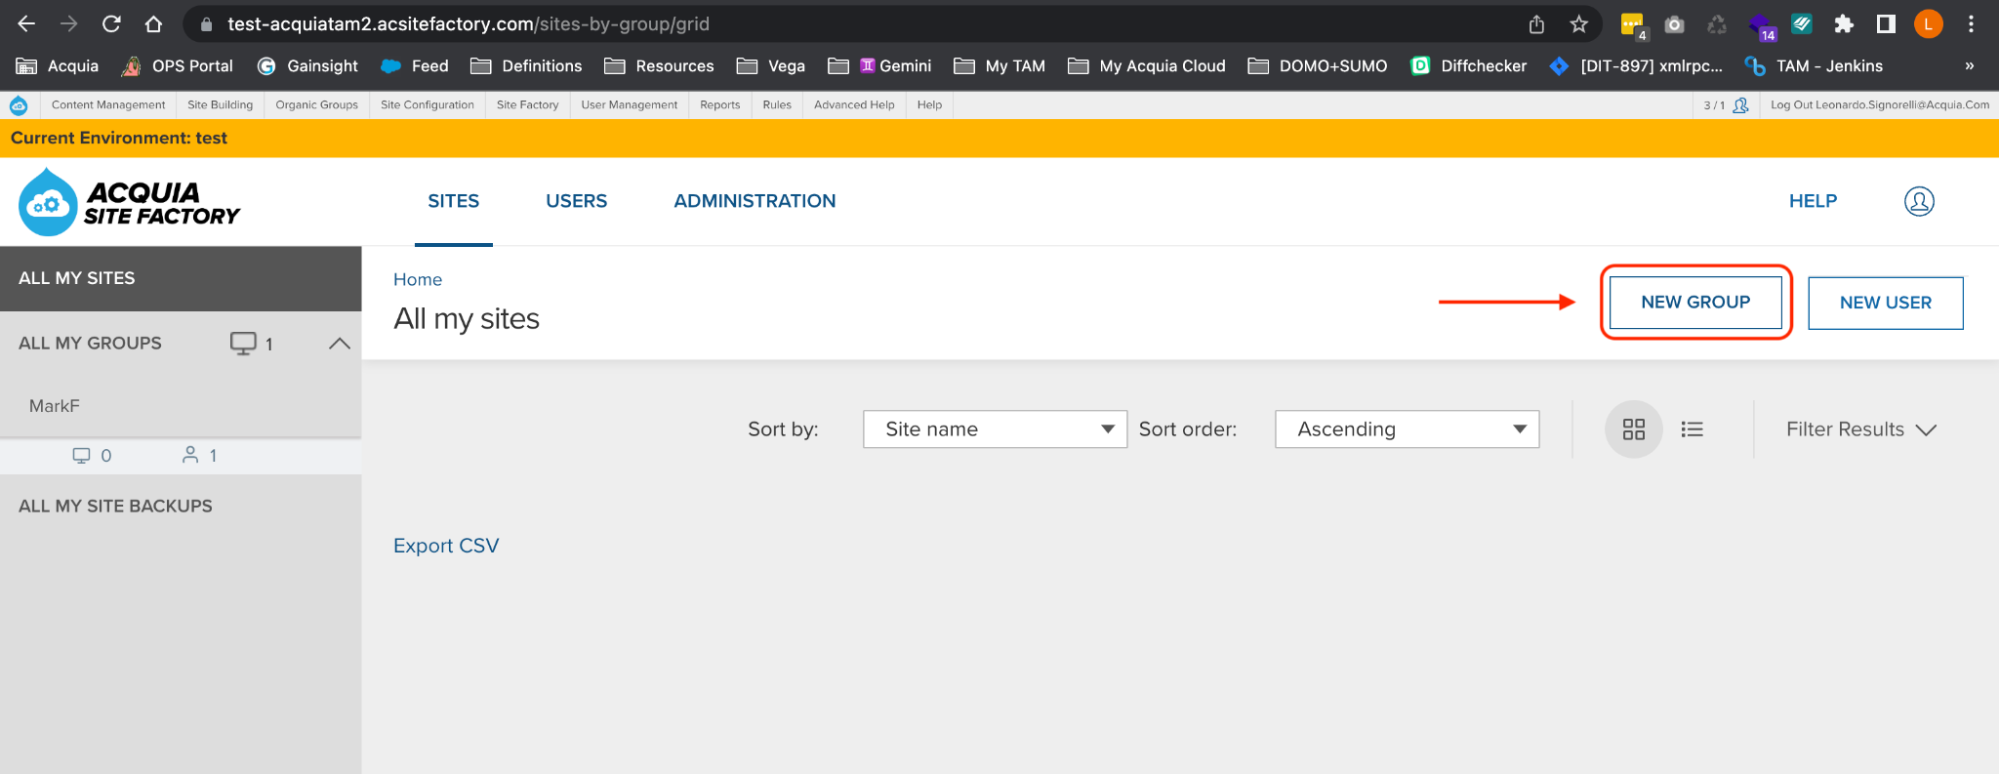
Assign a name to your new Site Group and save your changes:
Image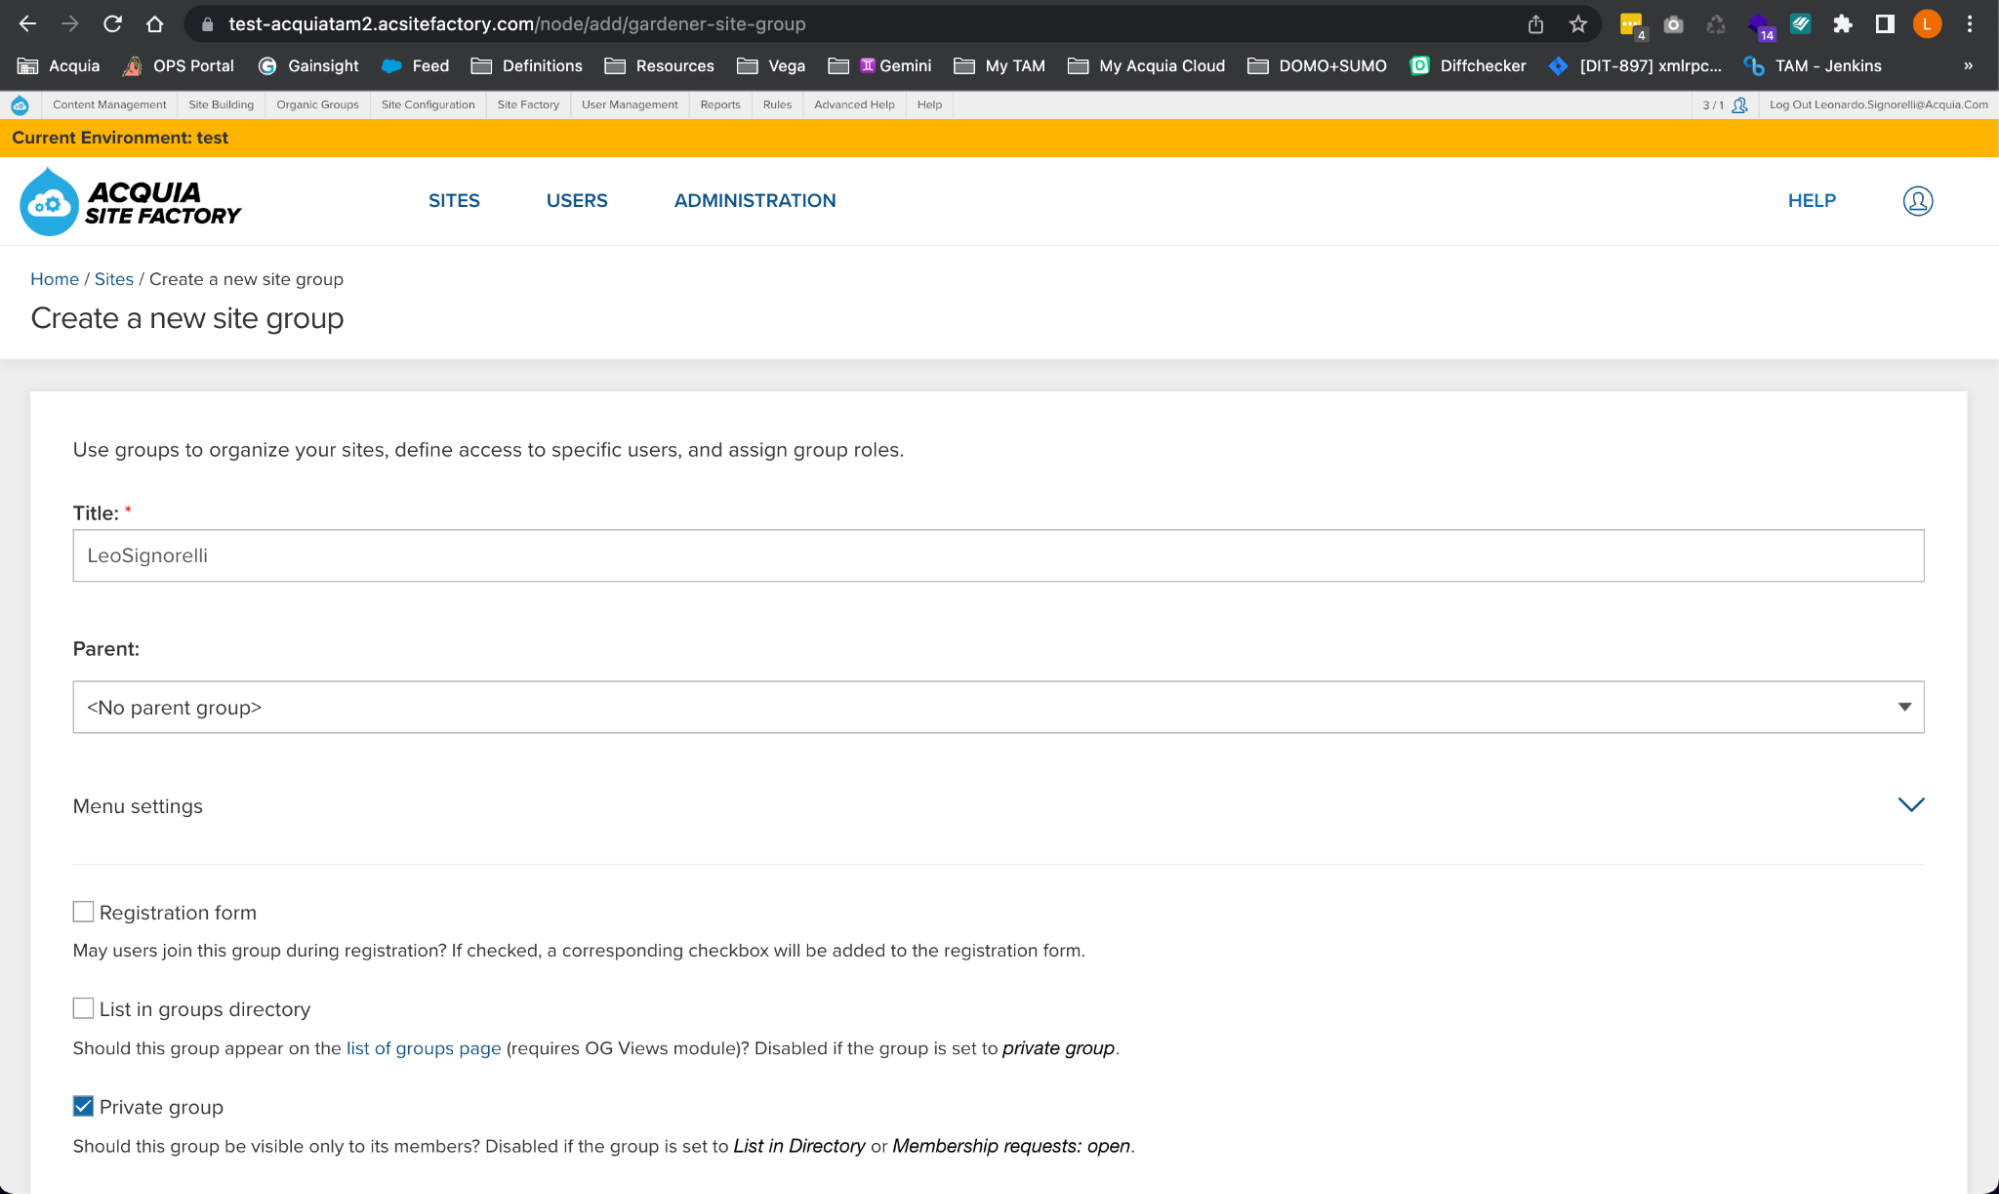 Image
Image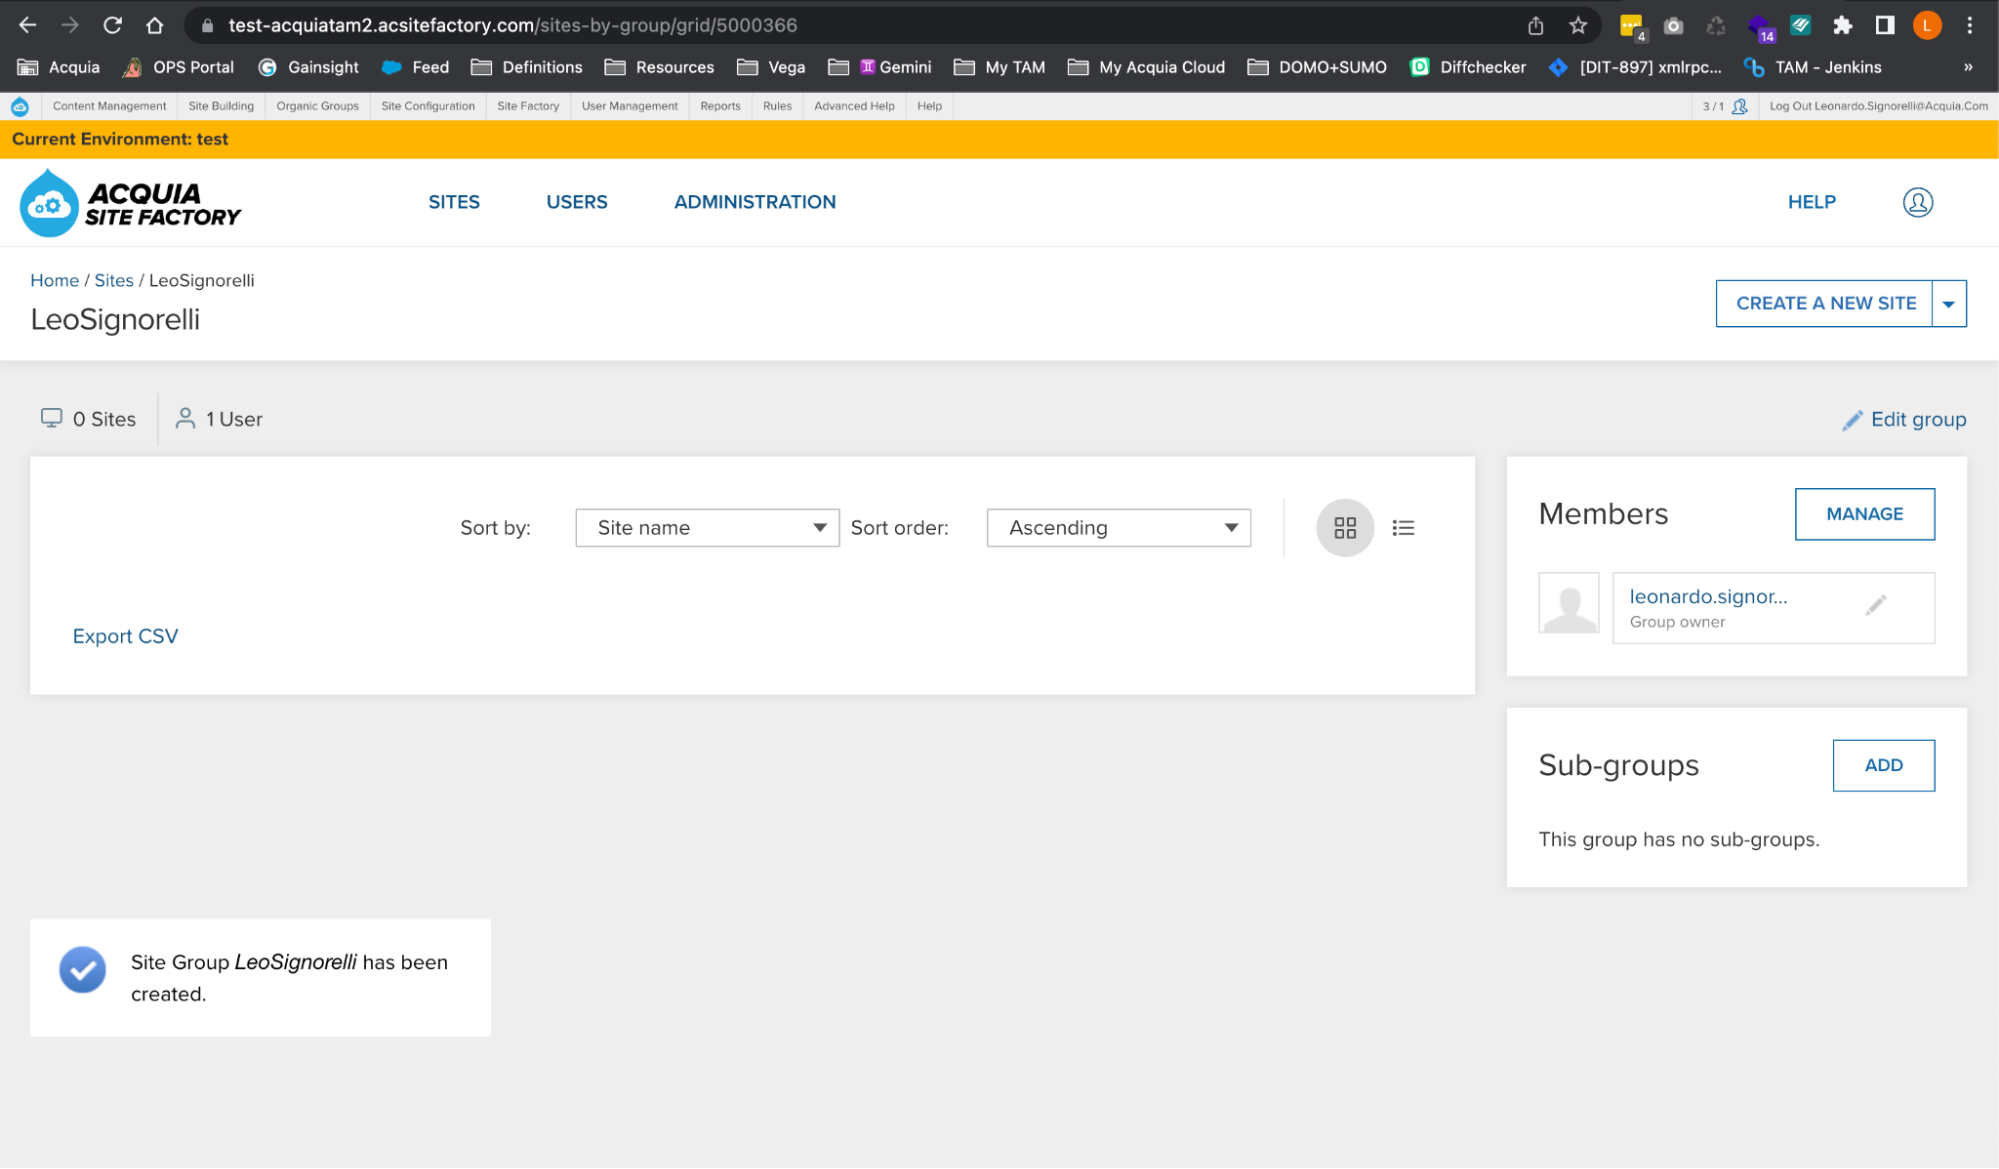
-
Create your first site in Site Factory
Now it’s time to create a new ACSF site using your new codebase. Go to Sites and select your group:
Image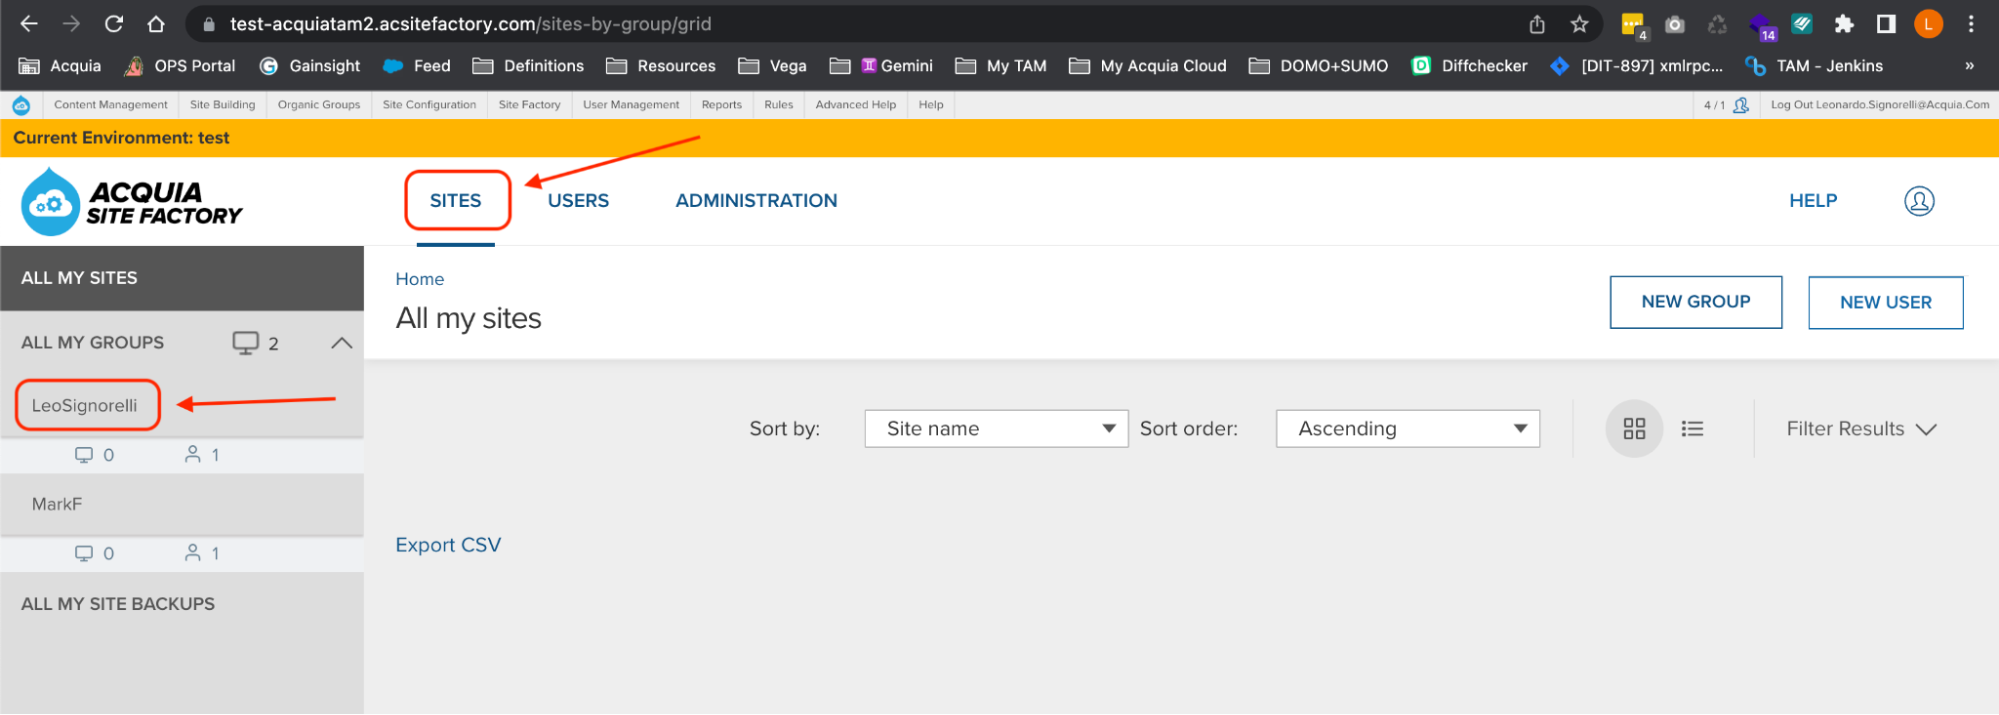
To begin creating a new site, click on the "Create a New Site" button. After doing so, you will be prompted to provide a name for your new site (e.g. site1). Once you have specified the name, click on the "Create Site" button to proceed:
Image Image
Image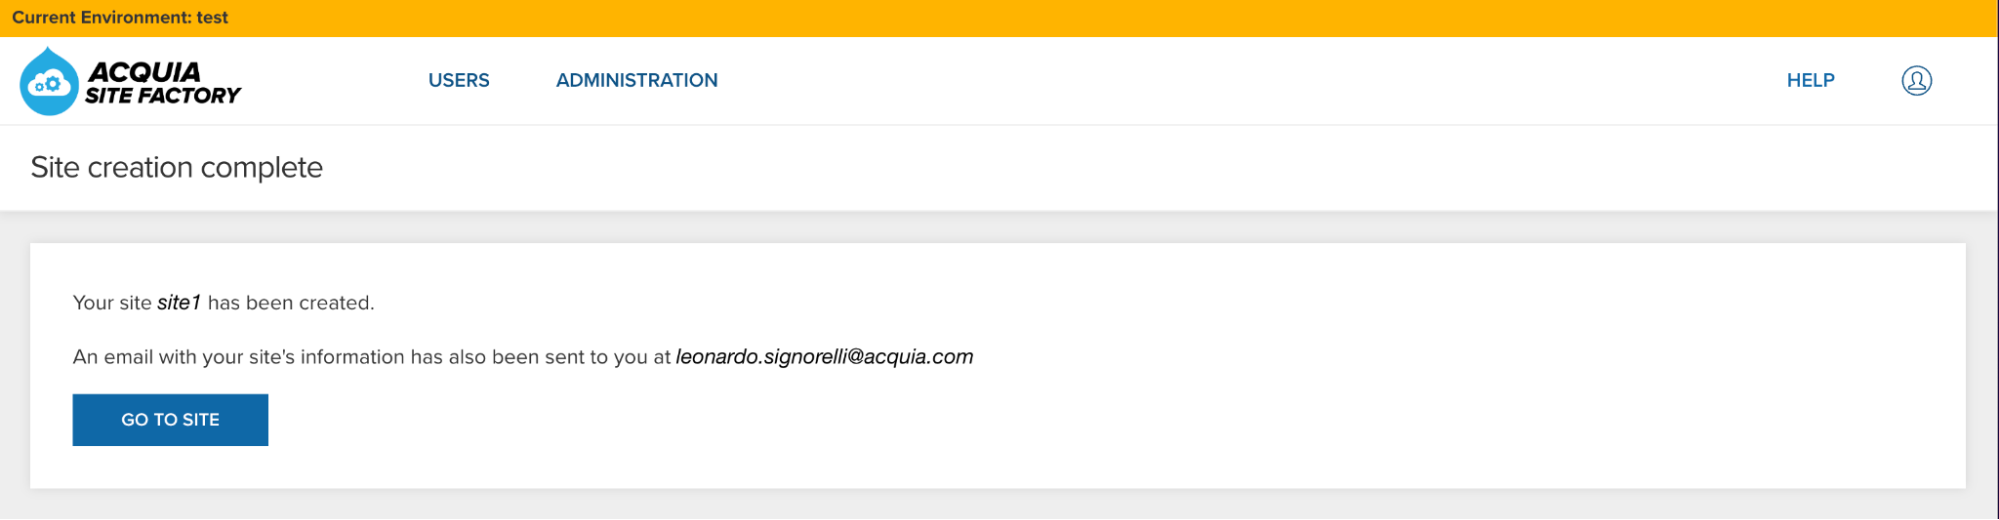
-
Add my custom Drush Alias Generator Bash Script
I wrote a bash script that simplifies the process of adding custom Drush aliases to your codebase. This will allow you to run Drush commands against your ACSF sites from your Cloud IDE instance with ease.
Inside the project folder, next to the blt, config, and docroot folders, create the following new folders:
cd /home/ide/project
mkdir drush
mkdir drush/sites
Using nano or vim, create a new bash script named aliasgenerator.sh:
nano aliasgenerator.shCopy the content of my aliasgenerator.sh bash script below and follow the provided instructions to configure this script for use with your ACSF account:
#!/bin/bash
# Author: Leonardo Signorelli
# Emails: [email protected], [email protected]
# Websites: astralmemories.com, freewebtools.net, codesnippets.freewebtools.net

# The Unlicense
# -------------
# This is free and unencumbered software released into the public domain.
# Anyone is free to copy, modify, publish, use, compile, sell, or
# distribute this software, either in source code form or as a compiled
# binary, for any purpose, commercial or non-commercial, and by any
# means.
# In jurisdictions that recognize copyright laws, the author or authors
# of this software dedicate any and all copyright interest in the
# software to the public domain. We make this dedication for the benefit
# of the public at large and to the detriment of our heirs and
# successors. We intend this dedication to be an overt act of
# relinquishment in perpetuity of all present and future rights to this
# software under copyright law.
# THE SOFTWARE IS PROVIDED "AS IS", WITHOUT WARRANTY OF ANY KIND,
# EXPRESS OR IMPLIED, INCLUDING BUT NOT LIMITED TO THE WARRANTIES OF
# MERCHANTABILITY, FITNESS FOR A PARTICULAR PURPOSE AND NONINFRINGEMENT.
# IN NO EVENT SHALL THE AUTHORS BE LIABLE FOR ANY CLAIM, DAMAGES OR
# OTHER LIABILITY, WHETHER IN AN ACTION OF CONTRACT, TORT OR OTHERWISE,
# ARISING FROM, OUT OF OR IN CONNECTION WITH THE SOFTWARE OR THE USE OR
# OTHER DEALINGS IN THE SOFTWARE.
# For more information, please refer to <http://unlicense.org/>

# Instructions
# ------------
# 1 - Add/Copy this bash script to the root of your ACSF codebase folder (Next to the config, and docroot folders).
# 2 - Add your ACSF Application name to the acsf_app_name variable:
acsf_app_name="acquiatam2"
# 3 - Make this bash script executable with the following command:
#     chmod +x aliasgenerator.sh
# 4 - Execute this script with the following command:
#     ./aliasgenerator.sh
# 5 - Create a new Drush alias for an existing ACSF site and exit the script.
# 6 - Now you should be able to execute drush commands against the selected ACSF site with the following structure:
#     drush @sitename.environment drush_command
# Example:
#     drush @yoursite.01live status

# Functions
create_new_site_alias () {
   echo "Make sure to enter the name of a site you already created in your ACSF account."
   echo "Example: If the ACSF URL assigned to your new site is site1.${acsf_app_name}.acsitefactory.com"
   echo "Enter site1"
   echo " "
   confirmation="novalue"
   while [ $confirmation != "y" ]
   do
       echo -e "Provide the name of the site you want to create a Drush alias: \c "
       read site_name
       echo " "
       echo -e "Is this site name correct?: \"$site_name\" (Yes/No/Cancel = y/n/c)"
       read confirmation
       if [ $confirmation == "c" ]; then
           # Exit the While loop
           break
       fi
   done
   if [ $confirmation == "c" ]; then
       echo " "
       echo "Cancel! Going back to the Main Menu..."
       echo " "
       # Cancel this function and go back to the Main Menu
       return
   fi
   # Generate the drush alias for this new site...
   echo " "
   echo "Generating the drush alias for $site_name.."
   # Go to  the sites folder inside the drush folder
   cd drush/sites/
   # Create a new yml file for this site
   echo "01dev:" > $site_name.site.yml
   echo "    uri: $site_name.dev-$acsf_app_name.acsitefactory.com" >> $site_name.site.yml
   echo "    host: ${acsf_app_name}01dev.ssh.enterprise-g1.acquia-sites.com" >> $site_name.site.yml
   echo "    options: {  }" >> $site_name.site.yml
   echo "    paths: { dump-dir: /mnt/tmp }" >> $site_name.site.yml
   echo "    root: /var/www/html/$acsf_app_name.01dev/docroot" >> $site_name.site.yml
   echo "    user: $acsf_app_name.01dev" >> $site_name.site.yml
   echo "    ssh: { options: '-p 22' }" >> $site_name.site.yml
   echo "01live:" >> $site_name.site.yml
   echo "    uri: $site_name.$acsf_app_name.acsitefactory.com" >> $site_name.site.yml
   echo "    host: ${acsf_app_name}01live.ssh.enterprise-g1.acquia-sites.com" >> $site_name.site.yml
   echo "    options: {  }" >> $site_name.site.yml
   echo "    paths: { dump-dir: /mnt/tmp }" >> $site_name.site.yml
   echo "    root: /var/www/html/$acsf_app_name.01live/docroot" >> $site_name.site.yml
   echo "    user: $acsf_app_name.01live" >> $site_name.site.yml
   echo "    ssh: { options: '-p 22' }" >> $site_name.site.yml
   echo "01test:" >> $site_name.site.yml
   echo "    uri: $site_name.test-$acsf_app_name.acsitefactory.com" >> $site_name.site.yml
   echo "    host: ${acsf_app_name}01test.ssh.enterprise-g1.acquia-sites.com" >> $site_name.site.yml
   echo "    options: {  }" >> $site_name.site.yml
   echo "    paths: { dump-dir: /mnt/tmp }" >> $site_name.site.yml
   echo "    root: /var/www/html/$acsf_app_name.01test/docroot" >> $site_name.site.yml
   echo "    user: $acsf_app_name.01test" >> $site_name.site.yml
   echo "    ssh: { options: '-p 22' }" >> $site_name.site.yml
   # Go back
   cd ../../
   echo " "
   echo "Ready! Going back to the Main Menu..."
   echo " "
}
# Splash screen
echo " "
echo " "
echo "              <------->"
echo "          <--------------->"
echo " <--------------------------------->"
echo " |       Drush Alias Generator     |"
echo " <--------------------------------->"
echo "          <--------------->"
echo "              <------->"
# Main Menu
selection="novalue"
while [ $selection != "2" ]
do
   echo " "
   echo "       |---------------------|"
   echo "       |      Main Menu      |"
   echo "       |---------------------|"
   echo "       | 1 - New Drush Alias |"
   echo "       | 2 - Exit            |"
   echo "       |---------------------|"
   echo " "
   echo -e "Select a number from the Main Menu: \c "
   read selection
   case "$selection" in
       1)  echo " "
           echo "Selected: New Drush Alias"
           echo "-------------------------"
           echo " "
           # Call the function
           create_new_site_alias
          ;;
       2)  echo " "
           echo "Selected: Exit"
           echo "--------------"
          ;;
       *)  echo " "
           echo "Wrong Selection! Please try again..."
           echo " "
          ;;
   esac
done
echo " "
echo "Exiting this script..."
echo " "
Save your changes.
Make this bash script executable with the following command:
chmod +x aliasgenerator.sh -
Login to your new Site Factory site
In your Cloud IDE instance, create a new Drush alias for your new ACSF site using the aliasgenerator.sh bash script. Execute the aliasgenerator.sh bash script with the following command and follow the instructions:
./aliasgenerator.shSignorelli IDE:~/project (main) $ ./aliasgenerator.sh <-------> <---------------> <---------------------------------> | Drush Alias Generator | <---------------------------------> <---------------> <-------> |---------------------| | Main Menu | |---------------------| | 1 - New Drush Alias | | 2 - Exit | |---------------------| Select a number from the Main Menu: 1 Selected: New Drush Alias ------------------------- Make sure to enter the name of a site you already created in your ACSF account. Example: If the ACSF URL assigned to your new site is site1.acquiatam2.acsitefactory.com Enter site1 Provide the name of the site you want to create a Drush alias: site1 Is this site name correct?: "site1" (Yes/No/Cancel = y/n/c) y Generating the drush alias for site1.. Ready! Going back to the Main Menu... |---------------------| | Main Menu | |---------------------| | 1 - New Drush Alias | | 2 - Exit | |---------------------| Select a number from the Main Menu: 2 Selected: Exit -------------- Exiting this script... Signorelli IDE:~/project (main) $Now from your Cloud IDE instance you can execute drush commands against your ACSF sites following this structure:
drush @SITE_NAME.ENVIRONMENT statusBecause we created site1 in the test environment, the drush commands should look like this:
drush @site1.01test statusSignorelli IDE:~/project (main) $ drush @site1.01test status Drupal version : 10.1.5 Site URI : http://site1.test-acquiatam2.acsitefactory.com DB driver : mysql DB hostname : staging-4341 DB port : 3306 DB username : iYJGGhx9iD2MeGZI DB name : acquiatamdb1317473 Database : Connected Drupal bootstrap : Successful Default theme : cohesion_theme Admin theme : acquia_claro PHP binary : /usr/local/php8.1/bin/php PHP config : /usr/local/php8.1/etc/cli/php.ini PHP OS : Linux PHP version : 8.1.16 Drush script : /mnt/www/html/acquiatam201test/vendor/bin/drush Drush version : 11.6.0 Drush temp : /mnt/tmp/acquiatam201test Drush configs : /etc/drush/drush.yml /mnt/www/html/acquiatam201test/vendor/drush/drush/drush.yml Install profile : tamprofile Drupal root : /mnt/www/html/acquiatam201test/docroot Site path : sites/g/files/utfjsx5000476test Files, Public : sites/g/files/utfjsx5000476test/files Files, Private : /mnt/files/acquiatam2.01test/sites/g/files-private/utfjsx5000476test Files, Temp : /mnt/tmp/acquiatam201test Connection to acquiatam201test.ssh.enterprise-g1.acquia-sites.com closed. Signorelli IDE:~/project (main) $In your Acquia Cloud Site Factory Console, go to the Sites tab and click the down arrow next to the “Log In” button of your new site. Then click the “Clear Caches” button to clear the varnish cache of your new site:
Image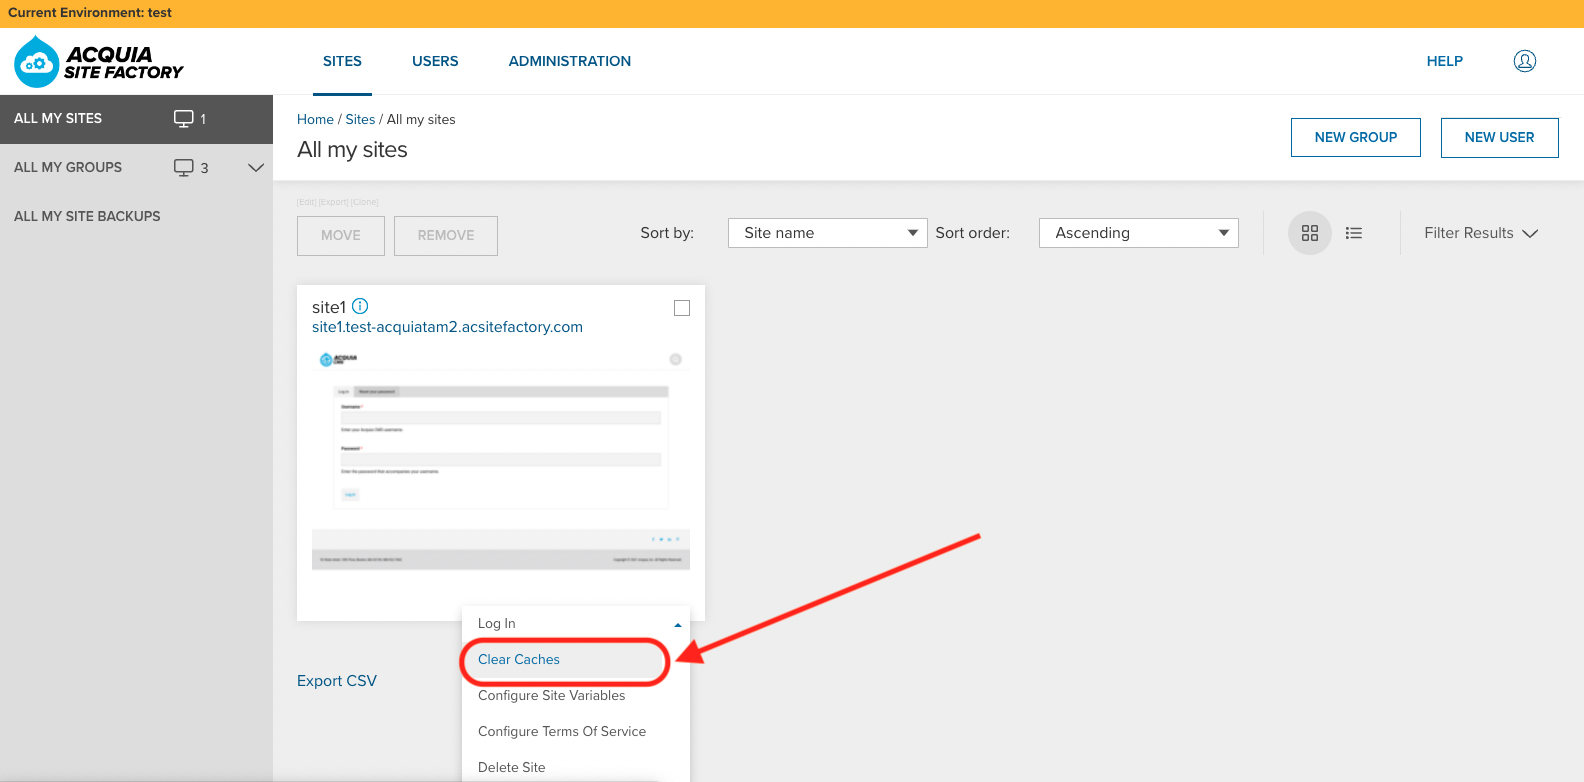
Clear the Drupal cache of your new site using “drush cr”:
drush @site1.01test crAccess your new ACSF site using drush uli:
drush @site1.01test uliImage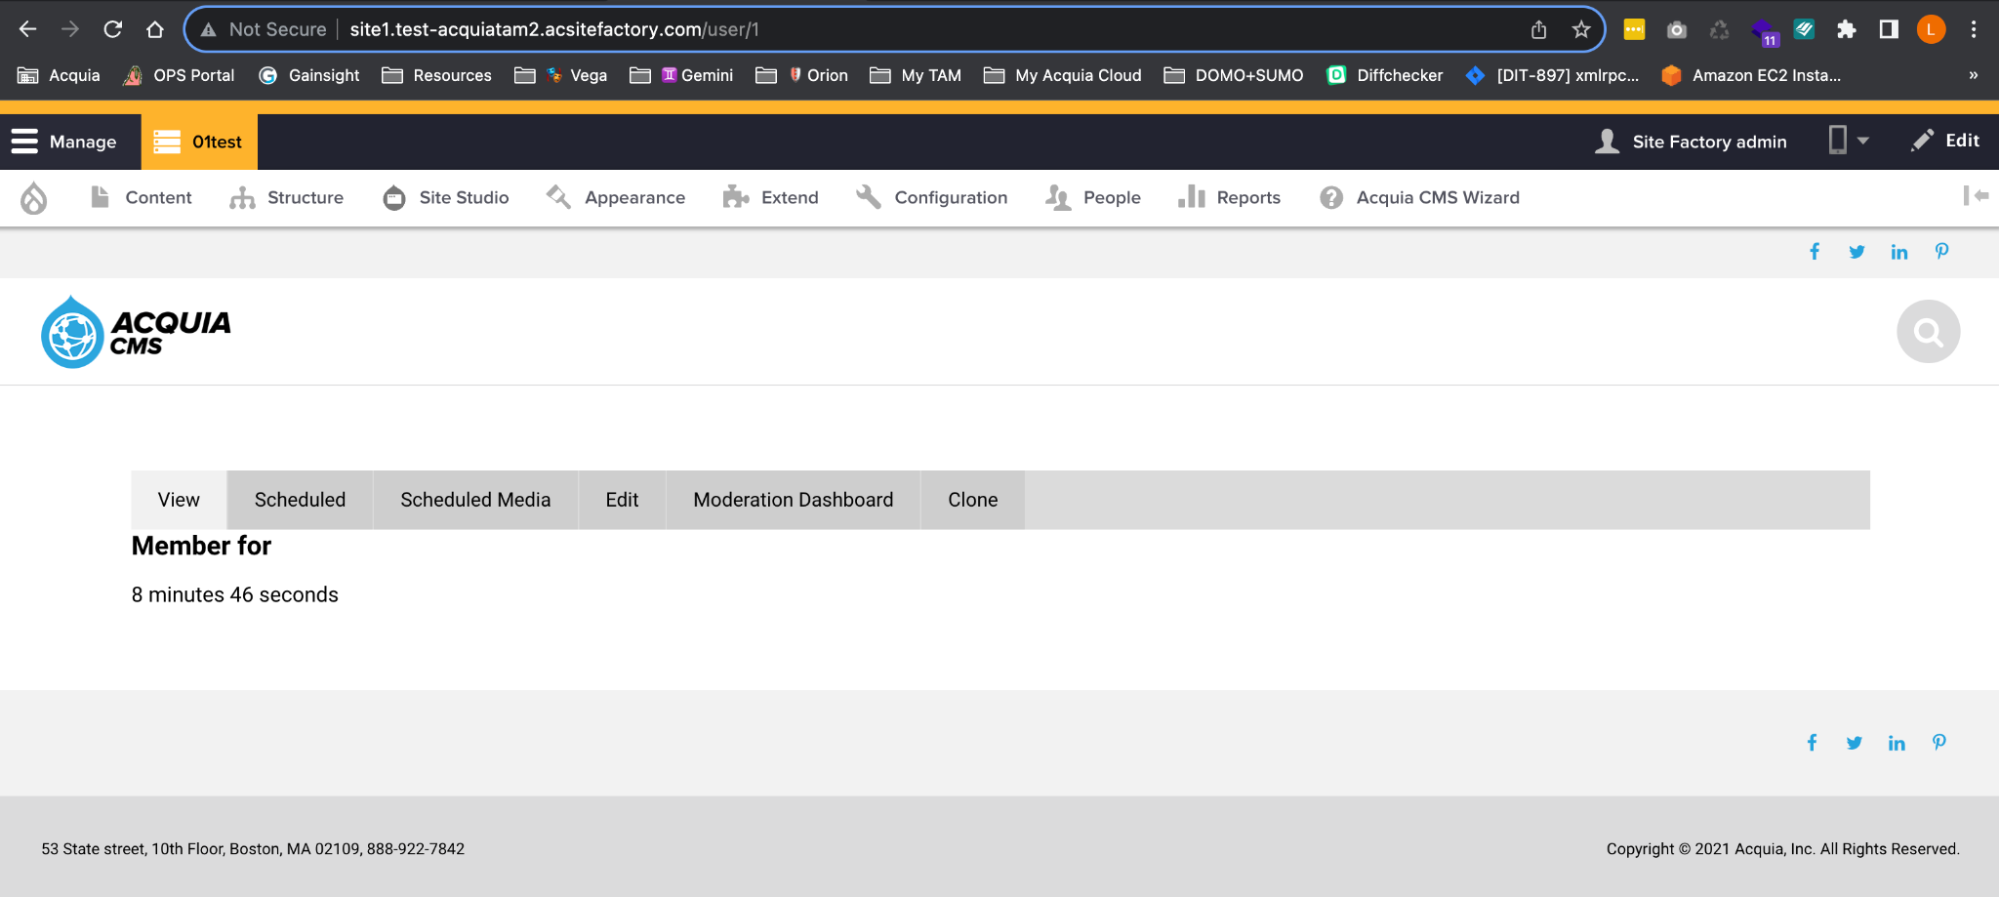
Congratulations on successfully completing the third phase of the five-step guide! You have accomplished the task of creating and configuring a new custom Drupal installation profile, ensuring its compatibility with Site Factory. Now, let us proceed to the next phase where you will learn how to deploy your codebase and create your first ACSF site using your custom profile.
Next phase: ACSF Deployment Workflow with Site Studio


