Contributing to Drupal CMS
- Last updated
- 2 minute read
Goal
This document explain the steps to setup Drupal CMS site in local & make contributions.
Prerequisites
- PHP 8.1 or later installed ( php --version )
- MySQL 5.7 or above ( mysql --version )
- Composer 2 or later ( composer --version )
- Git for local development
- You must have a github account.
Overview
The acquia_cms repo is a mono repository where we've kept all of our acquia_cms module's codebase in one super repository (instead of managing each smaller repositories). This makes it easy for developers to make any contributions as they can make changes to multiple modules at once and thus creating only one PR for a new feature (or bug), module updates, security release etc.
After code is merged, the Github Actions CI automatically push back changes to individual module's repository (hosted on drupal.org) to make the module's code in sync with that in acquia_cms.
Following is the directory structure:
.
|── composer.json
|── composer.lock
|── vendor
|── modules
   ├── acquia_cms_article
   ├── acquia_cms_audio
   ├── acquia_cms_common
   ├── acquia_cms_component
   ├── acquia_cms_document
   ├── acquia_cms_event
   ├── acquia_cms_headless
   ├── acquia_cms_image
   ├── acquia_cms_page
   ├── acquia_cms_person
   ├── acquia_cms_place
   ├── acquia_cms_search
   ├── acquia_cms_site_studio
   ├── acquia_cms_starter
   ├── acquia_cms_toolbar
   ├── acquia_cms_tour
   ├── acquia_cms_video
The root composer.json doesn't requires any acquia_cms modules nor any other contributed modules. To download all additional contributed modules/libraries/themes that each acquia_cms module provides, we've used the Composer Merge Plugin.
When composer command is run, it will parse each module's composer.json file and will merge them together on the fly with root composer.json. This combined composer.json will then be used to download additional modules/themes/libraries and thus generating the autoloader & updating the composer.lock file.
The acquia_cms distribution is deprecated and it should be used only for the local development and making contributions for the Acquia CMS modules.
-
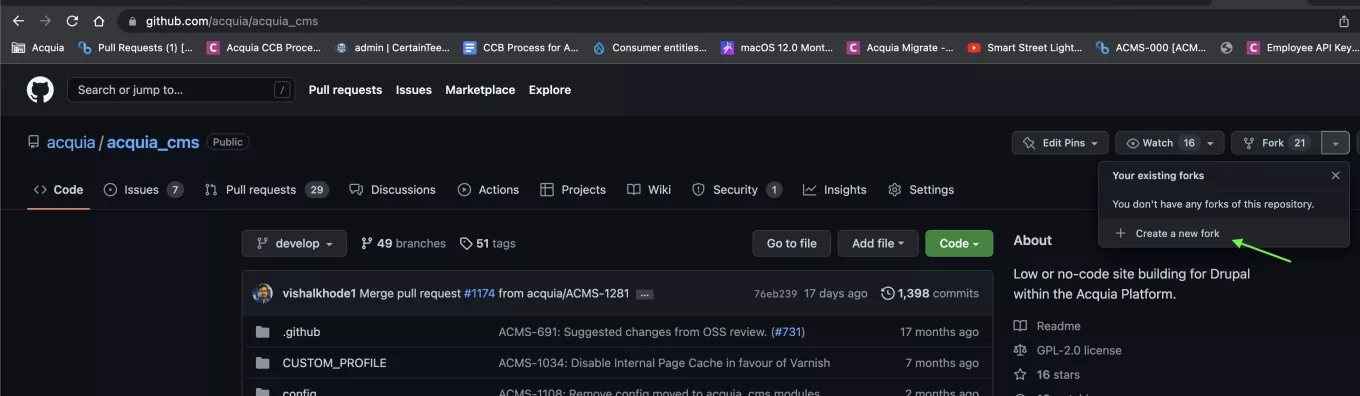
Fork the repository
Navigate to acquia_cms repository and click on Create a new fork and follow the instructions on next page.
![Fork Acquia CMS]()
-
Downloading Acquia CMS
You should run below commands one by one.
git clone --branch=develop [email protected]:vishalkhode1/acquia_cms.git project
cd project
composer install
In above command, make sure to change the repository url with your forked repo url.
-
Configure environment variables (Optional)
Before Installing Acquia CMS, you should set this environment variables. These are the recommended environment variables that needs to be set up before installation, but these are optional.
export SITESTUDIO_ORG_KEY="[replaceme]" export SITESTUDIO_API_KEY="[replaceme]" export GMAPS_KEY="[replaceme]" -
Site Installation
The Acquia CMS is no longer a Drupal distribution/profile, so it can't be simply installed using the
drush site:installcommand. We have created a new command that must be run to install Acquia CMS. Following is the command:./vendor/bin/acms site:install --yesOnce the above command is executed, the site installation should begin.
The above command is the wrapper command of the drush site:install command. That means, you can pass all options that you pass to the drush site:install command. You can run below command to see the list of all options that you can pass through the above command.
./vendor/bin/acms site:install --helpOnce the site installation is completed successfully, you can proceed to local development for contribute new feature/bug etc.
-
Local Development
After site is installed successfully, you can go ahead and make all the necessary changes. If your change require updating module's composer.json, then you after making the change, you should go ahead and run command:
composer update. This will update the module/libraries/themes etc. based on your changes and will update composer.lock file. After making all the changes, commit the code:git add . git commit -m "ACMS-000: Some meaningful message." git push origin developAfter code is pushed back to your forked repo, you should go ahead and create a PR against
developbranch of acquia_cms. -
Create an issue
After PR is created, you should go ahead and file a New issue from here and add your PR link in the in the issue you just created.