
Deploying Simple OAuth SSL Keys on Acquia Cloud
- Last updated
- 2 minute read
Goal
Set up a reliable deployment method for SSL keys across Acquia Cloud environments
Prerequisites
- Senior developer access to an Acquia Cloud Drupal application
- The Simple Oauth module installed in your Drupal site
- A little bit of PHP coding knowledge
- An ability to transfer files onto an Acquia server (e.g. SFTP or SCP)
Overview
OAuth is an industry wide standard for authenticating web services including Drupal. With the Simple OAuth module, you can allow your web service to quickly adopt the OAuth standard allowing standardized and controlled access to your web service Drupal application.
Setting up Simple OAuth requires generating and storing OpenSSL keys. These keys are then used to sign generated OAuth tokens (PCKE) which can be granted to web service consumers.
Unlike code, which is versioned and released through source control (VCS e.g. git), OpenSSL keys are sensitive data that should not be stored in version control history and replicated around developer environments. This means they must make their way to the Acquia environments without going through the code deployment pipeline.
This is a suggestive guide to create and store your keys. You may find you'll need to modify this method to suit your circumstances, the key principles and takeaways here are:
- Deploy different keys for each environment. This will prevent web service consumer token grants from working across environments.
- Store OpenSSL (PCKE) keys in a safe location on Acquia Cloud away from source code and volume snapshots & backups.
- Ensure Drupal can immediately find your keys for the given environment it is on and is not dependent on the config state.
- Maximize your management utility make key changes an operational task (e.g. Sysadmin) rather than a developer task (e.g. code deployment).
Key storage on Acquia Cloud should be thought of as ephemeral using this method as they're intentionally not backed up on Acquia Cloud. Keys should also be stored safely by your organization in the event they're lost and must be redeployed to Acquia Cloud.
-
Generate keys
So let's begin by creating the required keys. You should already have the Simple OAuth module downloaded and installed but in case you haven't you can quickly do this on your development environment (local or Cloud IDE):
composer require drupal/simple_oauth
drush en simple_oauth
Once installed, you can generate the keys using a handy drush command that comes with the module:
drush simple-oauth:generate-keys $HOME/keys/localThis command will generate two keys: public.key and private.key and will place them in a folder called
keys/localin your home directory; away and outside of your codebase. We can use this command multiple times to create keys for each environment and change out the termlocalfor the environment name. E.g.dev,testorprod. -
Rename the keys
The Simple OAuth module calls the keys
public.keyandprivate.keywhich are rather informative yet unhelpfully ambiguous. Since we'll have a public key and private key for each environment and these keys may be hosted on the same staging server (for non-production environments). We want to use naming conventions that are unique yet don't reveal their purpose unnecessarily. We'll do this by renaming the keys to the first 8 characters of their md5 sum value:mv private.key "$(md5sum private.key | cut -b -8).key" mv public.key "$(md5sum public.key | cut -b -8).key"Remember which key is the private one and which is the public one. If you forget, you can look at the first line in the file which will declare key type.
-
Upload keys
Let's create a folder in the no backup location on the server where we will store these keys.
mkdir -p /mnt/gfs/[sitename].[env]/nobackup/oauth_keysNext you'll need to upload the keys to the home folder of the server/container your environment resides on. You can use SCP or SFTP but here we'll use drush rsync:
drush rsync $HOME/keys/<public>.key @myapp.dev:/mnt/gfs/[sitename].[env]/nobackup/oauth_keys drush rsync $HOME/keys/<private>.key @myapp.dev:/mnt/gfs/[sitename].[env]/nobackup/oauth_keys -
Set Environment Variables on Acquia Cloud
Log into Acquia Cloud and go to the application you want to set up OAuth on. Go to the Dev environment to the Variables page found from the left sidebar.
![]()
Click on the Add Environment Variable button and create a new variable called
oauth_public_keyand set the Value with the location of the OAuth public key. Do the same again for the private key and call itoauth_private_key.Image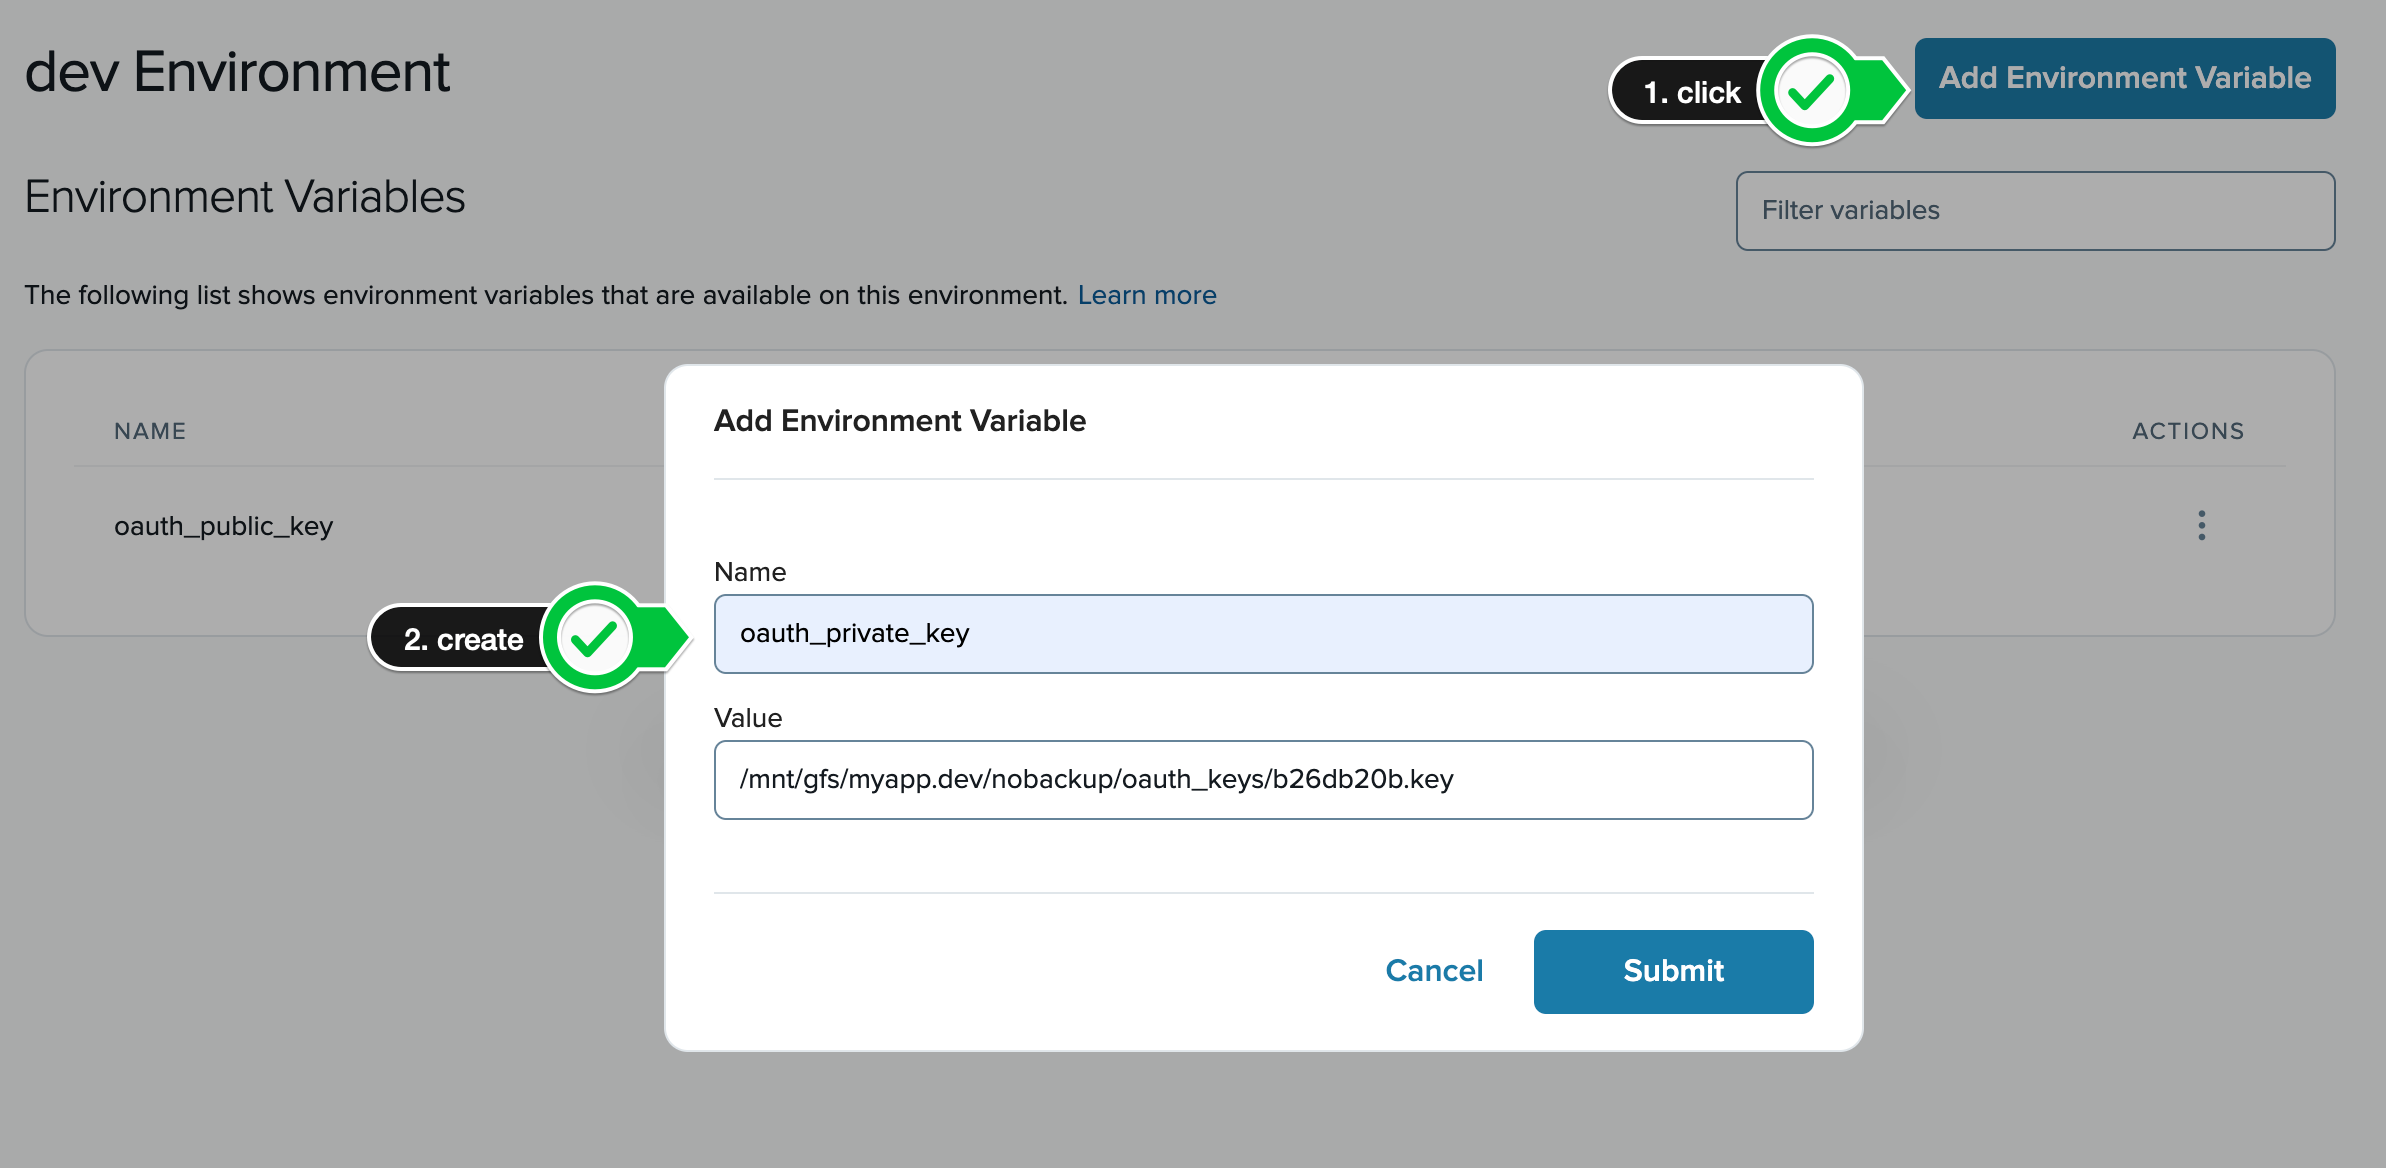
Once these keys have been submitted, Acquia will deploy them to your environment where you'll be able to access them from your Drupal application. You can test this using the
printenvcommand from an SSH session or through Drush:drush @myapp.dev ssh 'printenv' | grep oauth oauth_private_key=/mnt/gfs/myapp.dev/nobackup/oauth_keys/b26db20b.key oauth_public_key=/mnt/gfs/myapp.dev/nobackup/oauth_keys/9cc6ac1a.key -
Set Drupal to use Environment Variables
Now the keys are in place on the environment, and the environment variables inform us how to find the keys, we can tell Drupal how to find these keys. Edit your Drupal site's
settings.phpfile and add the following configuration:$has_oauth_pubkey = isset($_ENV['oauth_public_key']) && file_exists($_ENV['oauth_public_key']); $has_oauth_prikey = isset($_ENV['oauth_private_key']) && file_exists($_ENV['oauth_private_key']); // Only set the config if both keys are present otherwise the keys won't work. if ($has_oauth_pubkey && $has_oauth_prikey) { $config['simple_oauth.settings']['public_key'] = $_ENV['oauth_public_key']; $config['simple_oauth.settings']['private_key'] = $_ENV['oauth_private_key']; }This code is conditional to the environment variables being available. So in places where they're not set, they'll fall back to config state which you may like to have a fallback in place for (but is not covered here).
-
Deploy to Acquia Cloud
Now the code is place, deploy it to your environment with the environment variables set. You'll be able to visit the Simple OAuth settings page and see the config hard set in the setting form, inherited by the environment variables now managed in Acquia Cloud. You can also test and verify using
drush config:getdrush config:get simple_oauth.settings --include-overridden

Summary
- You generated new oauth keys locally and renamed them.
- You uploaded them to a folder on Acquia Cloud that can't be backed up but is accessible by your environment.
- You created Environment Variables that reveal the location of these variables to the Drupal application.
- You configured Drupal to use the environment variables to override Simple OAuth configuration and inform the module where to find the keys for the given environment they're on when the environment variables are set.
Now you have a solid method of OAuth SSL key deployments on Acquia Cloud that is secure and scalable.
Doing headless/decoupled development?
If you're building a headless or decoupled application with Drupal, check out Acquia CMS Headless. It uses Simple OAuth and Consumers modules for API authentication and makes integrating with front end applications easier with an API dashboard, dedicated front end developer roles, front end preview, automated API docs, and more!


