How Do I Start Troubleshooting Errors from the Acquia DAM API?
- Last updated
- 2 minute read
Goal
Troubleshoot errors from the Acquia DAM API.
Overview
Learning something new can be challenging, and working with a new API is no exception. It can often be daunting to read through the documentation with no guidance, so we’ve put together this guide to help get you started. We will focus on two Acquia DAM (Widen) API endpoints, and cover some basic response codes and errors you might encounter.
First, we will go over how to request a list of upload profiles available to the API user through the List All Upload Profiles endpoint. Afterwards we will describe how to use an upload profile’s UUID from the response with the Upload A File endpoint to create a new asset. If you’re not familiar with Upload Profiles, we recommend this article to get started.
Along the way we’ll provide general tips, code snippets and common errors. Lastly, we’ll provide the full code example for you to work with.
Our example is written in C# but the concepts can be applied to any language. If you’re just looking to test the behavior of the endpoints, without wanting to write any code, we recommend using Postman.
-
Getting Started
Before we can dive into the code you’re going to need a few DAM specific items to get started. You’ll need a valid API token with permission to View and Upload with at least one Upload Profile, and the ability to edit metadata for your chosen asset(s).
If you do not have this, you will need to work with your site’s administrator to generate a token with these permissions.
You’ll also need to ensure that your environment and IDE are correctly configured for C#.
-
Authorization
We will be using a Bearer token as our form of authentication, as required by our API. We are storing it as a global variable for access across our methods. While this isn’t generally the best practice, it is sufficient for our example.
To begin, create variables to hold the token and the base endpoint for the appropriate version of the API. We will be using the V2 API because it is our most current version and has the best performance.
Uri baseAddress = new Uri("https://api.widencollective.com/v2/"); string token = "Bearer __API__TOKEN__HERE"; -
List All Upload Profiles Endpoint
Now that the authentication and base endpoint are set up, we can begin working with the API.
The first endpoint we’ll visit is the List All Upload Profiles endpoint. It’s a simple GET request that retrieves all available Upload Profiles. To see what data the endpoint needs we can check the Assets > Creating New Assets section of our documentation. Reviewing the documentation, we can see that for “List All Upload Profiles'', all we have to do is make sure our Bearer Token and URL are correct, and we should be good to go.
An example for this endpoint is provided below, you just need to fill it in with your Bearer Token.
Uri baseAddress = new Uri("https://api.widencollective.com/v2/");
string token = "Bearer __API__TOKEN__HERE__";

// Set up our HttpClient so we can make the request
using (var httpClient = new HttpClient{ BaseAddress = baseAddress })
{
    // Set authorization header
    httpClient.DefaultRequestHeaders.TryAddWithoutValidation("Authorization", token);
    // Define endpoint for listing upload profiles
    string uploadProfilesEndpoint = "uploads/profiles";
    // Make the request async and store the response as a variable
    using (var response = await httpClient.GetAsync(uploadProfilesEndpoint))
    {
      // If the response doesn't indicate success, print out the status code and reason.
      if(!response.IsSuccessStatusCode) {
          Console.WriteLine("Requested failed with status " + response.StatusCode + " for reason " + response.ReasonPhrase);
      }
      // Otherwise, just print out the response.
      else {
          Console.WriteLine("Response success " + await response.Content.ReadAsStringAsync());
      }
    }
}
Great! If everything went as planned, we should now be shown all the upload profiles we have access to, along with some details about each one. Go ahead and copy the name of one of the upload profiles in the response as we’re going to use it in the next section. The next endpoint is more complex, as it requires additional information to be provided, such as a request body. We’ll cover the details in the next section.
-
Upload File Endpoint
When uploading a file through our API, there are 3 ways files can be uploaded. The file can be included directly, or as a downloadable URL, or the file ID from a completed chunked upload can be provided. Only choose one, the endpoint won’t accept multiple upload methods. To begin, we’d recommend using either the local path option or the URL. The local path option is uncommented in the example below. Make sure to have the information about the Upload Profile retrieved from the previous section on hand.
For this endpoint, you are only required to provide an Upload Profile, and one of the file options previously listed. In addition to this, there are two optional fields that can also be filled in to change the behavior of the endpoint.
The two optional parameters that can be added are metadata and filename. Choosing to provide a filename will overwrite the original file’s name when uploaded to Acquia DAM. Choosing to provide metadata will, when correctly formatted, apply that metadata automatically to the uploaded file. If adding metadata to your API upload is something you are interested in, follow our metadata update formatting rules for information on how to format your metadata.
Below we provide an example script for uploading files to this endpoint.
Uri baseAddress = new Uri("https://api.widencollective.com/v2/");
string token = "Bearer __API__TOKEN__HERE__";

using (var httpClient = new HttpClient{ BaseAddress = baseAddress })
{
httpClient.DefaultRequestHeaders.TryAddWithoutValidation("Authorization", token);

MultipartFormDataContent formData = new MultipartFormDataContent();

// The upload profile (Required)
StringContent profile = new StringContent("__UPLOAD__PROFILE__HERE__");
formData.Add(profile, "profile");


/* Where the file is coming from - Specify one of the following - URL, File ID, or local file */

// URL
// StringContent url = new StringContent("__URL__SOURCE__HERE__");
// formData.Add(url, "url");

// File ID
// StringContent fileId = new StringContent("fileId_for_chunked_upload");
// formData.Add(fileId, "fileId");

// Local file
StreamContent byteStream = new StreamContent(File.Open("__PATH__TO__FILE__HERE__", FileMode.Open));
formData.Add(byteStream, "file");


  // Optional parameter to overwrite current filename when uploaded
  StringContent newFilename = new StringContent("__NEW__FILENAME__HERE__");
  formData.Add(newFilename, "filename");

  // Optional metadata to be added to the asset
  StringContent metadata = new StringContent("{ \"fields\": { \"description\": [\"Directors\"], \"keywords\": [\"Butter, Hitchcock, Spielberg, Lucas\"]}}");
  formData.Add(metadata, "metadata");


  using (var response = await httpClient.PostAsync(baseAddress + "uploads", formData))
  {
    string responseData = await response.Content.ReadAsStringAsync();
    Console.WriteLine("Data retrieved: "+responseData);
  }
}
In our example we’re using the upload via path method, and we’re supplying both optional parameters. The __UNDERSCORED__ variables need to be replaced with values before this example will work. And don’t forget to include the bearer token.
If the example isn’t formatted correctly, it’s not the end of the world. You can send the request to our server anyways and it will tell you which part isn’t formatted correctly, or is missing, or whatever else is going on. Checking the response code will help you figure out what happened with your request
-
Responses
When a user makes any sort of network request, be it in the browser, through code, or through an API tool like Postman, they expect to receive a response from the appropriate server. Responses are grouped based on their “status code”, a number included with the response that describes the outcome of the request. We list out our API’s most common responses below. A comprehensive list of status codes can be found in Mozilla’s HTTP documentation.
200 - 299
Status codes in the range of 200-299 represent a success of some kind. This is a good time to note that responses in a range are often referenced by the first number of the range, followed by XX. So, responses in the 200-299 range can be referred to as 2XX responses.
A plain 200 means the request was accepted by the server and generally means that the requested action was successful. In our example, a 200 response from the List Upload Profiles endpoint will be accompanied with the information we requested, which is exactly what we want.
For the Upload File endpoint, a 201 response means that the asset was created successfully. Hooray! Also, an API link to the file, now in the DAM, is returned. If we wanted we could check the status of that asset with the Retrieve By ID or List by Search Query endpoints.
Ideally we would receive 2XX responses for every request we make, but that’s not always the case. If there is an error with request or server, or the request should be redirected, we receive something other than a 2XX. These other status codes are important to pay attention to as they describe what went wrong and how it can be fixed.
300 - 399
A response with a status code in the 300-399 range indicates that the resource you requested has moved, and that you need to make another request to retrieve it. Typically the Acquia DAM API does not return responses in this range and frequently HTTP libraries and clients will handle the redirect automatically, so we won’t cover those responses here.
400 - 499
Something’s not right with the request. It could be that you don’t have permission. Maybe your Bearer-Token authorization failed. Maybe the metadata isn’t formatted right. Whatever the reason, the server is saying it isn’t going to let you do what you’re trying to do until something’s fixed. The response code gives the reason the server denied the request.
- 400 - Bad request - The request isn’t formatted correctly - Make sure to check the response body as most times it will include additional information about what is wrong with the request. Additionally, if your request requires a payload, check that the payload is formatted correctly. Most of the requests in our API involve JSON formatting, so you can use a tool such as https://jsonformatter.org/ to verify that you have valid JSON and that it’s structured properly.
- 401 - Unauthorized - The authentication parameter isn’t valid - check that your request contains a Bearer token and that there aren’t any newline characters or spaces where they shouldn’t be.
- 403 - Forbidden - Incorrect permissions - The server got your request, but it doesn’t think you have the right permissions to do what you’re trying to do. Perhaps your role isn’t allowed to upload assets, or editing a specific metadata field is reserved for admins. Whatever the case, your request was received and denied. Contact your administrator for help, the problem is likely due to permissions with your account.
- 404 - Resource not found - We couldn’t find the resource. One possibility here is that the Asset or some sort of Id might be wrong. We searched for it and couldn’t find it. Check the URL parameters and make sure that any names or Ids are accurate.
- 429 - Too many requests - Some endpoints are rate limited and only allow so many requests per unit of time. For more information on how our rate limiting and other API FAQs check out this article. We include the number of requests available for the api token, so keep an eye on that number to stay within the limits. If you do see a 429 response code, wait a little and you may resume making requests.
500 - 599
Something went wrong with the server when processing the request. This might mean that the server is temporarily unavailable, or the server had an issue processing your request. First verify that our servers are expected to be available. Any known issues or scheduled maintenance periods are announced on our status page located at status.widen.com. If you continue to have issues, please contact Support via the Acquia DAM Community.
-
Bringing It All Together
So far in this article you’ve learned about a couple of different endpoints available through the Acquia DAM API, and some information on the responses you might receive. Now it’s time to put those lesions into practice with an example.
Below is a trimmed down version of the code provided earlier with three errors inserted. Read through the code and see if you can spot the errors. Afterwards, read through the step by step explanation of each of the errors, and how to fix them.
For this example we are using:
- The V2 API’s Upload Asset endpoint
- An Upload Profile called “API Uploads”
- A valid bearer token with appropriate permissions
- A local file called “GreenAppleImage.jpg” in the same folder as the code
Here is the code:
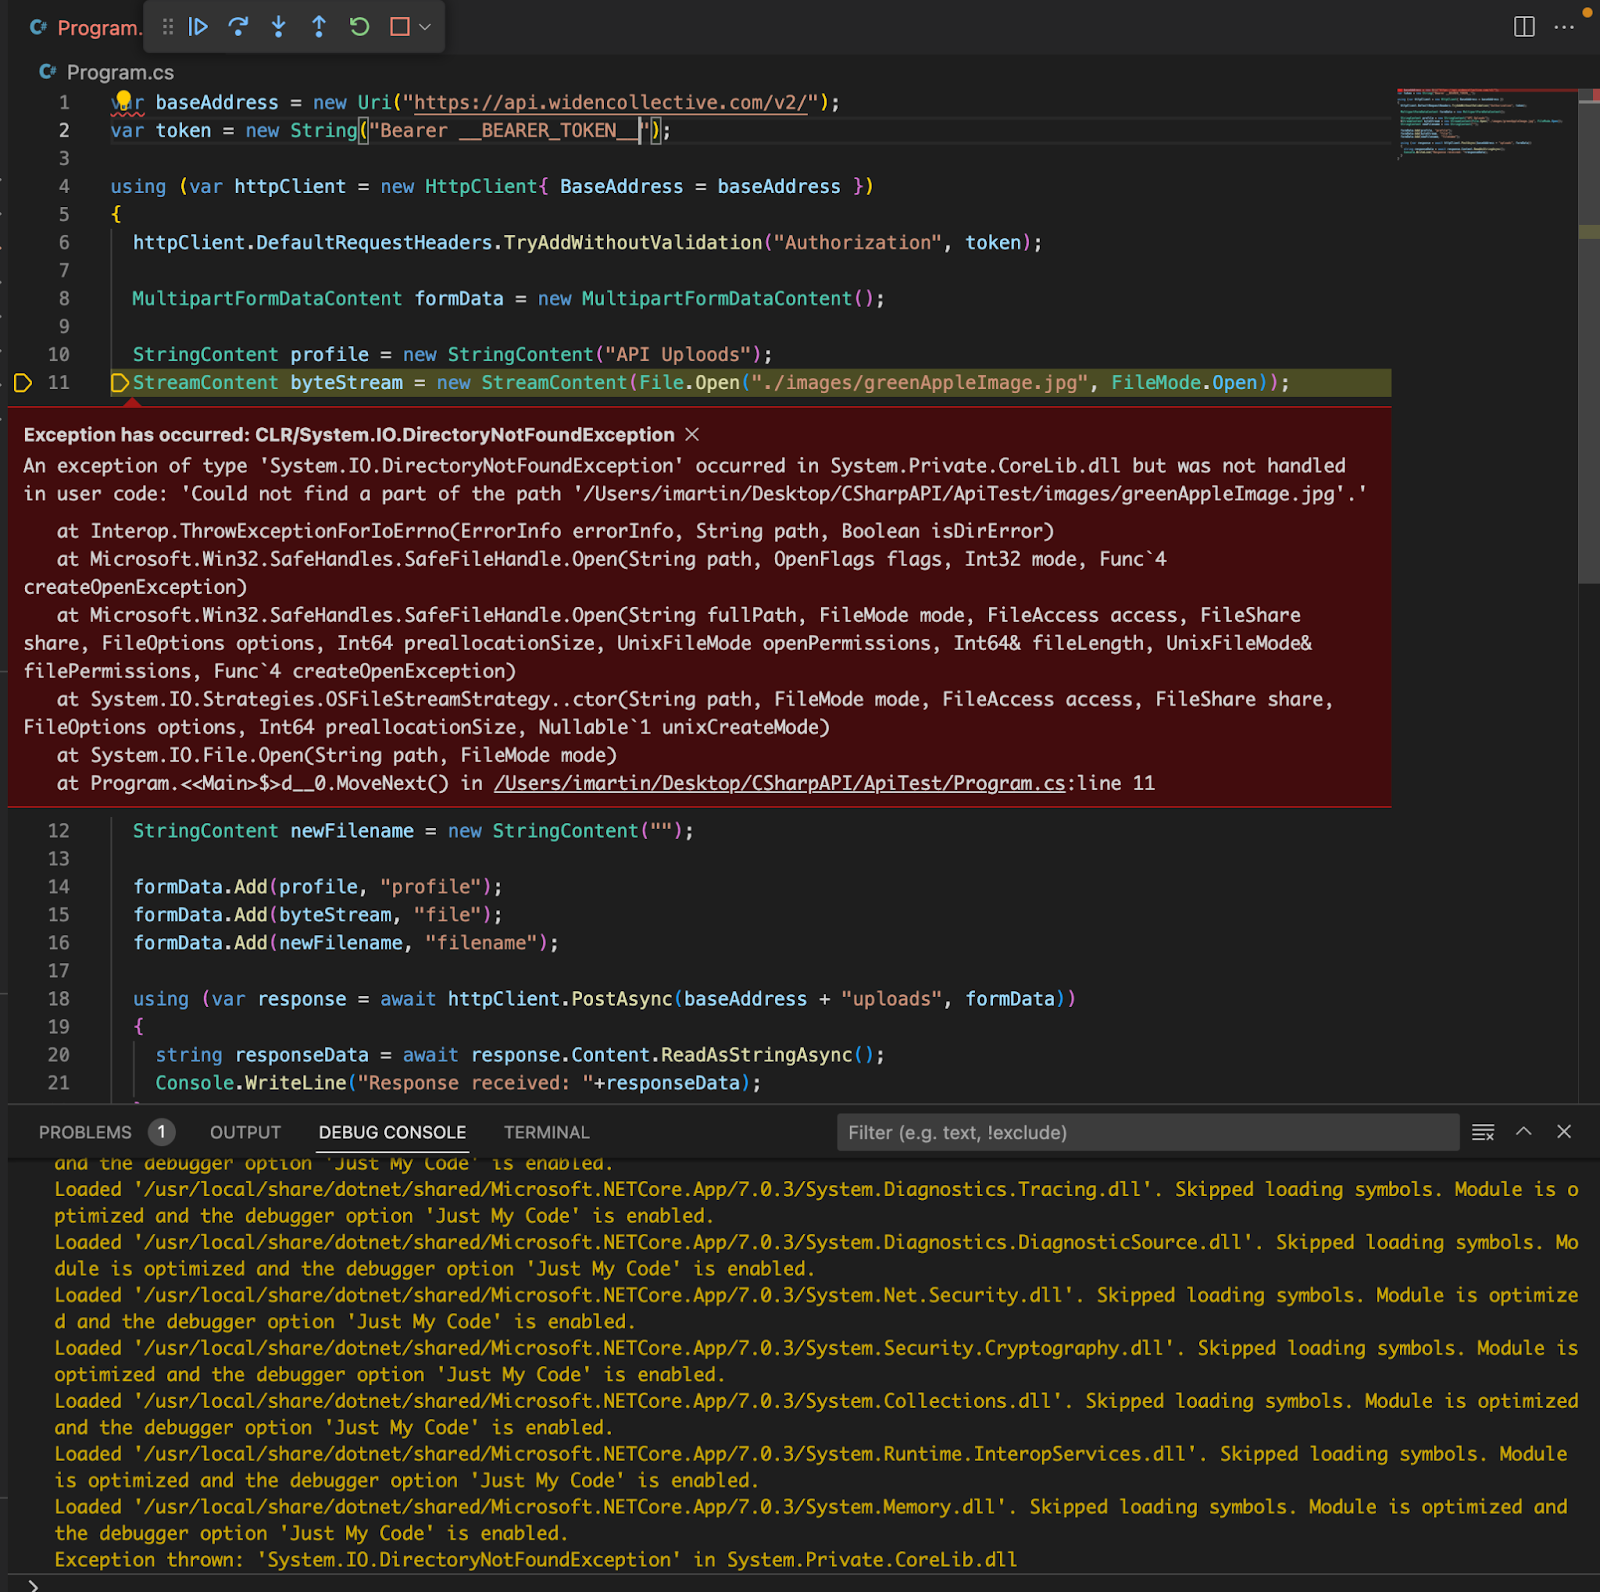
Uri baseAddress = new Uri("https://api.widencollective.com/v2/");
string token = "Bearer __BEARER_TOKEN__";

using (var httpClient = new HttpClient{ BaseAddress = baseAddress })
{
  httpClient.DefaultRequestHeaders.TryAddWithoutValidation("Authorization", token);

  MultipartFormDataContent formData = new MultipartFormDataContent();

  StringContent profile = new StringContent("API Uploods");
  StreamContent byteStream = new StreamContent(File.Open("./images/GreenAppleImage.jpg", FileMode.Open));
  StringContent newFilename = new StringContent("");

  formData.Add(profile, "profile");
  formData.Add(byteStream, "file");
  formData.Add(newFilename, "filename");

  using (var response = await httpClient.PostAsync(baseAddress + "uploads", formData))
  {
    string responseData = await response.Content.ReadAsStringAsync();
    Console.WriteLine("Response received: "+responseData);
  }
}
Our code had a compilation error. This means something’s wrong with our code so the request was never sent to the server. The exception thrown is DirectoryNotFoundException. It’s happening on line 11, where we are trying to get our image from ./images/greenAppleImage.jpg. The exception is being thrown because the image is in the same folder as our code, not the “images” folder. So we need to correct our code from “./images/greenAppleImage.jpg” to “./greenAppleImage.jpg”. Let’s fix the file path and run it again.
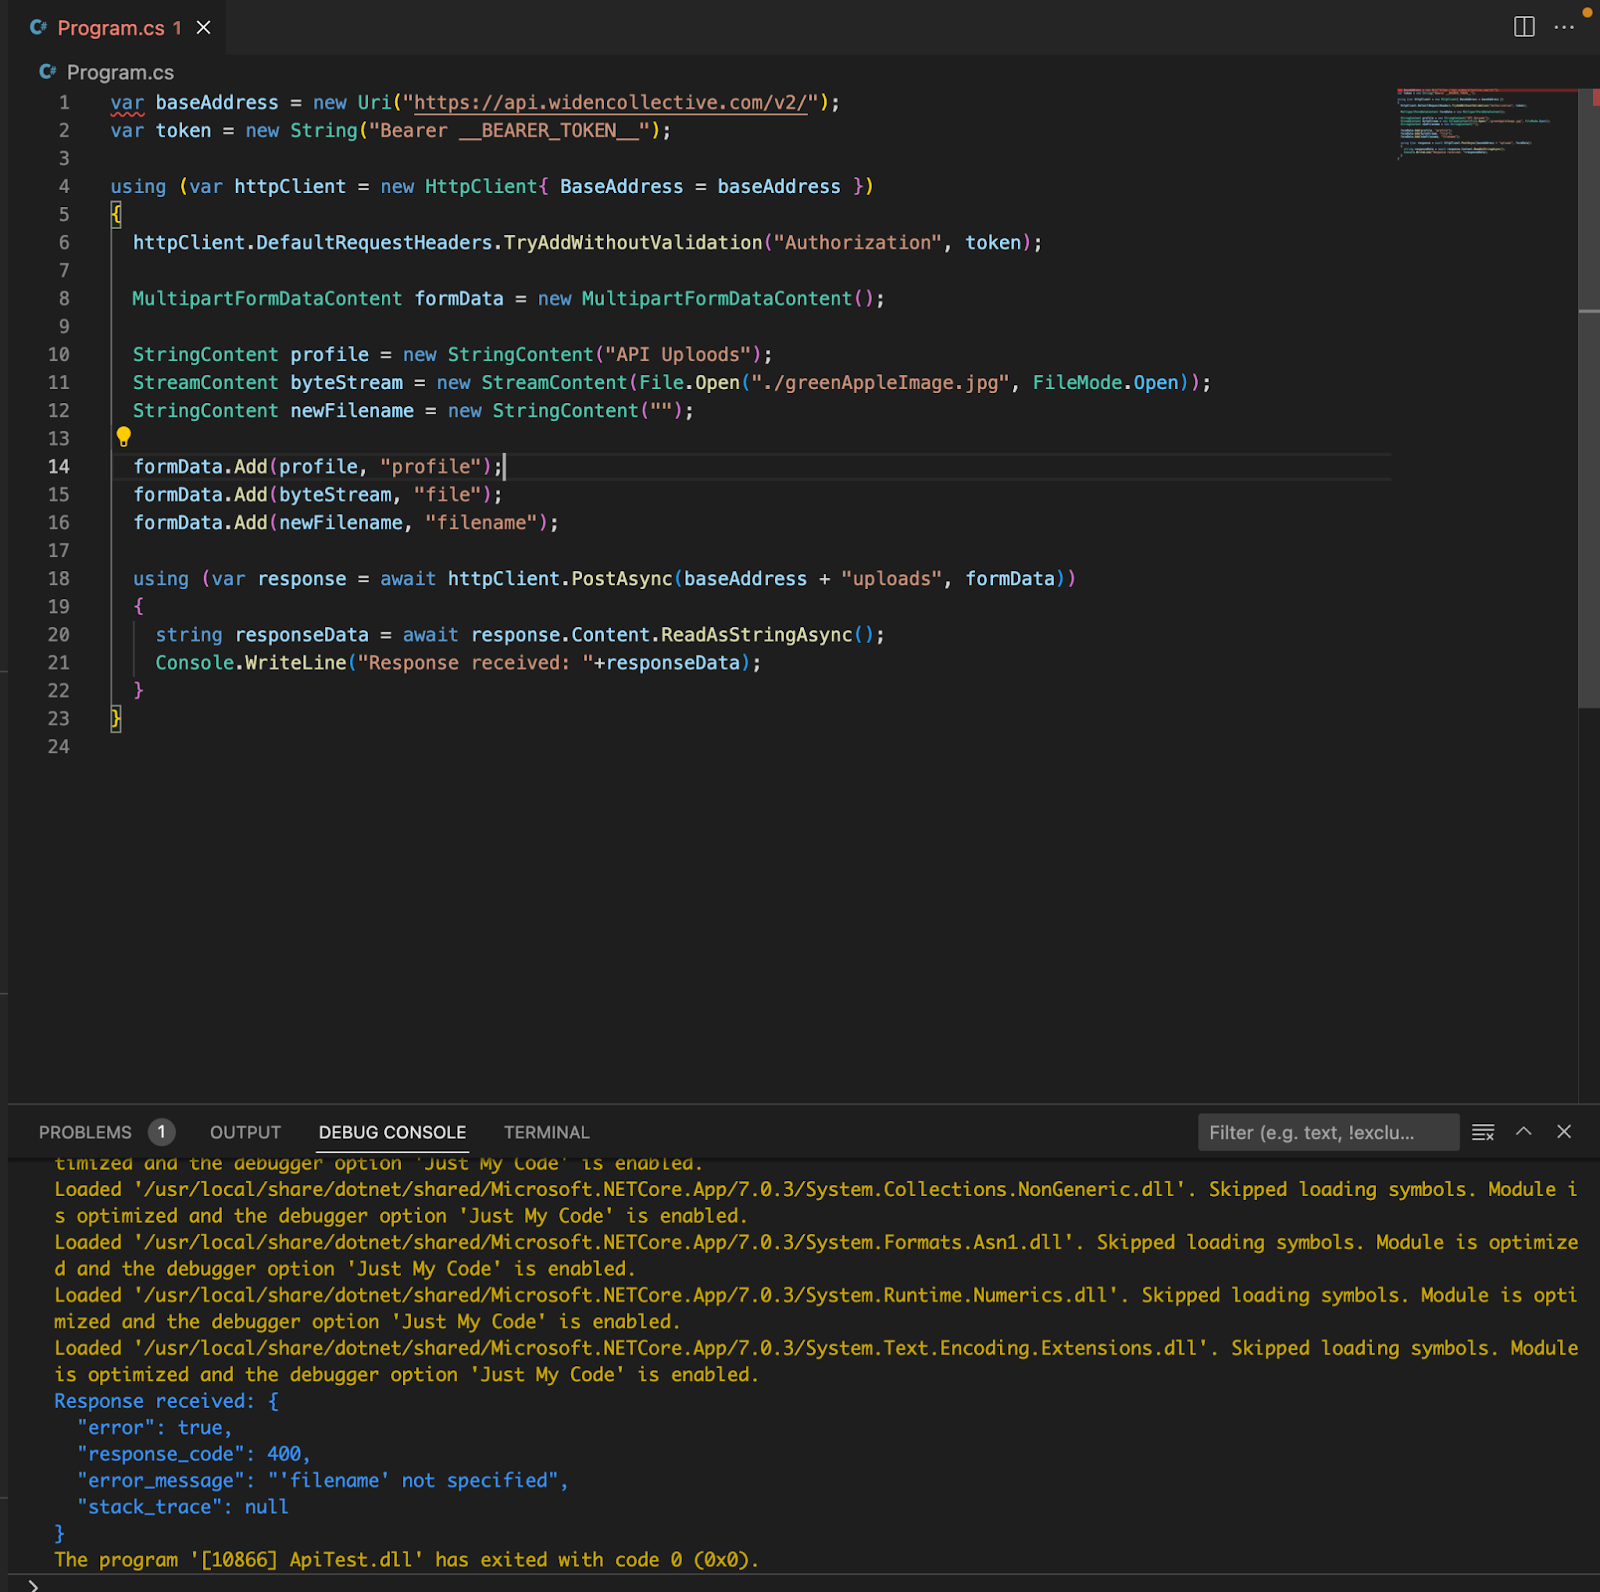
We forgot to fill in the new file name, it’s completely blank. We want the file to be called “Apple (Green).jpg”. Let’s fill that in on line 12 and try again.
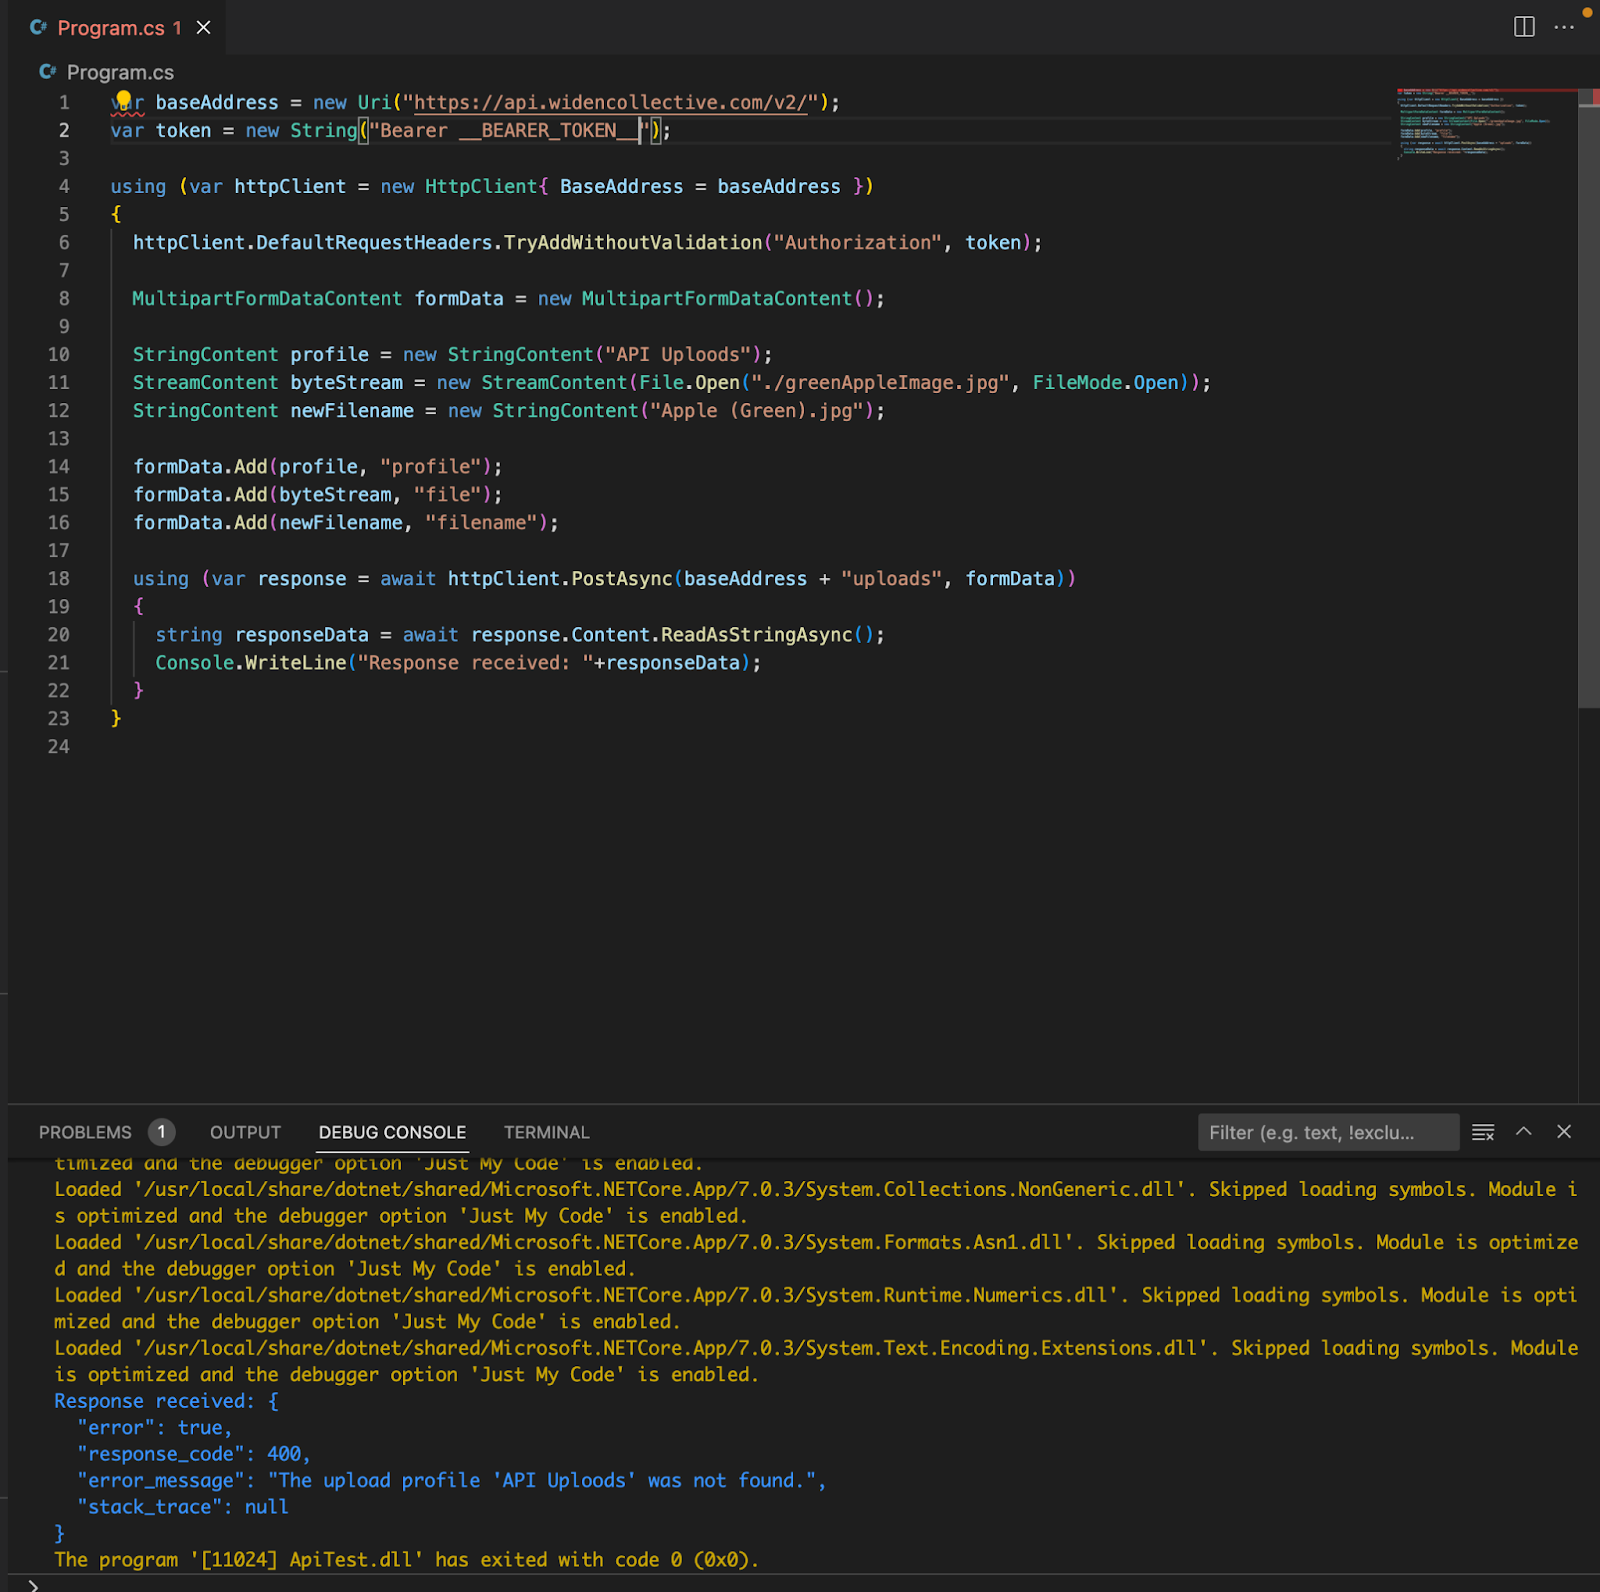
Whoops, we have a typo in our upload profile. We typed “API Uploods” when the actual name is “API Uploads”. Let’s fix it and try again.
We’ve received a response from the API with a link to the newly created asset. Upload successful!
Congratulations! You are now one step closer to mastering the Acquia DAM API. Check out the further reading section below for an in-depth look at adding and updating controlled metadata values via the API, as well as some more general articles.
-
Further Reading