
Next.js on Acquia: Customizing content types
- Last updated
- 1 minute read
Goal
Create a custom content type in Drupal CMS and render the content in Next.js using the next-acms.
Prerequisites
-
You have a working build of Acquia CMS for headless development setup.
-
You next.js project is connected to your Acquia CMS headless install (see tutorial)
Overview
Here are the step we’ll cover in this tutorial:
- Define a Book content type with fields in Acquia CMS and expose the content to Next.js.
- Build a /books page to display all published books in Next.js and link it in the.
- Build a book page in Next.js to view the content using React components.
This tutorial was written in collaboration with Chapter Three.
-
Create the Book Content Type
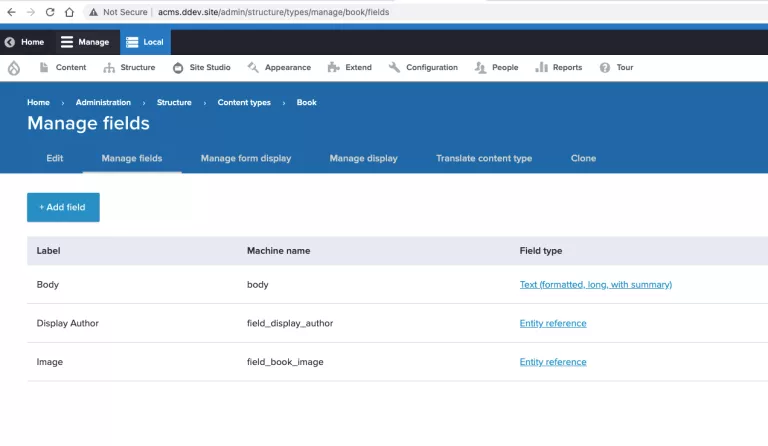
For our example, we are going to use a Book content type with the following fields:
- Title (title) - Title field
- Body (body) - Text (formatted, long)
- Author (field_display_author) - Reuse existing field from Article content type.
- Image (field_book_image) - Media (Image)
-
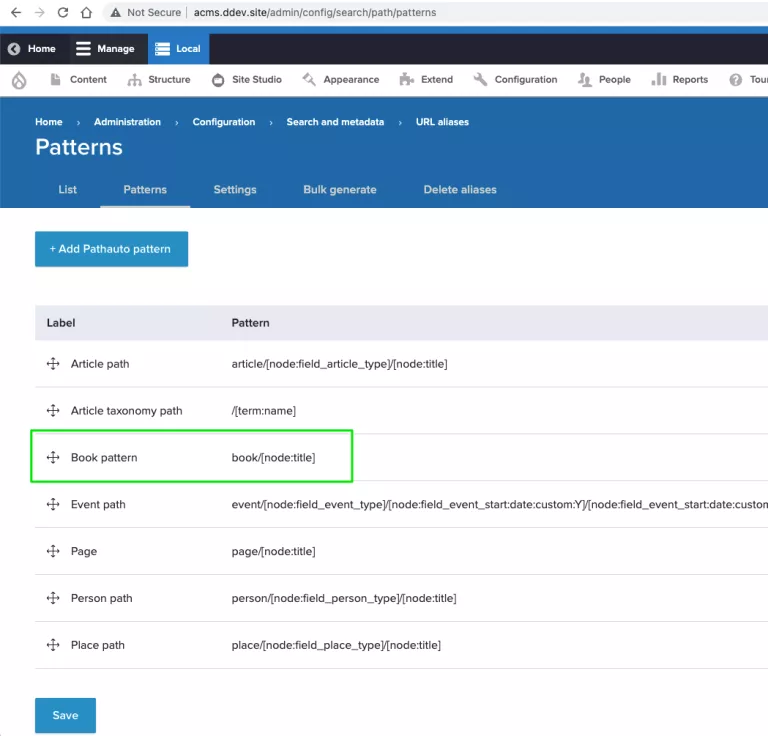
Create Pathauto pattern
Next.js uses the decoupled router module in Drupal to find content (resource) based on its URL alias. For this to work, the node always needs a URL alias. We can ensure this by setting a Pathauto pattern.
Create a Pathauto pattern for Book with the following pattern: books/Next.js on Acquia: Customizing content types
Once the content types have been created, you may go ahead and fill in some sample content.
-
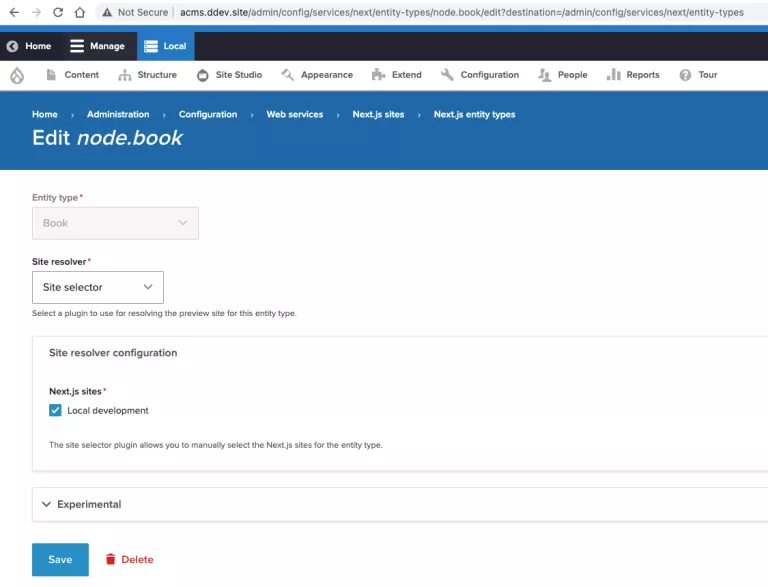
Set Book as a Next.js Entity Type
In Acquia CMS, go to Administration > Configuration > Web services > Next.js sites > Entity Types and add the Book content type with a “Site selector” site resolver.
Revalidation
Next.js has an experimental feature to revalidate content with Next.js when content in Drupal is updated (similar to Drupal cache tags). You may enable this and node pages in Next.js should update when content is updated in Drupal. The default cache lifetime is 15 minutes and Next.js will revalidate after this time.
-
Add books to the Drupal menu
As Next.js pulls Drupal's menu through, if we want to see our books page in the Next.js navigation, we must add it to the Menu.
Create a new menu item in the Main Navigation menu with a title of "Books" and a URL of
/booksNote:
/bookswill not exist in Drupal but Next.js will be able to find a route for it within the Next.js application.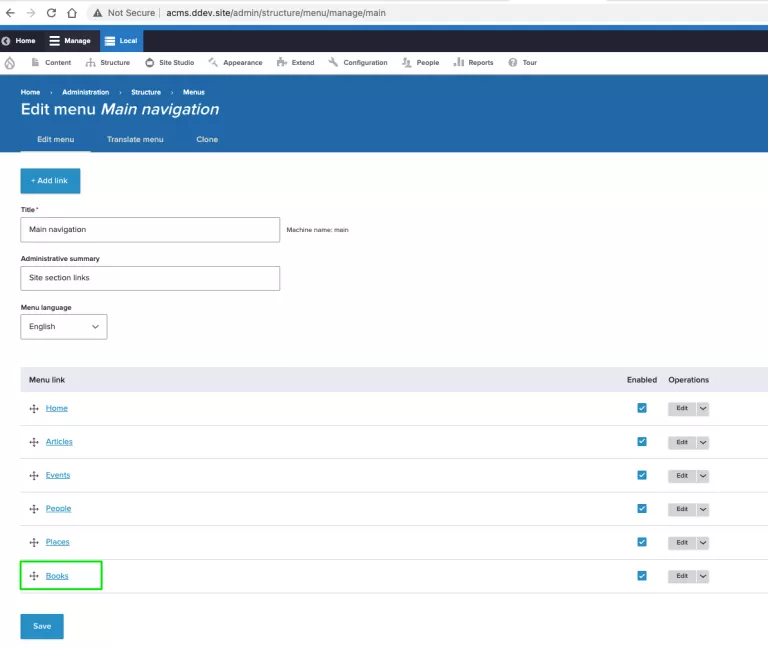
-
A page with all books
Now that our content types are created and we have some default content, we can pull this content into our Next.js site and display it. To do this, we are going to use the Next.js for Drupal framework that interacts with Drupal’s JSON:API implementation.
-
Fetch a list of books
Let’s start by creating a new page to show all our books.
- Create a new file called
books.tsxunderpages/books.tsx - Next.js requires two function to fetch and display data:
getStaticPropsto fetch data- a React page component to display data
Let’s add a scaffolded React component:
import { Layout } from "components/layout"
import { PageHeader } from "components/page-header"

export default function BooksPage({ books, menus }) {
  return (
    <Layout title="Books" menus={menus}>
      <PageHeader heading="Books" text="A collection of books." />
      <div className="container px-6 pb-10 mx-auto">
         <p>No content found.</p>
      </div>
    </Layout>
  )
}
Here, we’re importing the
LayoutandPageHeaderReact components and using them inside ourBooksPagecomponent to render our page template. Take a look atpages/articles.tsxfor a similar layout. Here we’re looking to keep the look and feel consistent across the site. The Acquia CMS starter template comes with Tailwind CSS out of the box. We can use utility classes to style our book collection. Lets pull our book content from Acquia CMS by adding a function calledgetStaticPropswith the following:import { getResourceCollectionFromContext } from "next-drupal" import { getMenus } from "lib/get-menus" export async function getStaticProps(context) { const books = await getResourceCollectionFromContext("node--book", context) return { props: { books, menus: await getMenus(), }, } }getResourceCollectionFromContextis a helper function from next-drupal. Here we are telling next-drupal to fetch a collection ofnode-bookresources.The
propsreturned fromgetStaticPropsare passed then to ourBooksPagecomponent.If you add a
console.log(books)in yourBooksPagecomponent you should see it log the sample books you created above.export default function BooksPage({ books, menus }) { // <--- get books prop console.log(books) // <--- log the books content in console …If you look at the content of books, you will notice
getResourceCollectionFromContextreturns thenode—bookswill all the fields. Since we only care about some of the fields, let’s tell JSON:API to only return a subset of the fields.💡 Fetching only the data we need is a best practice. Smaller payloads means faster transfer and processing keeping the application lean and fast.
 import { DrupalJsonApiParams } from "drupal-jsonapi-params"

const books = await getResourceCollectionFromContext("node--book", context, {
	// For the node--book, only fetch the following fields.
	params: new DrupalJsonApiParams()
      .addInclude(["field_book_image.image", "field_display_author"])
      .addFields("node--book", [
        "title",
        "body",
        "path",
        "field_display_author",
        "field_book_image",
      ])
      .getQueryObject(),
})
Next, let’s take a look at
field_display_authorandfield_book_image. These are entity reference fields and don’t include the metadata we need on the book entity so we must tell the JSON:API to include these entities in the response. We do so with the addInclude function.💡 We use
field_book_image.imagebecause we also want to include the data for the actual image i.e. the url of the image on Drupal. - Create a new file called
-
Display a list of books
Once we have our books data, we can go ahead and render a list of books in the React page component. Lets update
BooksPageto look like this:export default function BooksPage({ books, menus }) { return ( <Layout title="Books" menus={menus}> <PageHeader heading="Books" text="A collection of books." /> <div className="container px-6 pb-10 mx-auto"> {books?.length ? ( <div> {books.map((book) => ( <NodeBookTeaser key={book.id} node={book} /> ))} </div> ) : ( <p>No content found.</p> )} </div> </Layout> ) }This introduces a new React component that doesn’t exist yet:
NodeBookTeaser. We need to create this component before this page will render without error.Create a new file called
components/node--book.tsxwith the following component in it:import Link from "next/link" import { MediaImage } from "components/media--image" export function NodeBookTeaser({ node }) { return ( <article className="grid max-w-xl grid-cols-3 gap-10 py-4"> {node.field_book_image && ( <Link href={node.path.alias} passHref> <a className="block overflow-hidden no-underline rounded-md"> <MediaImage media={node.field_book_image} priority /> </a> </Link> )} <div className="col-span-2"> <p className="mb-4 text-sm text-gray-500"> {node.field_display_author?.title ? ( <span> <span className="font-semibold"> {node.field_display_author?.title} </span> </span> ) : null} </p> <Link href={node.path.alias} passHref> <a className="no-underline hover:text-blue-600"> <h2 className="mb-4 text-xl font-bold">{node.title}</h2> </a> </Link> {node.body && ( <div className="text-xs text-gray-600" dangerouslySetInnerHTML={ { __html: node.body.processed } } /> )} </div> </article> ) }Here you can see the React component is doing a number of things:
- Its templating with HTML tags like <div>, <article>, <h2> and <a>.
- Its passing objects onto other React components to render (<Link> and <MediaImage>)
- Its using tailwind CSS inline to style HTML components
- Its working with the book node object to conditionally render components (similar to how would in twig).
MediaImageis a component that comes with the Acquia CMS starter kit for rendering images managed by the Media module.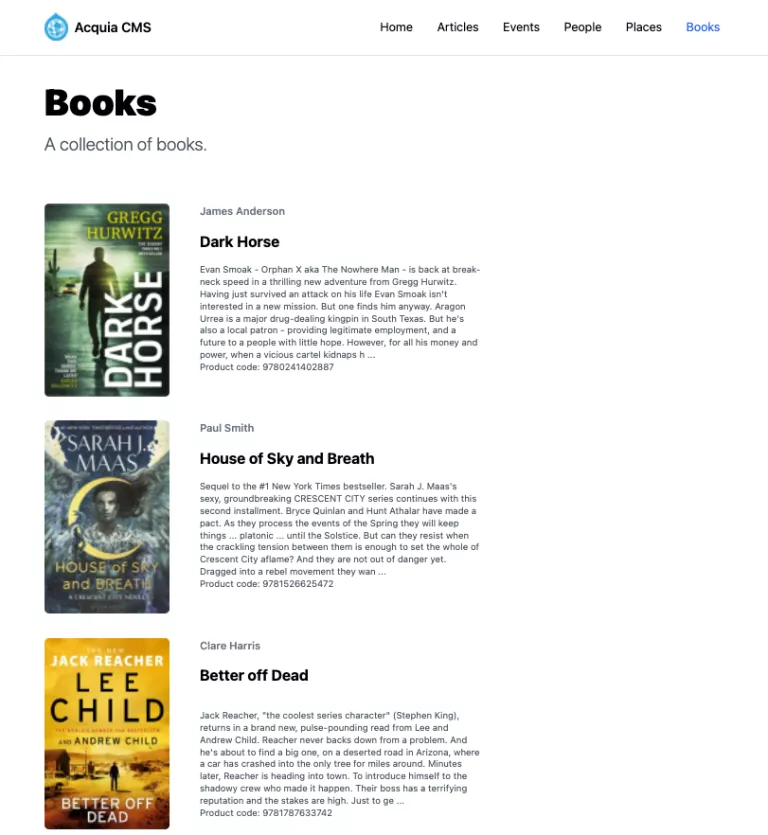
Now with this component defined, we must import it in our Books page to use it:
import { NodeBookTeaser } from "components/node--book"

export default function BooksPage({ books, menus }) {
…
That’s it. We now have a Books page built with data from Drupal. But if you click on a book link, you’ll find it doesn’t work yet.
-
A page for every book
The next step is to create a page for every book. This page will display additional information about each book.
The starter comes with a
pages/[[...slug]].tsxpage. This is a special page. It acts as an entry point for content or nodes that are created on Drupal.Let’s tell this page to build pages for
node—bookresources. To do so there are a number of places where we have to update the slug:- Import the
node--bookcomponent (like we did inpages/books.tsx) - Add
node--bookto theCONTENT_TYPESconstant - Update the
NodePagecomponent to use aNodeBookcomponent (which we’ll need to create) for book type nodes. - Specify the JSON:API query modifying parameters for the book content type.
So lets start by importing
node--bookcomponent we previously created. You can place this at the top of the file:import { NodeBook } from "components/node--book"This will make Next.js break because
NodeBookdoesn’t actually exist yet. We createdNodeBookTeaserbut notNodeBook. So lets create a stub incomponents/node--book.tsxfor now that we can revisit later:export function NodeBook({ node }) { return <h2>{node.title}</h2> }Next, Update the
CONTENT_TYPESvariable and addnode—book.const CONTENT_TYPES = [ "node--page", "node--article", "node--event", "node--person", "node--place", "node--book" // <--- Add node--book ]Then, update
getStaticPropsto add a condition for thenode--booktype and load related author and image data.export async function getStaticProps( context ): Promise<GetStaticPropsResult<NodePageProps>> { // ... if (type === "node--place") { params.addInclude(["field_place_image.image"]) } if (type === "node--book") { params.addInclude(["field_display_author", "field_book_image.image"]) } const node = await getResourceFromContext<DrupalNode>(type, context, { params: params.getQueryObject(), }) // ... }Then, update the
NodePagecomponent to render theNodeBookcomponent fornode—bookresources.export default function NodePage({ node, menus }: NodePageProps) { if (!node) return null return ( <Layout title={node.title} menus={menus}> {node.type === "node--page" && <NodeBasicPage node={node} />} {node.type === "node--article" && <NodeArticle node={node} />} {node.type === "node--event" && <NodeEvent node={node} />} {node.type === "node--person" && <NodePerson node={node} />} {node.type === "node--place" && <NodePlace node={node} />} {node.type === "node--book" && <NodeBook node={node} />} </Layout> ) }Now we have the
NodeBookcomponent correctly routed lets revisit it incomponents/node--book.tsxand revise the output:import { MediaImage } from "components/media--image" import { FormattedText } from "components/formatted-text" export function NodeBook({ node }) { return ( <article key={node.id} className="grid max-w-xl grid-cols-3 gap-10 py-12 mx-auto" > {node.field_book_image && ( <div className="my-6 overflow-hidden rounded-md"> <MediaImage media={node.field_book_image} priority /> </div> )} <div className="flex flex-col col-span-2 space-y-4"> <h1 className="mb-4 text-3xl font-black leading-tight md:text-4xl"> {node.title} </h1> <p className="mb-4 text-gray-600"> {node.field_display_author?.title ? ( <span> <span className="font-semibold"> {node.field_display_author?.title} </span> </span> ) : null} </p> {node.body?.processed && ( <div className="prose"> <FormattedText processed={node.body.processed} /> </div> )} </div> </article> ) }That’s it. If you visit the /books page and click on a book title, you should be taken to the book page.
To learn more about data fetching and rendering, refer to the Next-Drupal documentation.
- Import the


