
Next.js on Acquia: Next.js Starter Kit for Acquia Drupal CMS Headless Starter Kit for Drupal
- Last updated
- 2 minute read
Goal
In this tutorial, you’ll connect your existing Acquia Drupal CMS Headless Starter Kit from the first tutorial to the Next.js for Acquia CMS Starter Kit.
Prerequisites
-
A local machine where you have (or can install) node version 16.x or later
-
An existing installation of Acquia CMS Headless Starter Kit. See first tutorial on settings up Acquia CMS.
-
We recommend installing the Acquia CMS Starter Kit demo content so you can see content in your Next.js site.
Overview
At Acquia, we’re creating a better developer experience for headless CMS.
We’ve partnered with Chapter 3, maintainers of Next.js for Drupal, to build Next.js for Acquia CMS: a Next.js starter kit for the Acquia CMS Headless Starter Kit for Drupal.
This is the second of three tutorials on using Next.js optimized for the Acquia CMS Starter Kit. Next.js is a framework built on top of React.js, with great support, stability, performance and security features.
With next-acms you get an out-of-the-box Next application that connects easily to the Acquia CMS Starter Kit default content model. Try it out yourself! Here is a guide on how to get a local Next application quickly connected to Acquia CMS.
In this tutorial, you’ll connect your existing Acquia CMS Headless Starter Kit from the first tutorial to the Next.js Starter Kit.
Specifically, we will:
- Set up a local Next.js Starter Kit optimized for Acquia CMS Starter Kit
- Configure Next.js to use a JSON:API endpoint of your Acquia CMS Starter Kit installation
-
Create the project
We’ll start by creating our codebase:
npx create-next-app -e https://github.com/acquia/next-acms/tree/main/starters/basic-starter -
Setup your local machine
To use the starter kit locally, you’re going to need npm (Node Package Manager) which will give you a Node.js engine (node) and npx (node package execute). If you already have it installed, go ahead and skip to the next step.
Option 1: Install Node directly to your local machine
Using Homebrew on Mac:
brew install npmUsing Ubuntu:
apt-get install npmNow skip ahead to the “Install Node Packages” section.
Option 2: Use Docker
If you don’t want to run Node locally and prefer to keep things in a Docker container, then this section is for you!
With next-acms cloned on your host machine, you can now mount it to a standard node container to interact with it. Keeping the container ephemeral, the docker commands below spin containers up and down for each command:
# Install node dependencies.
docker run -it --rm -v $PWD:/usr/src/app -w /usr/src/app node:16 npm install

# Run the development server
docker run -it --rm -v $PWD:/usr/src/app -w /usr/src/app -p 3000:3000 node:16 npm run dev

# Build a production artifact
docker run -it --rm -v $PWD:/usr/src/app -w /usr/src/app node:16 npm run build

# Run the production server
docker run -it --rm -v $PWD:/usr/src/app -w /usr/src/app -p 3000:3000 node:16 npm run start
The docker commands here also connect port 3000 on your host machine to the docker instance. So from either
run devorrun startyou’ll be able to visit http://localhost:3000/ on your local machine and connect to your node container. -
Install Node packages
npm install -
Connect Drupal
To connect the Next.js site to your Acquia ACMS Starter Kit instance, we’ll pre-populate the Next.js for Drupal environment variables. These variables can be obtained from your site install through a handy Next.js starter kit built into Acquia CMS Headless Starter Kit.
On your Acquia CMS site, visit Tour > Get Started and view the Headless section and enable the Next.js starter kit.
Image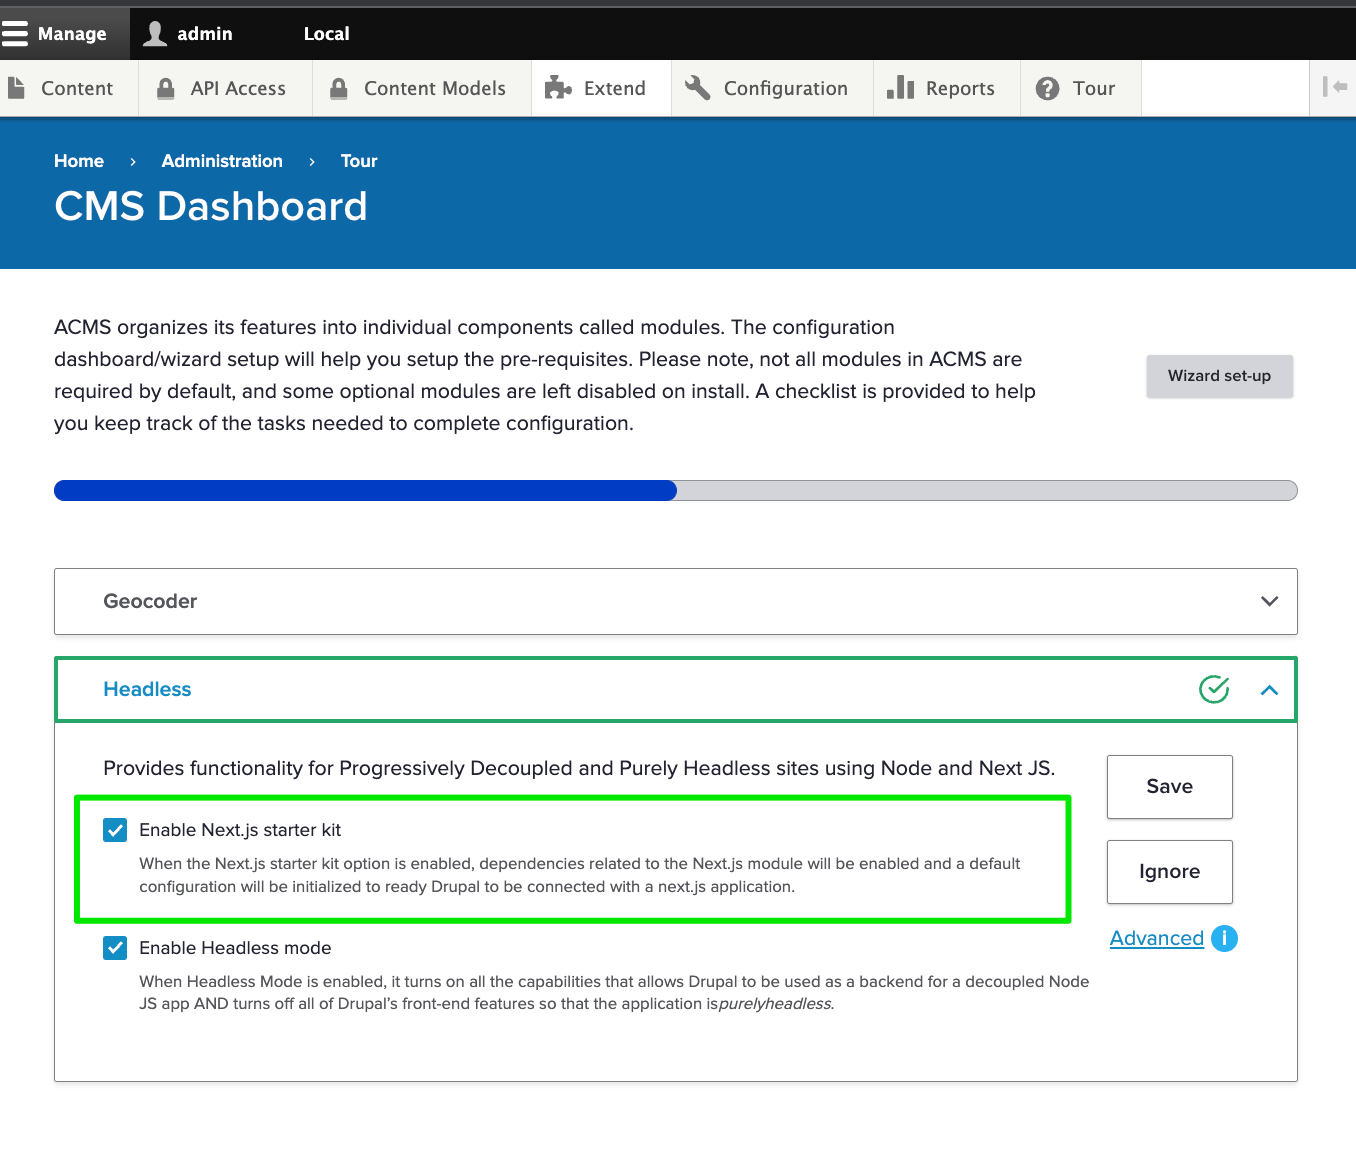
This will setup all you need in Drupal to connect with your Next.js app. Once saved, you'll see a status message with the Environment Variables for your Next.js site:
Image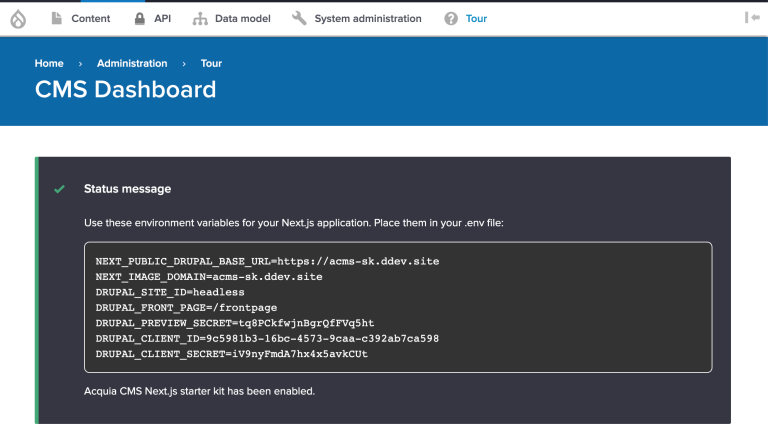
Now, back in your Next.js application, copy .env.example to .env.local
cp .env.example .env.localThen, change the contents of .env.local to the Environment Variables specified in Next.js site. Here is what these environment variables are doing:
Variable Purpose NEXT_PUBLIC_DRUPAL_BASE_URL Where the Drupal instance lives. Required by Next.js. NEXT_IMAGE_DOMAIN The domain to pull Drupal images from. Required by Next.js. DRUPAL_FRONT_PAGE Helps Next.js for Drupal manage frontpage paths. DRUPAL_CLIENT_ID Drupal consumer UUID that grants access for the Next.js app. DRUPAL_CLIENT_SECRET Drupal consumer secret for the given DRUPAL_CLIENT_ID. The consumer UUID can be found at Administration > Configuration > Web services > Consumer entities
Image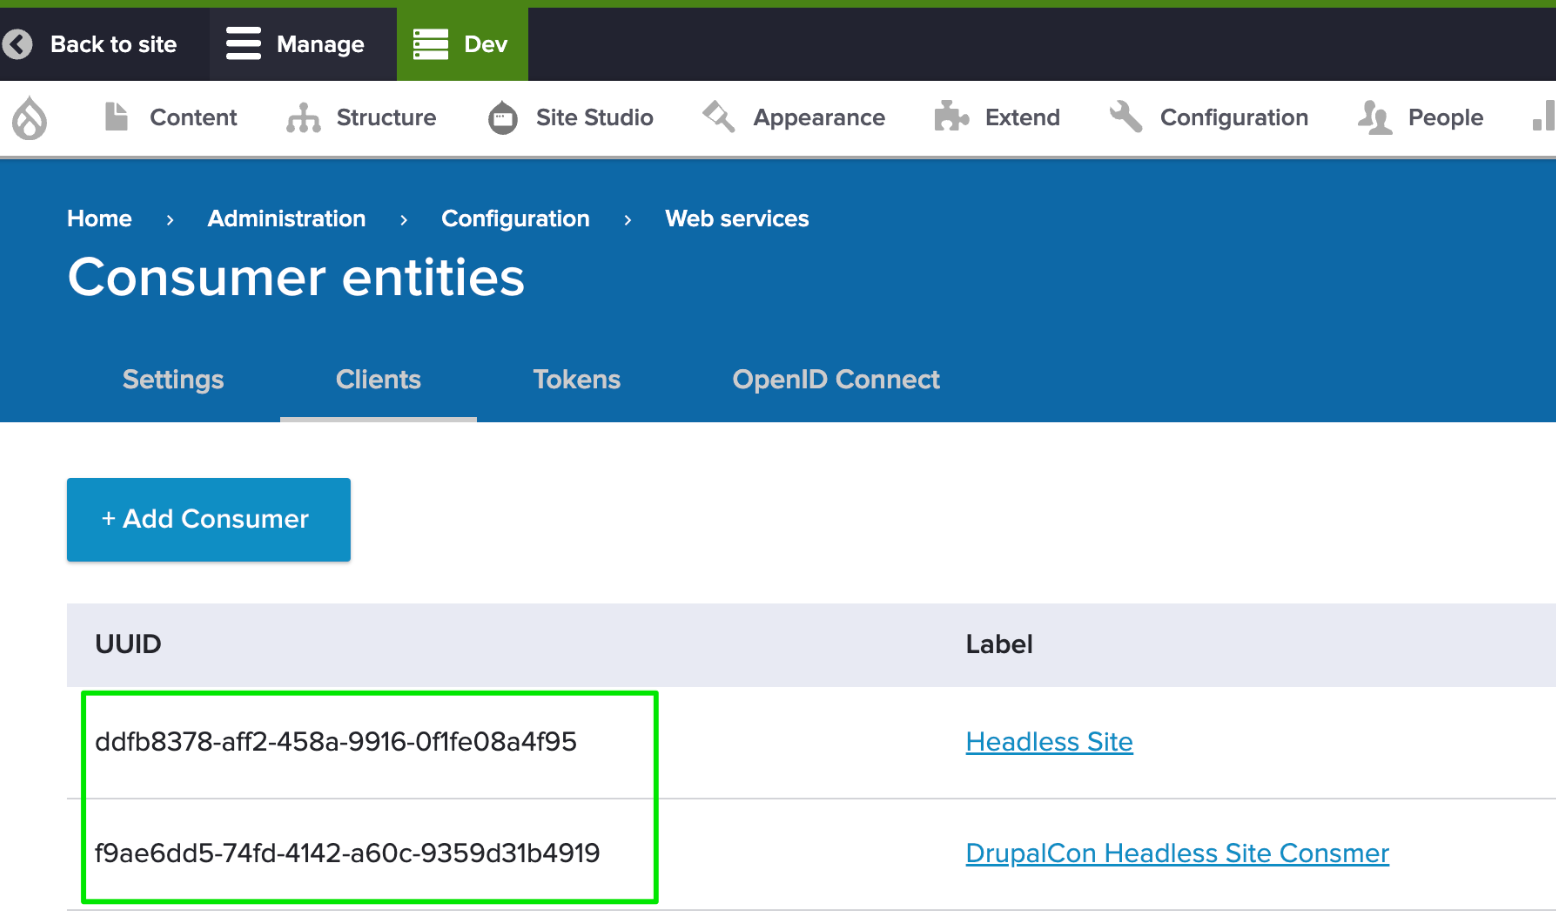
The consumer secret is stored as an encrypted value in Drupal and cannot be retrieved so you must recall it from when it was set. If not, you can edit the Consumer and set a new secret.
-
Start Development Server
To start the Next.js development server, run:
npm run devThis starts the development server on http://localhost:3000.
Image
Visit http://localhost:3000 to view the headless site.
Image
-
Let's run things faster. Much faster.
When running a development server, node is listening for changes to the codebase and reloading the server to reflect those changes. It’s also not caching anything as that can get in the way of development.
If you want to run things faster, you need a production build. While the development server builds and runs the application at the same time, production runtime is a two phase process:
npm run build
npm run start

# Or run: npm run preview
Notice that during the build process, Next.js is fetching data from Drupal and building static versions of the site. Then when you run that build, Next.js is loading those static pages directly from your filesystem making the performance lightning fast!
Image
What about content updates in Drupal?
By default, next-acms will serve cached content, but after 15 minutes, the next request will revalidate the content with Drupal and update/sync it into Next.js using Incremental Site Regeneration (ISR). We configure next-acms to wait for the response from Drupal to ensure fresh content is sent instead of stale cached content.
Outside of this Hello World example, you can also configure Drupal to notify Next.js of content events enabling event driven revalidation. In this mode, content is out-of-sync for only a second or so.
-
Customizing content types
The next step in this Next.js tutorial series is learning how to create new content types in Drupal and surface them up through Next.js.
Hosting Next.js
A big pain point of javascript applications is time-to-meaningful-paint. That’s the time it takes in the browser for a javascript application to show something that’s meaningful and interactive to the end user. That’s because the experience is dependent on the resources of the visitor’s device which also has to wait for all the dependencies to download.
Hosting compatible JavaScript frameworks, like Next.js, serverside, allows you to pre-render JavaScript applications meaning the client browser can focus on painting immediately. This is what makes the production build in Next.js so fast.
At Acquia we host and support Node.js applications (like Next.js) optimized for working with a content backend API built on Drupal. If you’re interested to find out more, get in touch with one of our team.


